How to Deploy NAV 2015 on Azure

First of all, I will make small introduction for all people who don’t know what a Microsoft Azure is. With simple words, Microsoft Azure is Microsoft cloud computing and services platform with physical infrastructure all around the world. On this cloud platform, there is a virtual machines, SQL databases, storages, with Visual Studio online, and many other things, as one “global operating system”. Microsoft Azure also can includes Microsoft Dynamics NAV services.

I will explain some basic deployment topologies that are supported. We can choose topology with one or two virtual machines.

If we choose to deploy Microsoft Dynamics NAV on a single virtual machine, the Microsoft Dynamics NAV Web Server components, Microsoft Dynamics NAV Server, SQL Server, and Microsoft Dynamics NAV database components will be installed on the same virtual machine.

#Azure1

If we choose to deploy Microsoft Dynamics NAV on a two virtual machines, the Microsoft Dynamics NAV Web Server components and Microsoft Dynamics NAV Server will be installed on one virtual machine, and the SQL Server and Microsoft Dynamics NAV database components will be installed on another virtual machine.

#Azure2

In the first scenario, this virtual machine represents a single cloud service on Microsoft Azure, and in second scenario each virtual machine represents a cloud service on Microsoft Azure. In both of these topologies, users can access Microsoft Dynamics NAV data by using the Windows client (from a ClickOnce site or without it), the Web or Tablet client and OData and SOAP web services.

If we want to deploy Microsoft Dynamics NAV 2015 on Microsoft Azure, we can use NAV Provisioning Tools for Microsoft Azure that support the automated deployment of Microsoft Dynamics NAV 2015 on Microsoft Azure virtual machines, using both of topologies. You can find NAV Provisioning Tools as Windows PowerShell scripts on Microsoft Dynamics NAV 2015 installation DVD on \\NAV2015DVD\WindowsPowerShellScripts\Cloud\HowTo\

#Azure3

You can find few files in this folder. First of all, you must configure Set-PartnerSettings file and after that you can run one of the following PowerShell scripts Example-1VM (deployment on 1 VP) or Example-2VM (deployment on 2 VMs).

If you want to deploy Microsoft Dynamics NAV 2015 on only one VM (usually for test or demo environment), you can find all details on How Do I video: https://msdn.microsoft.com/en-us/dynamics/nav/mt147285

Also, if you want to deploy Microsoft Dynamics NAV 2015 on two VMs (usually for production environment), you can find all details on How Do I video: https://msdn.microsoft.com/en-us/dynamics/nav/mt147286

In some other articles, I will describe all steps how to make Multitenancy environment or how to use production database, license, language etc.

Posting Groups #25 – Job WIP Posting (3 – Cost Value)

In one of my previous posts, I have already described how you can post Job WIP entries if you use Cost Value as recognized cost in WIP posting method. But, it was only part of posting when you calculate Job WIP for the first time. But if you have already posted Job WIP entries and want to post WIP, again after new usage posting (as Contract).

In this situation, system first need to post correction of previous Job WIP entries and that post new entries. You can see how there G/L entries look like on following table:

Job WIP Posting 3a

When we speak about “Remaining Cost in Comparison with Schedule”, we already think about relation between Contract usage posting and values as Schedule.

Posting Groups #24 – Job WIP Posting (2)

If you have the same example as in previous post, but with using different methods of WIP posting (e.g. Completed Contract, Cost of Sales or Contract-Invoiced Cost), you will get the some different results. To repeat, my example was only posted usage of resources and items, without invoicing. System calculates WIP for all Resource and Item usage, based on Unit Cost and consumed Quantity. Result of this posting is following:

Job WIP Posting 2

How to Upgrade NAV

Today, Microsoft has published new article about best practices and tips and tricks in upgrading process when you want to upgrade your solution to NAV2013R2 or NAV2015. After this first part about this topic, Microsoft already publish a second part with the same topic.The main reason why to read this article is because, the Classic Client is no longer supported by Microsoft. Now, it is the right time to make upgrade of your old NAV version.

Anyway, you can find awesome articles about this upgrade process here on MSDN Blog and part 2, as well. I recommend these articles.

Posting Groups #23 – Job WIP Posting (1)

As the most of projects are jobs performing usually several months (or several years), WIP calculation is very important part of Job Management. From NAV 2013, we have new functionality for WIP calculation in Jobs – the WIP cockpit. I already described how this feature works in my older post and now, I want to show you results of WIP posting in G/L Entry.

When you want to post WIP to G/L, system will use only Jobs Posting Groups for determining what account need to use. Considering, there are not only one method of WIP posting, it means system doesn’t post results on the same way every time.

In this first example, I have used following WIP posting methods as recognized costs: Cost Value and Usage (Total Cost). Results for these two methods are the same.

System calculates WIP for all Resource and Item usage, based on Unit Cost and consumed Quantity. Result of this posting is following:

Job WIP Posting 1

New Cumulative Updates for NAV2013R2 (CU20) and NAV2013 (CU27)

After today’s publishing of the newest Cumulative Update for Microsoft Dynamics NAV 2015, few hours later Microsoft published new Cumulative Updated for two older versions NAV 2013 and NAV 2013 R2, as well. There are:

You can download them from previous links, but in this moment there is some problem; I expect, it will be solved very soon. These CUs are named as Build 41371 (NAV 2013 R2) and Build 41354 (NAV 2013).

New Cumulative Update 8 for NAV 2015 has been released

Cumulative Update 8 for Microsoft Dynamics NAV 2015 has been released today, one hour ago. It includes the most of application area (Cash Management, Finance, Inventory, Jobs, Prepayments, Purchase, Sales, Service and Warehouse) and very useful platform hotfixes and regulatory features that have been for Microsoft Dynamics NAV 2015.

It also has a lot application hotfixes for following localizations: Belgium, Switzerland, Czech Republic, Germany, Spanish, France, Italy, Norway, Russia and UK.

You can download Cumulative Update 8 for Microsoft Dynamics NAV 2015 from here. This CU is named as Build 41370.

Posting Groups #22 – Item Purchase for Job

If you want to purchase items directly for some Job, you can do it using e.g. Purchase Order and posting it. Flowchart of posting groups usage is the same as in post I already wrote about item purchase posting. There is only one additional step in comparison with standard item purchasing; you have to choose Job No. and Job Task No. in each line on Purchase Order.

This is not currently real example of Job Posting Groups using, but it still has some specifics when you have purchasing for Job. When you post this document, you will get both of posting documents – Purchase Receipt and Purchase Invoice, as well. But when you look in Purchase Receipt, you will see that you have two Item Ledger Entries for each line in document. One of them is Purchase, but second in Negative Adjmt. with the same quantity. It actually means that in the same posting process, system post item purchase (as usually) and item consumption for Job purpose. This posting also creates one Job Ledger Entry for each line in document with Usage Entry Type for each Negative Adjmt. line in ILE.

When you look at G/L Entries, you will see the following result of this posting:

ItemPurchJob

Using Jobs and Resources in NAV

In 2013, I was wrote series about using Jobs in Microsoft Dynamics NAV. Reason for this was that Microsoft have added several enhancements to jobs and project management features.

One of them was improvement of using work in process (WIP) to make monitoring this process easier and to improve the interaction with financial reporting. From Microsoft Dynamics NAV 2013, we have got the following enhancements:

  • You can create and define a job WIP method, to supplement the five system-defined choices.
  • Jobs setup has been expanded to include options to control the treatment of WIP in all jobs. For example, you can specify that a WIP method that you have defined be the default for your organization.
  • Users can now track and perform WIP calculations in a new location. From here, you can calculate and post WIP to the general ledger and show any warnings if there are problems with a WIP calculation. For more information, see Job WIP Cockpit on my previous blog post.

Because, I already posted about that, I makes compilation of these posts and put them on one place, because this can be very useful in following posts about using of Job Posting Groups. This will not be a manual for using of Jobs module, but it can be helpful in some areas.

Job WIP Cockpit

As the most of projects are jobs performing usually several months (or several years), WIP calculation is very important part of Job Management. Now, we have new functionality for WIP calculation in Jobs – the WIP cockpit.

The WIP cockpit provides a complete overview of costs, revenues, and profits generated by the project in particular period. In a single place, we can see the amounts that will be posted to company ledgers, and see how these amounts were calculated, with details of the underlying transactions that caused them just another click away. In addition, the WIP cockpit displays WIP warnings, which enable users to see if the underlying collected data is in line with what is defined by the WIP method and if all prerequisites for recognizing costs and revenues are met before posting WIP to a company’s balance sheet.

The Job WIP Cockpit is the central location to track WIP for all of your projects. Each line contains information about a job, including calculated and posted WIP.

How WIP cockpit work?

You can find WIP cockpit page on Jobs->Tasks->Job WIP Cockpit.

The window has two parts, and supports easy access to the typical tasks and routines needed to ensure that WIP compliance stays on track. In the upper part of the window, for any job listed, you can select it and perform the following actions:

  • Calculate WIP: On the Home tab, in the Process group, choose Calculate WIP. The results are displayed in the Job WIP Totals section of the window.
  • Post WIP to G/L: On the Home tab, in the Process group, choose Post WIP to G/L. Job WIP totals are posted to the general ledger.
  • Show Warnings: On the Home tab, choose Show Warnings to see the Job WIP Warnings list. From there, you can see the warning message, and make any adjustments that are necessary, if the WIP Warnings field is set to Yes.
  • Entries: On the Analyze tab, you can review WIP entries and WIP general ledger entries, if there are any, as well as job ledger entries associated with the job.

In the lower part of the window, you can see details about calculated WIP for an individual job and use the information provided there to analyze your results.

Calculate WIP

It is necessary to position on required job on top part of window. After that you need to start function “Calculate WIP…”. NAV will make calculation and fill lines based on Job Tasks on bottom part of window, related with top job line. You can see calculated WIP values at bottom part of window.

If you made mistake, you can delete this WIP entries by starting function “Delete WIP Entries”. This function will delete bottom line related with required job line on top part of window.

If system find some problem, NAV will marked with Yes field “WIP Warnings”. You can open page from this field with warning comments.

Post WIP to G/L

If you want to post calculated WIP values to G/L Entry, you need do start function “Post WIP to G/L…”. System will post all WIP entries to G/L entries and move value from “Recog. Costs Amount” field to “Recog. Costs G/L Amount” field on top part windows, as delete WIP entries in bottom lines. You can see all transaction using report “Job WIP To G/L”. Also, you can analyze G/L entries using function “WIP G/L Entries” and using Navigate from that table.

Creating Jobs

I do not want to describe complete process of creating new Job. If you need it, you can find complete manual here. But I want to emphasize few things:

It is important to choose Job Posting Group on the Posting tab. Job posting groups determine which G/L Accounts we post to. The Job Posting Group that you set up on the Job Card will be used as default Job Posting Group on the Job Tasks, but you can change this posting group on each Job Task.

It is also important to set WIP Posting Method. It indicates whether ‘WIP Posting Method’ is per job or per job ledger entry. When we select ‘Per Job’, NAV uses total WIP costs and sales to calculate WIP. When we select ‘Per Job Ledger Entry’, NAV uses the accumulated values for WIP costs and sales. The default value is Per Job:

  • Per Job: Default. If there have been no general ledger or WIP entries, you can modify this field. You can also modify this field if all existing entries are reversed.
  • Per Job Ledger Entry: WIP is posted per job ledger entry. This option can be selected only if there are no existing WIP entries or WIP G/L entries, or if all WIP G/L entries have been reversed.

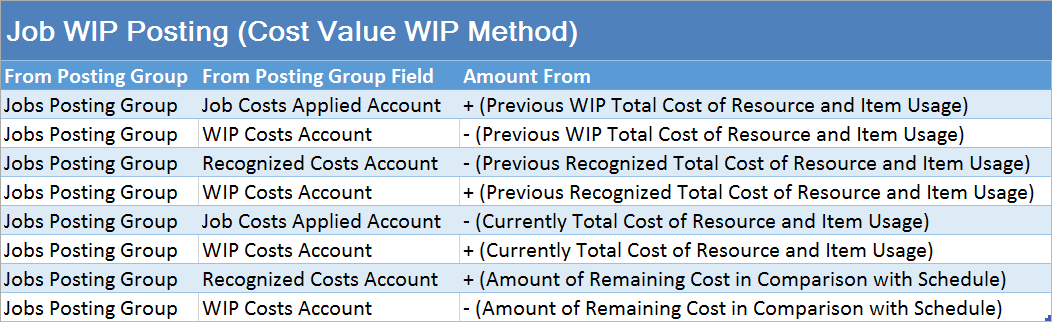
And finally, we have to set WIP Method. It contains the name of the work in process (WIP) calculation method that is associated with a job. Work in process (WIP) is used to match expenses with revenues. Microsoft Dynamics NAV supports multiple ways to calculate WIP and recognition of sales and costs (see the Job WIP Methods).

We should create a new Job WIP methods that reflects the needs of our company. After we have created it, we can set it as the default Job WIP calculation method that will be used in our company.

NAV supports multiple ways to calculate WIP and recognition of sales and costs:

  • Completed Contract: No sales or costs are part of the calculation.
  • Cost of Sales: Recognizes WIP when the customer is invoiced.
  • Cost Value: Recognizes WIP when the customer is invoiced.
  • Percentage of Completion: Recognizes costs as they are reported.
  • Sales Value: Recognizes costs as they are reported.

In addition, it is possible to create our own formula for calculating the WIP associated with a job, but not now about this.

Create a code for the method, add a description, and then select the appropriate values for the ‘Recognized Costs’ and ‘Recognized Sales’ fields. By design, the ‘System Defined’ check box is not selected, but three others are selected. There are next fields:

  • WIP Cost: For this field, the following applies: Cost Amount (WIP) = Usage (Total Cost) – Recognized Cost. For system defined WIP methods, the ‘WIP Cost’ field is the default and is checked. For WIP methods that we create, we can only clear the check box if we set ‘Recognized Costs’ to ‘Usage (Total Cost)’. When we do this, ‘Job Costs Applied’ and ‘Recognized Costs’ are not posted to the General Ledger.
  • WIP Sales: For this field, the following applies: Sales Amount (WIP) = Contract (Invoiced Price) – Recognized Sales. For system-defined WIP methods, the ‘WIP Sales’ field is the default and is checked. For WIP methods that we create, we can only clear the check box if we set ‘Recognized Sales’ to ‘Contract (Invoiced Price)’. When we do this, the contract (invoiced price) is not posted to the general ledger.
  • Valid: Indicates whether a WIP method can be associated with a job when we are creating or modifying a job. If we select this check box in the Job WIP Methods window, we can then set the method as a default WIP method in the Jobs Setup window. Once set, we cannot clear this check box if the WIP method has been specified as the default WIP Method in the Jobs Setup Window.
  • System Defined: Indicates whether a Job WIP Method is system-defined. We cannot change the contents of this field.

I think, it is enough to understand following posts about usage of Job Posting Groups… maybe more than you really need, but… If you still need more, you can find it here. More about Job planning and similar topics, you can find here.

Posting Groups #21 – FA Disposal Posting

When you want to post disposal of Fixed Assets, you can do it using FA G/L Journals. You must choose Disposal as FA Posting Type. In my examples, I post this journals with marked Depr. until FA Posting Date field.

You can get two different types of G/L entries, depends of setup in Depreciation Book. You can choose Net or Gross method on Disposal Calculation Method field.

In my first example, I have used net method. In this example I used FA with already posted some depreciation and write-down entries.

FA Disp Nm

In my second example, I have used gross method. In this example I used FA with already posted some depreciation and appreciation entries (entries can be different, depends your FA has had appreciation or write-down).

FA Disp Gm

All of these posting results depend only of FA Posting Type.