NAV Gallery Image – PS Scripts Order

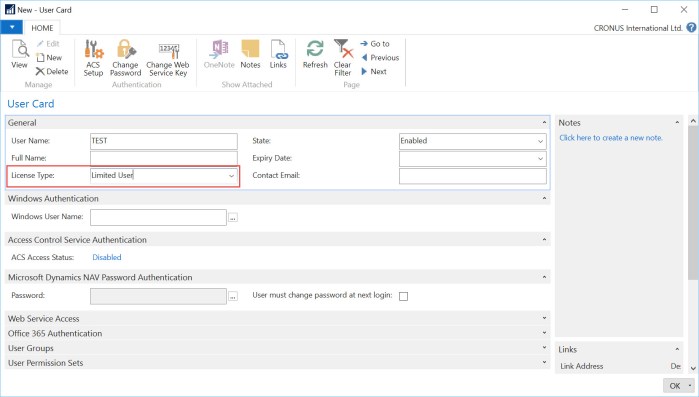
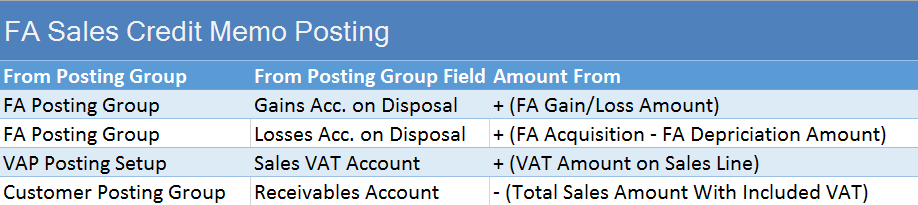
This week I have training about NAV and Azure and I used some examples in NAV 2016 Gallery Image on Azure.

NAV90GalleryImage.jpg

This image is awesome, but sometime people doesn’t know what PowerShell script can be started before some others. For example, you cannot run “Use Azure SQL Database” and after that “Install Multitenancy”…

Because of that I wanted to make some small help to all people who want to use this NAV 2016 image. In the following, you can find a chart with order of using all PowerShell scripts. Now, you know how to configure all of them on the same VM.

NAV90GalleryImageOrder.jpg

Advertisement

How to Configure Limited Users in NAV?

A few days ago I’ve wrote about new possibilities in using of Limited Users in NAV 2016. I think this is big improvement, because we can use limited users for much more roles.

But I got a few comments about configuration limited users. OK, you can configure users as limited and this is all. Nothing more.

l-1.jpg

But people wants to configure what three additional application tables these limited users can use. Base on the standard NAV, this is not possible. These users get write access to a maximum of three application tables in the object range 0 – 99,999,999 other than the General Ledger Entry table. But system will count the first three used application tables beside the default tables. This is counted by the session. That means, users can use different three application tables in different sessions.

Some of administrators still want to limit these users on some specific tables. There is not feature for this requirement, but it can be made using User Permission Sets. We can create one permission set with all read permission on all tables (or less if you want this). Then, we can configure additional permission set with all permissions (insert, modify, delete) on our default 151 application tables. And on the end we can configure specific permission set based on our requirements for three additional tables.

Every time when we want to configure new limited user, we just need to add him these first two permission sets and one specific for him (or his role). In this case this limited user will have read permission to all tables and all other permissions to default tables and three we added to him. In this case, his three application tables will not depends of his first usage in session.

This is not some specific feature, but it is useful work around solution for configuration.

Posting Groups #25 – Job WIP Posting (3 – Cost Value)

In one of my previous posts, I have already described how you can post Job WIP entries if you use Cost Value as recognized cost in WIP posting method. But, it was only part of posting when you calculate Job WIP for the first time. But if you have already posted Job WIP entries and want to post WIP, again after new usage posting (as Contract).

In this situation, system first need to post correction of previous Job WIP entries and that post new entries. You can see how there G/L entries look like on following table:

Job WIP Posting 3a

When we speak about “Remaining Cost in Comparison with Schedule”, we already think about relation between Contract usage posting and values as Schedule.

Posting Groups #24 – Job WIP Posting (2)

If you have the same example as in previous post, but with using different methods of WIP posting (e.g. Completed Contract, Cost of Sales or Contract-Invoiced Cost), you will get the some different results. To repeat, my example was only posted usage of resources and items, without invoicing. System calculates WIP for all Resource and Item usage, based on Unit Cost and consumed Quantity. Result of this posting is following:

Job WIP Posting 2

How to Upgrade NAV

Today, Microsoft has published new article about best practices and tips and tricks in upgrading process when you want to upgrade your solution to NAV2013R2 or NAV2015. After this first part about this topic, Microsoft already publish a second part with the same topic.The main reason why to read this article is because, the Classic Client is no longer supported by Microsoft. Now, it is the right time to make upgrade of your old NAV version.

Anyway, you can find awesome articles about this upgrade process here on MSDN Blog and part 2, as well. I recommend these articles.

Posting Groups #23 – Job WIP Posting (1)

As the most of projects are jobs performing usually several months (or several years), WIP calculation is very important part of Job Management. From NAV 2013, we have new functionality for WIP calculation in Jobs – the WIP cockpit. I already described how this feature works in my older post and now, I want to show you results of WIP posting in G/L Entry.

When you want to post WIP to G/L, system will use only Jobs Posting Groups for determining what account need to use. Considering, there are not only one method of WIP posting, it means system doesn’t post results on the same way every time.

In this first example, I have used following WIP posting methods as recognized costs: Cost Value and Usage (Total Cost). Results for these two methods are the same.

System calculates WIP for all Resource and Item usage, based on Unit Cost and consumed Quantity. Result of this posting is following:

Job WIP Posting 1

Posting Groups #22 – Item Purchase for Job

If you want to purchase items directly for some Job, you can do it using e.g. Purchase Order and posting it. Flowchart of posting groups usage is the same as in post I already wrote about item purchase posting. There is only one additional step in comparison with standard item purchasing; you have to choose Job No. and Job Task No. in each line on Purchase Order.

This is not currently real example of Job Posting Groups using, but it still has some specifics when you have purchasing for Job. When you post this document, you will get both of posting documents – Purchase Receipt and Purchase Invoice, as well. But when you look in Purchase Receipt, you will see that you have two Item Ledger Entries for each line in document. One of them is Purchase, but second in Negative Adjmt. with the same quantity. It actually means that in the same posting process, system post item purchase (as usually) and item consumption for Job purpose. This posting also creates one Job Ledger Entry for each line in document with Usage Entry Type for each Negative Adjmt. line in ILE.

When you look at G/L Entries, you will see the following result of this posting:

ItemPurchJob

Posting Groups #21 – FA Disposal Posting

When you want to post disposal of Fixed Assets, you can do it using FA G/L Journals. You must choose Disposal as FA Posting Type. In my examples, I post this journals with marked Depr. until FA Posting Date field.

You can get two different types of G/L entries, depends of setup in Depreciation Book. You can choose Net or Gross method on Disposal Calculation Method field.

In my first example, I have used net method. In this example I used FA with already posted some depreciation and write-down entries.

FA Disp Nm

In my second example, I have used gross method. In this example I used FA with already posted some depreciation and appreciation entries (entries can be different, depends your FA has had appreciation or write-down).

FA Disp Gm

All of these posting results depend only of FA Posting Type.

Posting Groups #20 – FA Write-Down and Appreciation

When you want to change Fixed Asset value, you can do it on few ways. In this post, I will show you how you can do it using Write-Down and Appreciation in what will be results of these postings in G/L entry, based on posting groups you use.

Both of these posting types, you can do using FA G/L Journals. Posting depends on FA Posting Type.

In my first example, I will use Write-Down FA Posting Type. If we do not mark Depr. until FA Posting Date field, the result will be as following:

FA WD 1

But, if we mark this field, result will with some difference (system will post depreciation in the same register):

FA WD 2

In my second example, I will use Appreciation FA Posting Type. Again, in my first posting I will not mark Depr. until FA Posting Date field and result will be as following:

FA App 1

If we however mark Depr. until FA Posting Date field, the result will be as following:

FA App 2

But, we have common fact with all of these examples. In all of them, system only uses FA Posting Groups and manually configured Balance Account No.

Posting Groups #19 – FA Sales Credit Memo Posting

It is usual to have possibility to post Credit Memo for any item you sold. You can also make Credit Memo for Fixed Assets you sold. Generally, you can use the same flowchart about using of posting groups, as I published for FA Sales Posting.

But G/L entries will not be the same (with opposite sign) as you got in FA sales posting process. You will get the following G/L entries:

FA_Sales_CrMem

Entries are a bit different in comparison with posted invoice. Entries in FA Ledger Entries also will be the different. You will get only Gain/Loss FA Posting Type entries in FA Ledger Entries with Credit Memo Document Type. That means, you must create additional Acquisition and Depreciation entries manually, if you want to have Fixed Asset again in your system.