How to install NAV 2018?

OK, two days ago NAV 2018 has been released and I hope all of you were already downloaded this new version. Installation process is still very easy, but I want to show just few points where you need to take care.

When you run setup and try to customize your installation, you will see now one more thing here – Modern Development Environment (by default this is enabled, but just check it). If you don’t want to work with extensions, you don’t need it, but I hope you will develop only with extensions in this version.

01.PNG

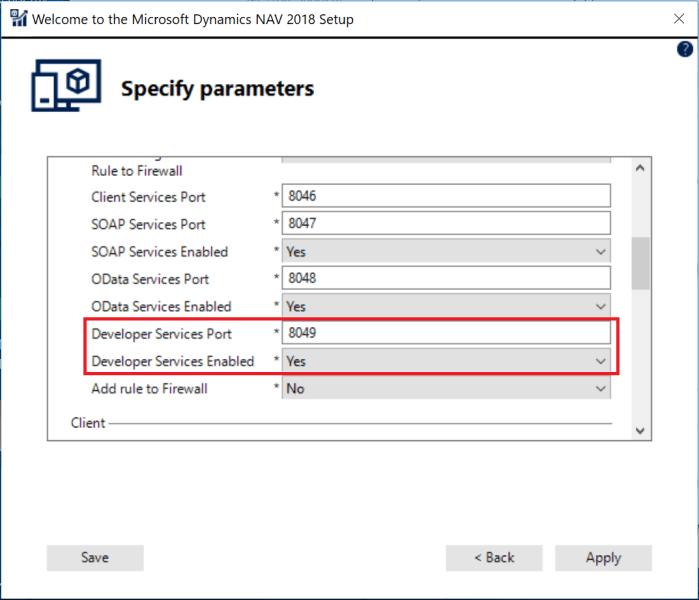
After that, just keep eyes opened on the next step, when you need to specify parameters. OK, if you don’t do it, you can do it later. But anyway, I think it is much easier to do when you install NAV. This is related again with Modern Development Environment, and this time it is not enabled by default. You need to change Developer Service Enabled option to YES and to choose Developer Services Port. After that, everything is the same as in previous NAV versions.

02.PNG

But if you didn’t finish previous step during installation process, you just need to run NAV Administration tool and add Port on Development tab and to restart service.

11.PNG

Or you can do it using PowerShell if you prefer with the following cmdlet (do not forget to restart service after changing):

Set-NAVServerConfiguration <InstanceName> -KeyName 'DeveloperServicesPort' -KeyValue <PortNumber>

Now, you are ready to work with NAV 2018 and to make your first extension.

PS

And just to mention, you can find System Requirements for Dynamics NAV 2018 here. But I tried to install NAV on SQL 2017 although there is noticed that NAV 2018 is available on SQL 2016 and SQL 2014 (and Azure SQL as well). However, I installed it on SQL 2017 and it works. I’ll check it with more details, and if I find something, I’ll publish it.

Advertisement

NAV 2017 Demo Image on Azure

Dynamics NAV 2017 has been published three days ago and we already got NAV 2017 Demo Image on Azure. This is very short period and this is amazing. All people who want to test NAV 2017 don’t need to install it on its computers, but they can use it on Azure. Great job.

Currently, we can create demo image only if we use old Azure Portal. We just need to start with new virtual machine from gallery image and choose Dynamics NAV 2017. We need to configure a few fields and wait a few minutes. And yes, we can use NAV 2017 with a lot of interesting tools.

NAV2017VM1.jpg

But be careful; if you prefer new Azure Portal, you cannot do it. It is still not possible, but I expect it will be done in few following days. Now, just go to the old portal and finish procedure.

NAV2017VM2.jpg

Of course, you can see this VM using new portal as classic VM, but you cannot create it. If you need this VM only for testing, my recommendation is to use D1 or A2 sizes. They are good enough for all tests and you will not spend a lot of your money for this purpose.

When you create VM and run it, you can start with initializing of NAV. On my first sight, there are the same PS scripts as well as on the older NAV demo images. I will test all of them and if I find something new, I’ll publish this.

NAV Gallery Image – PS Scripts Order

This week I have training about NAV and Azure and I used some examples in NAV 2016 Gallery Image on Azure.

NAV90GalleryImage.jpg

This image is awesome, but sometime people doesn’t know what PowerShell script can be started before some others. For example, you cannot run “Use Azure SQL Database” and after that “Install Multitenancy”…

Because of that I wanted to make some small help to all people who want to use this NAV 2016 image. In the following, you can find a chart with order of using all PowerShell scripts. Now, you know how to configure all of them on the same VM.

NAV90GalleryImageOrder.jpg

VMs in New Azure Portal

I’ve already wrote about new Microsoft Azure Portal code named Ibiza. When you look this new portal, one of the first news in that now we have two menus for virtual machines:

  • Virtual Machines
  • Virtual Machines (classic)

AzureVMandVMclassic.png

You will see that all virtual machines you already created using old Azure Portal are placed in Virtual Machines (classic). I want to give you a small descriptions about difference between these two options.

The new Azure Resource Manager with a new API doesn’t uses resources as the old API. Because of that, the classic API stack is still operational, but you’ll see those resources showed up as (classic). You have not a reason to convert classic VM to the new VM. You just need to know that you cannot include classic VM in a virtual network deployed with Resource Manager and they don’t have to be included in a virtual network (unless new VMs must be included).

But if you want to migrate classic VM to the newer model, first you have to be sure you can afford a downtime for your VM. If you can afford it, than you can do it using ASM2ARM PowerShell script. You can find all details here.

I hope, I helped you. I have some more information about it and I’ll prepare a real interesting example soon.

NAV on Azure SQL on NAVTechDays

Last week we finished one of the best NAV conferences this year. NAV Tech Days this year had about 950 NAV passionate attendees from all around the world. Everything in organization was the amazing; Luc did a great job.

This NAV Tech Days was very special for me, because I was the speaker on this conference for the first time. My topic on NAV Tech Days was “Deploying and Managing Dynamics NAV 2016 with Azure SQL Database”. This is something new in Microsoft Dynamics NAV 2016. I know, a lot of partners still not use NAV on Azure, but by my opinion this feature can move all of us forward. Azure SQL can save a money and we finally have a good tool for managing our multitenant environment – Management Service Portal.

I gave a word to people on my session that I’ll publish my presentation and PowerShell scripts on my blog. You can find them here:

In few following scripts, I’ll describe all details about using NAV 2016 on Azure SQL Server and give you some answers on additional questions I already got.

2015-11-23_13-19-19.png

PowerShell & NAV on MSDN Blog

In last few months, Microsoft Dynamics NAV Team Blog publishing excellent articles about using Windows PowerShell with Microsoft Dynamics NAV. I have collected all of them on one ToC. Read, learn and enjoy:

And, one additional article about Using Windows Powershell cmdlets to modify companies and databases (not part of Coffee Break story).

All articles are wrote by Jasminka Thunes (Escalation Engineer Dynamics NAV EMEA), Lars Lohndorf-Larsen (Escalation Engineer Dynamics NAV EMEA) and Bas Graaf (Senior Software Engineer Dynamics NAV).

Thanks, very useful.

Multitenancy on NAV2015 Image on Microsoft Azure

When we speak about NAV on Azure, we expect Multitenancy as main strength. This is because, we expect an easy repeatability. Now, I will explain how to achieve this goal using NAV 2015 image deployed on Microsoft Azure.

We have excellent tolls, but we also have some rules. First, if you already run “O365 Integration pack” and “ClickOnce Deployment pack” scripts, unfortunately you cannot use this tools. You will get message similar as on following picture:

Multi0

You need to have a clean image deployment with running only “Initialize the VM pack” (must run it). Then, you need to run install.ps1 file from C:\DEMO\Multitenancy folder. You can find it, when you click on Enable Repeatability from NAV on Azure Welcome Screen. You can run this PowerShell file using PowerShell ISE.

When you open this script, you have to replace “vmadmin” in path with your user name on all places you can find. You can see one of the examples on following picture:

Multi0-1

You could also rename tenant ID, if you want it. It has name “Default”, by default.

After that, you can save and run your script. When script is finished, you will get URLs file with your new links with tenants.

Multi1

Now, you can use these new links to run your NAV 2015 with tenant. If you want to add new tenant or remove existed, you can do it running Multitenancy Demo Admin Shell from your VM desktop. You can also use it tool to add users to tenant or remove existed from tenant.

Multi2

Using ClickOnce to create Windows Client for NAV2015 Image on Microsoft Azure

The last time when I wrote about new NAV 2015 image on Microsoft Azure, I showed you how to create VM and how to change credential to NavUserPassword for really cloud using. After running the Initialize the Virtual Machine, you got possibility to run all NAV clients from VM and Web Client from your computer. Of course, for this you had to add new Endpoint on Microsoft Azure Portal: HTTPS, with 443 as port numbers. But, I suppose you want to use NAV with Windows Client from your PC. For this usage, we again got an excellent tool on Welcome screen. You need to click on Install Click Once deployment of the Windows Client link and you will find PowerShell script in DEMO folder. You need to run your PowerShell ISE as Administrator and open this script install.ps1. Now, you only need to run this PS script. After few minutes, system will show you all links, and on the end link for ClickOnce. ClickOnce1

Now, you have to add new Endpoints on your Microsoft Azure Portal:

  • HTTP, with 80 as port numbers for ClickOnce install (this port is configured in previous script)
  • Windows Client, with 7046 for NAV Window Client running

ClickOnce0

When you finish with Endpoints, you have to use your ClickOnce link from URLs file on your Internet Explorer. System will open ClickOnce Online Installation page. You need to run Install and wait. ClickOnce2

After installation is finished, you only need to fill your credentials and run your Microsoft Dynamics NAV 2015 Windows Client on Microsoft Azure.

ClickOnce3

That’s all about easy using script for ClickOnce Windows Client installation. But, I will show you something more about it few daysd

Changing Credential Type at NAV2015 Image on Microsoft Azure

Now, I have to continue my previous article about new Microsoft Dynamics NAV 2015 image in Gallery Image on Microsoft Azure. I said that system is configured with Windows credential type. Now, I want to describe, how you can change it very easy with prepared scripts in DEMO folder.

On ‘Welcome to Microsoft Dynamics NAV on Microsoft Azure’ page, you can find Initialize the Virtual Machine link and with it, you can open DEMO\Initialize folder with PowerShell scripts.

azure1

When you open and run install.ps1 script, you will configure Microsoft Dynamics NAV 2015 with NavUserPassword credential type with all necessary configurations. Script is pretty smart and when you run it, it will ask you all necessary configuration questions:

  • NAV language
  • NAV administrator username
  • NAV administrator password
  • Your Cloud-Service name
  • Certificate Pfx File

System always give you possibility to choose default values or to change with your own. For Certificate Pfx File, system ask you to fill your certificate file or choose self-signed certificate. When script finish all necessary tasks, you will get as result all information (URLs and credentials).

ađazure2

Also, you will get all shortcuts (Windows, Web and Tablet Client, Development Environment, Administration and Development Shells…) on your desktop.

Thanks to Microsoft. I really like this script, because everything is so easy. I will continue with other features on this Microsoft Dynamics NAV 2015 Gallery Image in few following days.

Video Series on Partner Source Site

In the last few years, you could find a lot of different “How Do I” videos on MSDN or Youtube. But, you always had a problem when you want to find some specific video. Now, Microsoft have arranged a part of Partner Source for these videos and not only for videos. If you are a Microsoft Dynamics NAV partner, you will easy find video you need.

Microsoft organizes six different contents “buckets” from the Readiness & Training News page for Microsoft Dynamics NAV. There are:

Now, you can find all currently published videos, allocated in logical parts. In the near future, there will be a lot new videos to make cohesion between them and all of us hope that it will help to all partners.