How to Configure Bricks – Madeira and NAV2017

I’ve got a few questions how to configure Bricks I already wrote on NAV 2017. Generally, Bricks are not something new. We already had a Bricks on NAV 2016, but we used them only in Phone Client. I already wrote how to configure Bricks on Phone Client here.

I don’t expect something special in NAV 2017 about Bricks. To open the Field Groups window, on Table Designer just choose View, and then choose Field Groups. In a table, we can see two Field Groups: DropDown and Brick. If Brick Field Group doesn’t exists, DropDown is interpreted as Brick.

Brick.jpg

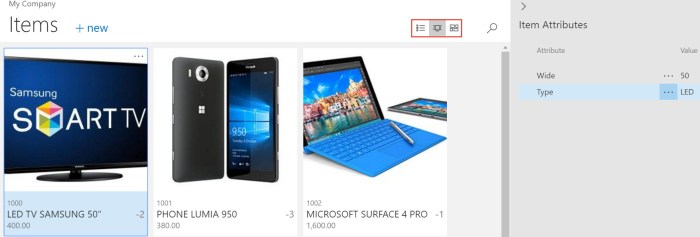
What is new here? News is that we can use Bricks in other clients. I still cannot speak more about it (it is still by NDA), but everything I mention is the same as on NAV 2016. And yes, if you want picture on item, you need add picture as part of Brick Field Group. About Project “Madeira” you cannot use Development Environment for customization and you can change it only using Extensions.

I hope, this is good enough. More about it when we get official release of NAV 2017.

Advertisement

Bricks in Project Madeira and NAV2017

Very often, using of standard lists in NAV were not so comfortable because of specific data sets. Now, we will get some new feature that all list pages can be showed as “bricks”. If you remember, we used bricks in NAV 2016 for Phone Client. But now, we can use this for all lists: Customers, Vendors, Bank Accounts, Chart of Accounts, Currencies, Items, all Journals… You just need to choose brick view:

CustomersBricks.jpg

You can configure what you want to see on bricks and optimize space and readability for data that appears in these pages using a Brick Field Group. You can change importance of these data and their layout changing orders of them.

But if you choose Items, you can see more. Not only list and bricks, you can choose tiles as well. Difference is that you can put item picture on both bricks and tiles. Again, you can configure what you want to see by yourself:

ItemsTiles.jpg

NAV 2017 Roadmap

In just two month, Microsoft will publish new Microsoft Dynamics NAV version. In the encounter of this event, month ago Microsoft published the last NAV roadmap on WPC in Toronto. Now, we can see what will be generally the main features in NAV 2017.

NAV2017_Roadmap1.jpg

We still cannot notice a lot of things (these thing are not so clear), but if we try to use Project “Madeira”, we can find a lot of some new features and that means, we can expect the most of them in NAV as well.

In the same time, Directions NA has already published agenda for this conference and now we can see the main topics, because NAV 2017 will be published in this period. See you there.

Item Attributes in NAV 2017

How many times you needed some additional attributes on item? And every time you added some new field or something… Now, we will have a small, but smart feature in new NAV2017 – “Item Attributes”. Well, I still cannot say it will be in new NAV for sure, because currently it is a part of Project “Madeira”. But the most of the new features in “Madeira” will be part of NAV2017 and my title is named as you read because of that.

What is Item Attributes? This is something similar to dimensions. We have one additional table with Item Attributes. You can create Attributes as you want. And for each assigned Attribute to Item, you can assign Item Attribute Value (again as you want). You can use a lot of different attributes and everything depends by your needs.

MadeiraItemAtt1.jpg

Good thing is when you add your attributes and values to some item, you can see all of them in fact box in the right side of page, on both of them card or list. And even more, you can filter your items based on Item Attributes.

MadeiraItemAtt2.jpg

MadeiraItemAtt3.jpg

You can choose different attributes and you can use standard filters when you want to use attribute values for filtering (you can easy use “Select More” for this purpose).

All these examples are made on Project “Madeira” and you can do it by yourself using Project “Madeira” demo instance. You can also find more about Item Attributes here.

Create Items with Item Templates in New NAV and Madeira

First, this feature is currently published in Project “Madeira” and I’m sure it will be part of NAV 2017, but almost all about NAV 2017 is still by NDA and I cannot write about it.

But this feature is looks fine and I want to share it. When we created new Items we usually used Item Category to preconfigure some fields for item. But now, I think we have a better feature. We can just configure page “Set Up Customer/Vendor/Item Templates” with a lot of data. And that means this feature is not connected only with Items (you notice it right); you can also use this feature as template for other codes.

MadeiraTemplates.jpg

Now, you can chose one of the templates from list or to create your own template choosing table number to dedicate template to some of the tables. OK, if you want to create Item Template, you will use table 27.

When you open Item template, you can see that now you can configure lot of different fields, as for example:

  • Base Unit of Measure
  • Automatic Extended Texts
  • Type (Inventory or Service)
  • Price include tax and Price/Profit Calculation with profit and discount groups
  • Costing Method and Indirect Cost
  • and Posting groups in Financial Details

But you can do even more, you can open Dimensions command from ribbon and preconfigure dimensions and dimension value and as well as value posting for dimensions (mandatory, same code, no code). And now when you want to create new Item, system will ask you what Item Template you want to use from all enabled templates.

MadeiraSelectTempolate.jpg

If you want to change something you can later use command “Apply Template” from ribbon to add some template to your item.

If you didn’t use some template or if you changed some details, you can also use command “Save as Template” to save these values as template for some other usage.

MadeiraRibbon.jpg

Interesting feature and you can use this not only for items. This is more standardized feature in comparison with older versions.

NAV Madeira is NAV 2017

We know the name now. The next release of Microsoft Dynamics NAV will be NAV 2017. It is no longer a secret and we will not use the code name NAV “Madeira” in the future.

New version will have a lot of new improvements, but I’ll share more about it with you very soon (it is still by NDA). Currently, this is just a small fast news.

Project Madeira with Desktop Outlook

In my few previous articles, I showed you how you can use Project “Madeira” with Outlook. But in all these posts, I used Outlook Online. You can also do everything the same in Desktop Outlook. You just must use Exchange Online.

Because of that, I want to show just some example in Desktop Outlook using Office 2016. You can use all examples I already showed. In this my small example, I got an email about some Invoice Issue from client.

MadeiraDesktopOutlook1.jpg

In this case, you just need to run “Desktop Links” add-in and Outlook will open your invoice in email body. For example, I’ll make an invoice correction and change discount fro 5% to 10% and re-post and re-send invoice to my customer.

You just need to choose Correct and system will make and post credit-memo, the same as invoice and create new invoice with the same data. You will change everything you want and choose “Post and Send”. System will post this invoice and create new email with this invoice in attachment as PDF.

But we have something more. In the right corner, we can find “Contact Insight” button and when we run it, we will get all information about this customer in the right pane. This pane is interactive and that means you can click on any data and you will get new information here.

Also, you can find “New” button and we can create all sales and purchase documents from this place. I think almost all functionalities in the Online and Desktop Outlook are mostly the same, but Desktop Outlook experience is even better.

Advanced Scenario with Project Madeira and Outlook

I think in my few previous posts, I’ve already showed some very interesting Project “Madeira” feature in collaboration with Office 365 and Outlook. Now, I will finish this small story with the some more advanced business scenario.

I got an email from my client where he asks an offer for some items. As I expect, because he is my old client, “Madeira” automatically recognized him and gave me possibility to see his company contact card or him as my customer. This second info is more useful for me.

MadeiraScenario1.jpg

On this card, I can see his balance, past due balance, overdue as a chart and few interesting tiles with information about his existing quotes, orders, invoices, credit memos, posted documents… If I want to see details about his balance, I need just to click on amount and I’ll get all information from Customer Ledger Entry; again everything in mail Outlook client. I can see posted document from this entry or edit if I want it…

MadeiraScenario2.jpg

And the same situation is if I click on amount in the chart. I also can use these tiles to see all documents with details from this default place.

OK, I decided I’ll give him an Offer. From this customer card, I can make new Sales Quote (I can make other sales document as well). As I expected, system noticed me that he has overdue balance, but I will live with this risk J. Now, I just need to fill what he wanted on quote and choose Send by email.

MadeiraScenario3.jpg

System will automatically create new email with attached Quote as PDF and all necessary information in mail body. And I just need to click Send. When I get confirmation, I will continue with working making an Invoice and sending approval request. And after that I’ll choose to Post and Send this invoice.

As you saw, we can make almost all sales business processes without leaving our Outlook client. And this is not everything we can; this is only part of possibilities. But we can see all of these in only few months. I am really waiting to see this product in production environment.

New Extensions for Project Madeira

When I run Project ‘Madeira’ for the first time, I found only three extensions there:

  • QuickBooks Data Migration
  • PayPal Payments Standard
  • Envestnet Yodlee Bank Feeds

All of them were created by Microsoft. But now, we can find eight of them (one new from Microsoft and few of them by ChargeLogic and Sana Commerce).

MadeiraExtensions.jpg

It looks nice to see new extensions here from other vendors. I hope we will have a hundreds of them in few months as well.

But I’m afraid about their visibility when we have a hundreds or thousands of them. I use brick view for the best visibility, and yes – search works fine, but I think we have to have some additional tags. Minimum I need is Category tag, because we will have a lot of completely different types of extensions (data migration, notifications, integrations, payment, some specific vertical or horizontal solutions, localisations,…). Also, it will be fine to have Market tab because some of extensions are for global market, but some of them will be only for some specific countries.

I expect to have some kind of rating as well. We will have a lot of similar extensions, and we need something for differentiation. I think these ideas can improve ‘Madeira’ experience. But it look it will be a great product.

Project Madeira and Power BI

If you have demo Project “Madeira”, you can also try to use Project “Madeira” automated Power BI. You need to use the same credentials and log to powerbi.com

Then, you need to run Services and choose Project “Madeira” package:

PowerBiMadeira1.jpg

Choose “Connect” and put your OData Feed URL. You can find this URL in your Project “Madeira”. You need to find Web Services page using search and copy OData URL until your company name, as the following model:  https://[navserver]/[instance]/OData/Company(‘Sample%20Company’).

Wait some time and type your credentials, using the basic authentication method. You need to use your O365 username, but as your password, you need to use your “Web Service Access Key”. To create your “Web Service Access Key”, go to the your User card in Project “Madeira” and use “Change Web Service Key” command to generate your “Web Service Access Key”.

PowerBiMadeira2.jpg

After that, you need to continue with logging to your PowerBI. You don’t need to take care about certificates and similar; everything is already prepared. When you finish, you will get page similar as my. Then, you can check and try to make it funny…

PowerBiMadeira3.jpg

Pretty easy. Enjoy.