Cannot Connect Web Client to NAV on Azure SQL

In my last two articles, I’ve showed you how to deploy Microsoft Dynamics NAV 2016 on Azure using Azure SQL Server. Now, if you already finished it any you want to use NAV Web Client, you have to install Web Server components on VM you configured as service tier and create Endpoint for WebClient on this VM, opening port 8080. Now you have to login with different username (for example, Admin username you already used on your VM). Now, you have to type the following URL: http://<AzureVM_Name>.cloudapp.net:8080/DynamicsNAV90/WebClient/

If you have problem with connecion and get the error message, this is probably because port 8080 is not opened. If you want to open this port, you have to open Remote Desktop Connection to your VM and run the following: Control Panel > Windows Firewall > Advanced Settings > Inbound Rules.

AzuWC_CP_Fw.png

If you can find “Microsoft Dynamics NAV 2016 Web Client” as rule, you need to add 8080 as Local Port. But if you cannot find it, create a new rule (using the command in the right pane) and add this name and local port.

How to Create BACPAC for Azure SQL

A BACPAC is a Windows file with a .bacpac extension that encapsulates a database’s schema and data. The primary use case for a BACPAC is to move a database from one server to another – or to migrate a database from a local server to the cloud. I’ll write about BACPAC because I want to introduce you with NAV 2016 database migration to Azure SQL Server. I already had a session with this topic on NAV TechDays in Antwerp and I want to introduce more people with this processes.

If you want to prepare BACPAC file from your NAV 2015 database, you need to run Microsoft SQL Management Studio and find your local database from where you want to create BACPAC file.

SQL1.png

Right-click on database and choose Task > Extract Data-tier Application. Click Next and choose where you want to save your BACPAC file.

If you want to save it on local HDD, choose “Save to local disk” and browse the location where you want to save this file on your local computer.

SQL2.png

If you want to deploy it to Azure storage, choose “Save to Windows Azure”, click Connect and type your Storage Account and Storage Key and choose Container. If you want to change BACPAC temporary name and location, change the file name and browse the location. This temporary file and location is file where system will put BACPAC file before it’ll be uploaded to Azure storage; after that system will delete it. Click Next and Finish and wait. System will create BACPAC file.

Report Layouts per Customer in NAV 2016

Microsoft Dynamics NAV 2016 is released about one month and we could see a lot of different new features. One of the small but amazing news is possibility to add different report layouts per each customer. This was one of very often requirement in implementation process and finally we can use it.

We can choose different reports per customer and after that, different report layouts. We can also add an e-mail as default per each document. It is possible for Quote, Order Confirmation, Invoice, Credit Memo and Customer Statement.

CustomerRepLayouts

We just need to open a customer card and find Document Layouts on Navigate tab. Than choose report IDs and layouts. Eventually, you can add an e-mail. You can use RDLC or Word layouts, as well. Now, if you print one of these documents, you will see that these report document layouts are configured as default.

If you want to make new document report Word layout, I already wrote about it here.

Directions NA and Directions EMEA 2016

Few days ago, Directions 2015 season has finished. Directions EMEA in Mannheim has finished in first part of October and Directions NA in Orland has finished on the end of the same month. There were a really amazing conferences, bigger then ever. We had a a lot of excellent sessions and announcements of the last NAV release.

After all these news, we have a complete year to make some good projects with NAV 2016 using all these knowledge we learned on Directions sessions. Now we have some also amazing NAV conferences (NAV TechDays and Convergence), but with them this year conference season is finished.

What we can expect the next year? Of course, we are waiting new Directions, as well. Currently, we already know where Directions will be and start to prepare for them with never better NAV.

See you there.

New CUs for NAV 2015, NAV 2013R2 and NAV 2013

Yesterday I’ve published article about the first CU for Microsoft Dynamics NAV 2016.

Only one day after this release, Microsoft also published new Cumulative Updates for:

Now, you can download and try them.

CU 1 for NAV 2016 Has Been Released

The first cumulative update for Microsoft Dynamics NAV 2016 has been released today. It includes all application and platform hotfixes and regulatory features. This cumulative update is known as Build 43402 and you can download it here from Partner Source.

One of the platform hotfixes is solving the issue when Dynamics NAV 2016 overwrites Dynamics NAV 2015 MMC controls. There are also some useful hotfixes as for example: G/L budgets do not export and import as in Dynamics NAV 2015, the password on the Setup page can be edited in view mode, cannot using of toolbar in report preview…

There are also a lot of application hotfixes for almost in all NAV modules.

But I’m not sure what exactly mean the feature: “Setting the language and regional format in the Web client setup is no longer supported”. If I understand it good…

But, first to install it and then more information.

My PPTs from Directions EMEA and NA

I’ve just published my Power Point presentations from both of Directions conferences. You can find presentations from Directions EMEA and Directions NA. I didn’t want to publish them earlier because Directions NA wasn’t closed.

Now, you can find all details from these two presentations and learn how to implement standard NAV solution in construction business. If you need some help about this, give me a question. If you want to know more about vertical solution for NAV in Construction, I will answer everything you need.

Presentation from Directions EMEA 2015

Presentation from Directions NA 2015

These presentations will be available for download until the end of this year.

Directions NA 2015 has opened

Direction NA 2015 has opened yesterday in Orlando (Florida). This is one of the most important NAV conferences in America. There are about 600 attendees. Key note session by Microsoft was a bit different as on Directions EMEA. In the forefront, it was Microsoft Dynamics NAV Managed Service, a really amazing tool for managing your clients on the cloud.

Today we are starting with new sessions. You can find more (agenda, speakers, sponsors…) about this event on this link.

WP_20151025_015

How to Install NAV 2016 Phone Client as Test Environment

We have new NAV 2016 more than two weeks. One of the really exciting news is using of Universal Apps. We finally can use NAV on phone.

But one of conditions of using of Phone Client is installing of security certificate. This is the same story as we already have in NAV 2015 for using of Tablet Client. If we have signed certificate, there is no problem. But if we have not it…

Can we use self-signed certificate on phone? Yes, we can. I will show how to do it on Windows Phone.

Of course, first we need to download Dynamics NAV Universal App for Windows Phone from Store. Type Dynamics NAV in Store Search and download this app. You can easy find it as app made by Microsoft Corporation with new logo.

Than we have to have installed NAV 2016. In my example, I’ve installed NAV 2016 on Azure. You can do it easy if you have Azure subscription. Or you can do it on your own servers and install self-signed certificate on your server. If you deploy NAV 2016 on Azure using PowerShell scripts, you will have already created certificate. I’ll install this certificate on my own computer in Internet Explorer.

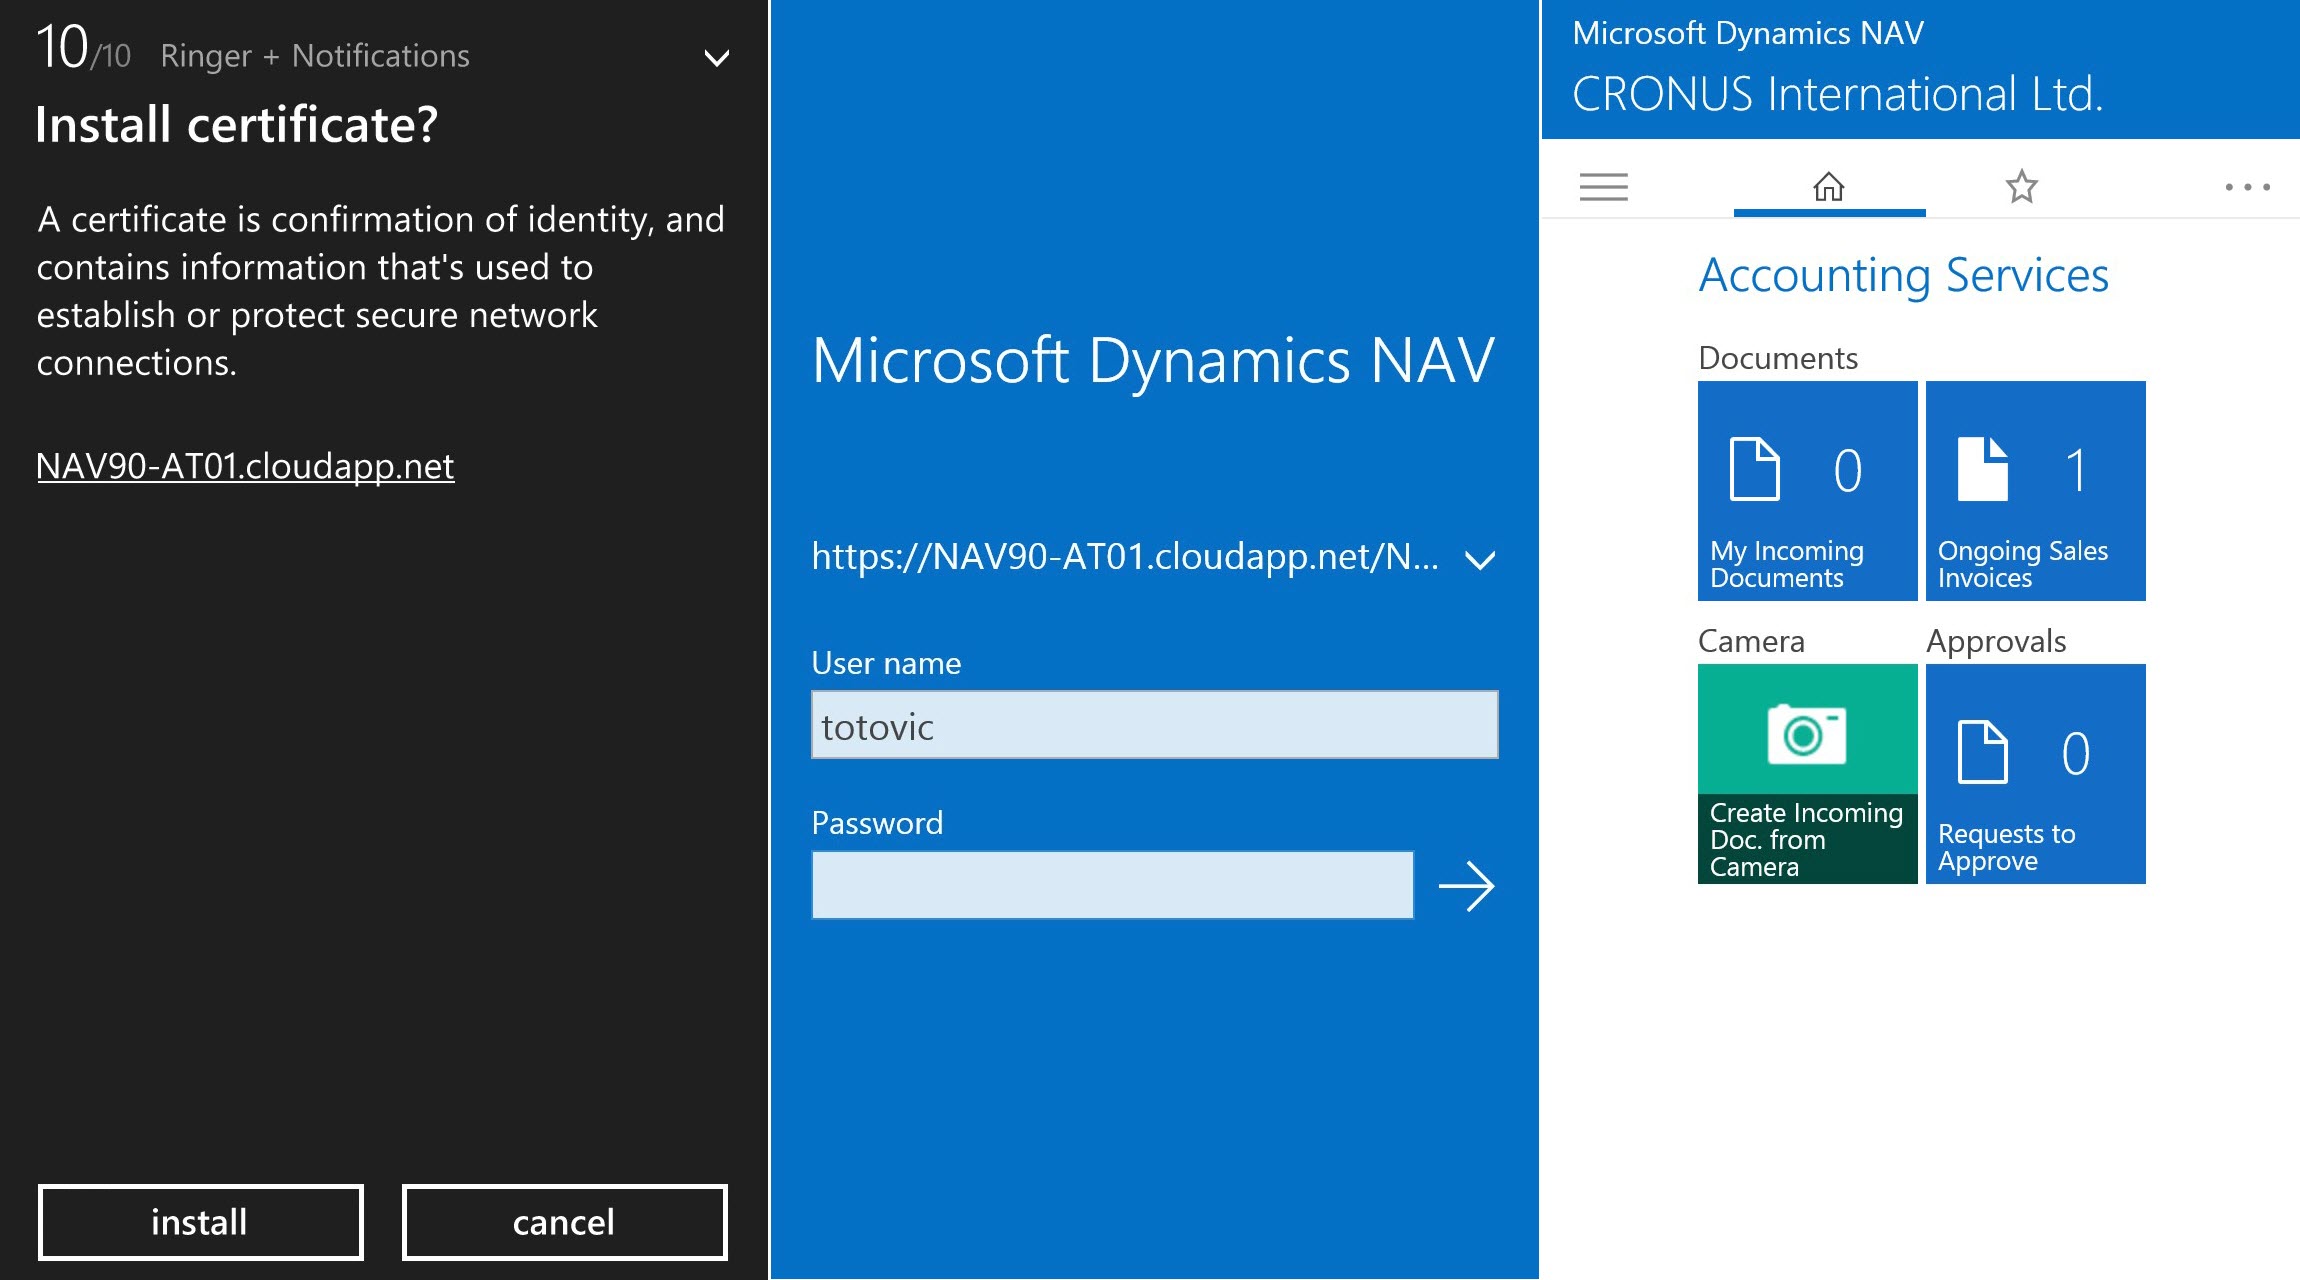
Run your Internet Explorer as Administrator and type your NAV 2016 Web Client URL. Choose “Continue to this website (not recommended).” and click on “Certificate error” > “View Certificates” > “Install Certificate”.

PhoneClient1

Choose Local Machine and “Place all certificates in the following store” > Browse > “Trusted Root Certification Authorities” > OK > Next > Finish > OK > OK.

Open MMC on your computer and add Certificates as snap-in using Add/Remove Snap-in command. Open “Certificates – Current User” > “Trusted Root Certification Authorities” > Certificates and find your already installed certificate. Right-click on certificate and chose Open. Go to Details tab and click “Copy to file” > Next > Next and choose your certificate name. Save this certificate XXXXX.cer on your computer and send it to your e-mail (e-mail using on your phone).

When you get this e-mail on your phone, click on your certificate in attachment and install it. Then run your Dynamics NAV Universal App and type your service URL https://YourComputerName/WebServerInstance and your username and password.

PhoneClient2

If you finished everything I said, you will open your NAV instance on your phone as you can see on picture.

How to Run NAV 2016 Integration with CRM Online

In my previous article, I described how you can register your trial CRM Online subscription. Now, I suppose you want to test new feature in NAV 2016 – enabling natively integration with CRM Online.

We can do in on following way. Before we start with integration, we should enable encryption in Data Encryption Management page. After that, to configure connection in NAV 2016, open “Microsoft Dynamics CRM Connection Setup” page and type your Dynamics CRM Online URL you already registered (https://YYYYYYYY.crm4.dynamics.com), your username (full YourAccount@XXXXX.onmicrosoft.com) and password.

Now we need to test the connection settings. We can do it running Test Connection command on ribbon. When we run it, NAV will try to establish a connection to the Dynamics CRM server and if the settings are valid and a connection can be established, a message appears that states the test was successful. If everything is OK, then we need click in Enable check-box.

NAVCRM1

After you configure all these fields, you need to click Yes to make synchronization between CRM Online and NAV. After synchronization is finished, the connection to CRM Online is configured and CRM integration is enabled.

NAVCRM2

Now, you can configure some additional fields if you want. I suppose to use help for this (but I’ll write about it in other articles). And on the end, if you want to disable CRM integration, you only need to uncheck Enable field.