Where is the limit in Business Central CRM capability when integrating it with D365 Sales? (part 3)

As I have told you in the previous blog post for part 3, I will introduce you to the Data Synchronization feature, and I will try to explain all capabilities of Data Synchronization.

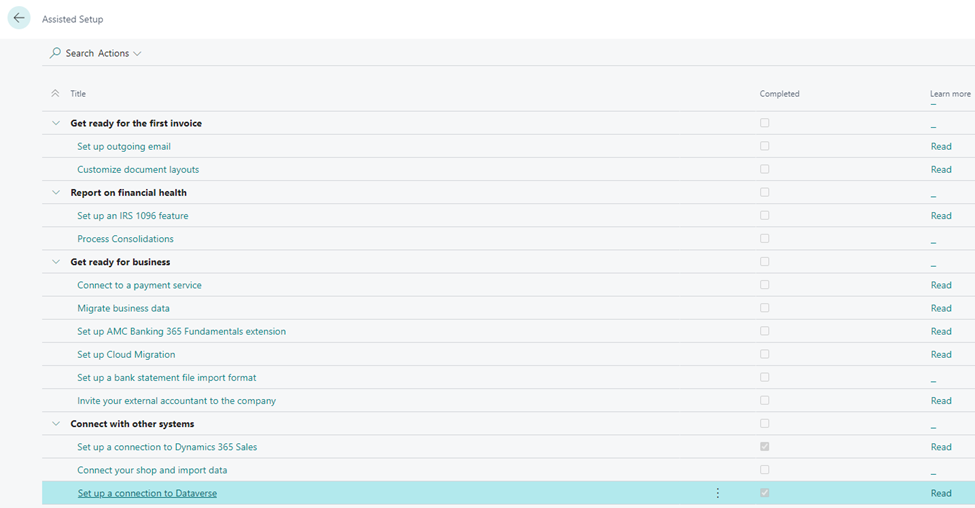
Before we start creating and explaining how it works, one step needs to be made before we Synchronize Sales Professional and Business Central. You will need to create Synchronization between Dataverse and Business Central first. The procedure of making it is the same. The difference is in the number of tables and the type of synchronization. In Dataverse Synchronization, you will get full sync of Contact, Customer, Vendors, and Currency. It is important to mention that this data sync is easy to set up and work with. As was the case a few years back, you don’t need an Admin User and Integration User (Non-Admin) in Dataverse. Now everything is done through a wizard in Business Central. All you have to do is go to the Assisted Setup in Business Central, choose Set up a connection to Dataverse and follow the steps. You have to pay attention to this setup at the beginning, where you have a question: Would you want to create a Virtual Table? It is up to you. You can switch it off or on, but we will not need Virtual Tables for our Dynamics 365 Sales Professional Synchronization.
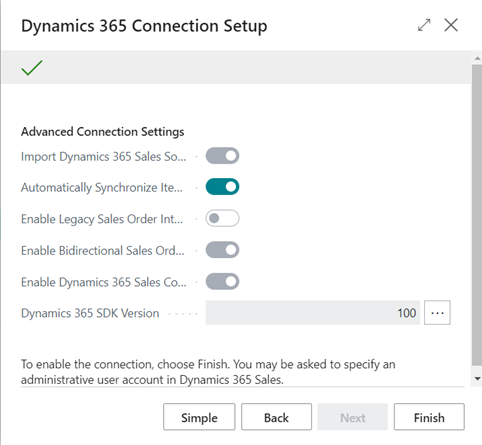
Now that we have created Dataverse Synchronization, it is time to focus on our Sales Professional Data Synchronization. After you have created Dataverse Synchronization next step is to choose on the same page in Business Central Set Up connection to Dynamics 365 Sales. What will welcome you is almost the same wizard you got when you were created previously, but as you go through the next page, you will see the possibility of going to the Advanced setup of Synchronization. If you click on advanced, you will see the option to choose some of the tables for sync, my recommendation is to select all of them except Enable Legacy Sales Order Integration, but you will see that if you choose to Enable Bidirectional Sales Order Integration, you will not be able to select Enable Legacy Sales Order Integration.
Now when we choose Finish and let the system do its job, we will end that now we have a much more extensive list of synced tables than previously whit Dataverse synchronization. For example, we have Items, Opportunity, Sales Quote, Sales Invoice… etc. And of course, we see here which type of connection is made to which table, Bidirectional or To Integration Table or From Integration Table, but leaving this on the side more important is now to do coupling criteria. What are we doing here exactly? We are setting which field we want to do, checking duplicates, setting case-sensitive fields, and deciding whether we want to create e New record if he can’t find an existing one.
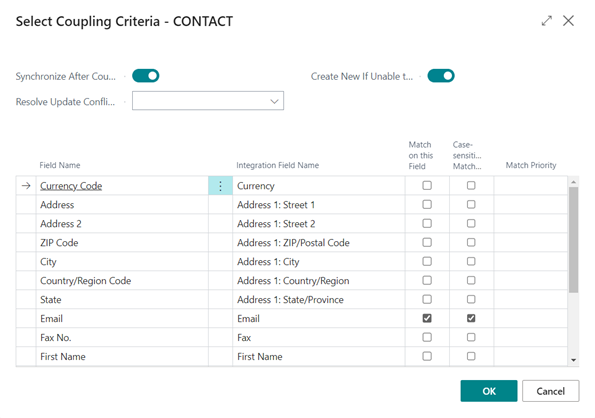
So, we now have to define Coupling criteria for all tables where the system asks us to do it, and when we finish, we will choose Run Full Synchronization. And the system will do its job, create all records, and match all already existing records on both sides.

Now that we have synced systems and what can we do with them?

In conclusion to this whole blog post, I will give you some examples of what you can do and how you can use the synchronization on and, of course, one CRM (Dynamics 365 Sales Professional) and one ERP (Business Central) for SMB altogether and use the best of both software and to get the best value at the end.

For example, as I have mentioned leads in previous blog posts, this is Sales stuff, and it is good not to mess with Business Central Customers as you may create some Invoices or a lot of financial transactions. So, let’s keep our ERP clear, and those data where we have some contact with somebody, let’s keep it in CRM. But this Lead is getting more interested, and we are getting the possibility to sell something to him (Athens Desk 1896-S, 😊), and he is becoming an Opportunity. We now have Synchronization between ERP and CRM and customer info in both systems. Still, what we can do more from Sales professional because we have Items, UOM, and Sales Quote Synced, we can create a quote in Sales Professional. Now when we want to do Invoicing, we can go to BC and get out the Quote that we made in Sales Professional (because of synchronization), and from that Quote, we will create an Invoice and successfully sell our product to our client. But this is not the end, because we know that in CRM works Salespersons and that for them it is important to understand what we have sold to somebody. This Invoice will be synced back to our Opportunity, and when it is on Opportunity, it will automatically be attached to the Account Table. Each Salesperson will know in the future what this client has bought for what amount and when. This process is called the Lead to Opportunity to Cash business process in two software which works together perfectly.

And one more thing, I’m not persuading you to start using and buying Sales Professional, but I just wanted to show you all the good stuff which comes for you for only 20$ per user per month as an Attached License if you are already a BC user.

And finally, there is always one more question. What if I need to add more tables to the synchronization? The answer is YES! I will stay on this answer because I would not like to rewrite your Microsoft Docs, but I’m giving you the link. In short, you will need a bit of BC development, but you will get it and make extra tables available in synchronization.

Business Central and D365 Sales

I know it has passed since I wrote the first part of this topic, ‘Where is a limit in Business Central CRM capability and when integrating it with D365 Sales (part 1),’ and people expect the second part. But as I’ll speak about this topic on Directions EMEA this year, I decided to postpone the following parts after this event. I would like to keep it interesting and show many of these topics in my session. Of course, as I cannot go so deep into details in 45 minutes, I’ll continue here with publishing my point of view related to this topic.

In the meantime, if you will attend Directions EMEA in Hamburg this year, I warmly invite you to come to my session and discuss this. My session will hold on November 10, 2022, from 11:15 to 12:00 in Room: Hall Y4 – Dynamics 365 Sales Professional for Business Central Users.

But I promise I’ll continue with this topic here in my blog.

How to integrate Business Central with Dynamics 365 Talent – part 3 (inserting data with LogicApps)

The last days of the previous year, I’ve started with blog series how to integrate Business Central with Dynamics 365 Talent (now Dynamic 365 Human Resources). I wanted to show how to integrate these two solutions without code, using only available services.

I’ve started with the first post, with an overview and then continue with the second one where I explained how to configure both solutions. Now I would like to continue with the third part where I’ll explain integration tools we can use.

Generally, you can use Flow (Power Automation) or Azure Logic Apps. Personally, for this purpose I prefer Logic Apps. There are many reasons for this, and I’ll show the basic comparison between these two solutions:

I don’t want to say Flow is not good solution as I enjoy in using it, but for this purpose (integration) I think Logic Apps is much better choice.

To use Logic Apps, first you must have an Azure subscription. When you open an Azure portal, you can easily find Logic Apps using a search feature. Create a new Logic Apps using Add command.

If you already used Microsoft Flow, you will find that Logic Apps are very similar, but as this is on the first place Azure service, you have to make some basic configuration as a choosing a service Name, what Subscription you want to use, Resource Group and Location for your service.

Then you just need to click on Create and wait a few seconds. If you still don’t see new service, probably you need to hit Refresh and new service will appear. When a new service is created, you need to open it and start creating a flow. System will open Logic Apps Designer and you can start with a Blank Logic App button scrolling little bit down (if this is your first time with Logic Apps, I can recommend to look the introducing video before you start). Do not forget that you need to have already deployed Business Central and Talent and created Talend entities in CDS (check in PowerApps with Data tab).

On the first sight you will see it obviously look like very similar as Microsoft Flow (Power Automation). First you need to start with a trigger, and as there is not trigger for Talent, you need to find ‘Common Data Service’ trigger – ‘When a record is created’. Yes, the first Logic App will be for inserting new data, but to complete this process, minimum necessary will be to make a Logic App for update as well.

Now you need to sign in to create a connection to Common Data Service. You will use credentials you used for Talent and CDS. When you finish with signing in, choose an environment where you have installed Talent and Workers as an entity name. On the end, add Organization as a Scope.

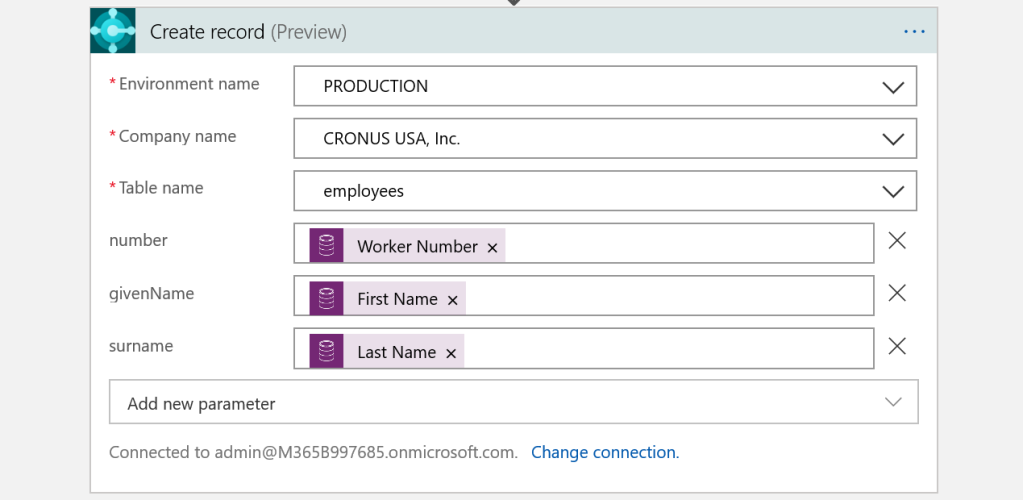
In a new step, you need to make an action. For this purpose, you need to choose Business Central and find ‘Create record’ action. When you sign in, first you need to choose if you want to use Production or some other environment and after that you need to choose a company name and as a Table name choose Employees (this is an API from Business Central).

On the end you just need to connect fields. To do this you need to click on Add new parameter and to choose Business Central fields you want to use for integration. Minimum you have to use are number, givenName and surname. Now you need to connect BC with Talent data i.e. Given Name (from Talent) to First_name, Surname to Last_name…

Click Save and as this is a service, do not forget to click Run. Only now, your Logic App is ready for using.

Be careful here with choosing fields for integration… you can try to integrate more fields here, but it cannot be useful. The answer on your question is when you create new record to the Worker entity in Talent, only a few field will be treated as an insert and the most of them will be treated as an update. Look at the last image where I’ll create new record… only these field you see are treated as an insert.

When you click Hire and add details, all other values you will add will be treated as an update. Because of that, you will see that created new Logic App for updating is absolutely necessary. But I’ll explain more about this in my next post.

But right now, you can create new Worker in Talent and you will see that system created new Employee in Business Central immediately.

How to integrate Business Central with Dynamics 365 Talent – part 1 (Introduction)

When I think about new Business Central features, the first thing in my mind is openness for integrations. As a part of Dynamics 365 family, the main power of this solution is when it can work simultaneously with other. Because of that, I showed these capabilities in a few conferences. As I got lot of requirement to explain it in more details, I’ll write about good example of BC integrations with one other Dynamics 365 solution – with ‘Dynamics 365 Talent’.

‘Dynamics 365 Talent’ is a new Microsoft Dynamics HCM solution (new name ‘Dynamics 365 Human Resources‘). This solution was initially based on AX HRM, but now it is separated solution. As we can use it independently and this solution is really amazing HCM system, I think it can be interesting how we can integrate this solution with Business Central and make them as the powerful tool together… and with no code.

If you are thinking how to make it and how to make it with no code, the answer is using one of the Azure services – Logic Apps. As ‘Dynamics 365 Talent’ has entities on CDS and Logic Apps has connectors for CDS and for ‘Business Central’, only what we need to do is to map entities and fields in both systems and of course, to think abut business logic on the first place. Depends what is the primary reason for integration, we can choose some of the options:

  • integrate HRM core system with HR in Business Central
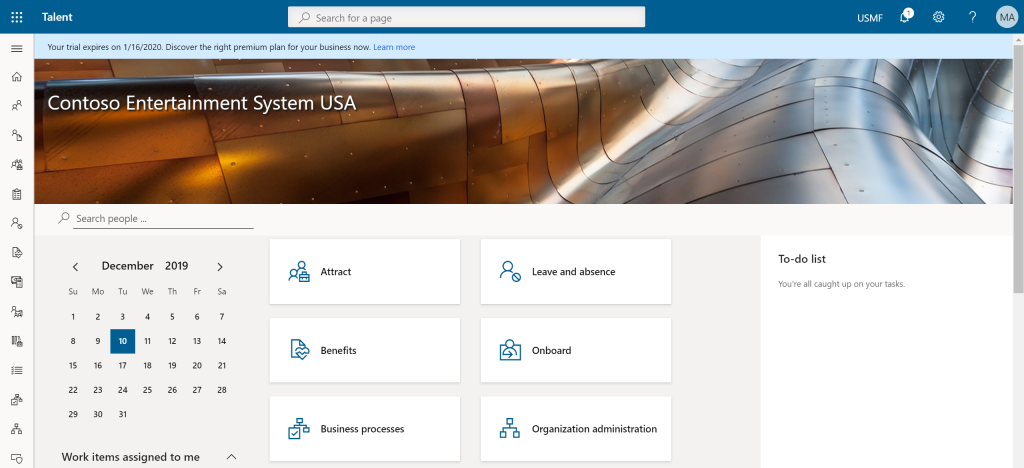
  • integrate Attract or Onboard apps in Talent with Business Central.

In second option, we will use HR module in Business Central and use only one or two parts from ‘Dynamics 365 Talent’. On the other side, in first option we will use core HR in ‘Dynamics 365 Talent’. In this text, I chose to explain the first option.

In this first text, I’ll just explain some basic concepts and you will find more details in the following texts with this topic.

Basic setup in Business Central

First, as we don’t need all HR capabilities in Business Central (we already have all of them in dedicated HR solution – ‘Dynamics 365 Talent’), we will move only data necessary for other areas in Business Central. In this example I’ll show how to move data to Employee table as this table can be used for example in a Payroll system or you can use this information in Fixed Assets card.

Locate information in Talent

Now when we have the basic configurations, we can continue with integration. First, we need to find where an employee’s data are saved in Talent. To find this we need to open list of CDS entities and we can do it using PowerApps platform.

When we have these basic information, we can continue with technical parts how to do it in a practice.

My Session(s) on eXtreme 365 Conference

This year I’ll start with my sessions little bit earlier then usually. My first conference where I’ll have a lecture will be eXtreme in Dubrovnik. In a past, this conference was mainly for the Dynamics CRM solutions, but from the 2017., we have not only CRM, but AX, NAV… as well.

So, this year I’ll be there with minimum one session. I’ll speak about Dynamics 365 ‘Tenerife’ (and NAV as well) in a real world of integrations using Flow and CDS. I hope it will be interesting. If I’ll have more lectures, I’ll announce it here as well.

In a mean time, you can go and check more details about eXtreme 365 conference here, and I recommend to register if this is suitable for you.

eXtreme365.PNG

Dynamics 365 for Talent – Integrations

Few days ago, I’ve started with a story about new product (still Technical Preview) – Dynamics 365 for Talent. I want to spend a few words about possible integrations.

When you look at the official announcement, you can find that key integrations will support the overall business and the following integrations will be created, but they will be available at or shortly after general availability:

  • LinkedIn
  • Microsoft Dynamics AX 2012 R3
  • Microsoft Dynamics 365 for Finance and Operations, Enterprise Edition
  • Background screening
  • Global payroll providers
  • ATS providers

As you can see, there are not planed integration with Dynamics 365 for Financials or with Dynamics NAV. But  think it will be necessary because these products don’t have a real HRM solution. But I’ve also found that it will be possible to use Common Data Services platform with built-in extension points for Power Apps, Flow and Power BI.

TalentSys.PNG

But, when I tried to make connection via Flow and Power App, I’ve found that it is still not available as a connection. Of course, it is probably because it is only technical preview and I’m sure it will be available with a general availability. I’m waiting this moment and I want to make some kind of integration. I’ll write about it, I hope soon.

Create an Invoice from Outlook Calendar in Project Madeira

I’ve already wrote about using integration of Outlook and Project Madeira. If you use Exchange Online, you can use a lot of automation. As I wrote in my last article, everything I used is based on Project “Madeira” currently demo features, but I expect we will have minimum the same in new NAV 2017. But OK, we will still wait with this until we get the official new release.

I older articles, I showed you how to use this kind of integration in emails, but now we can use some automation in Outlook Calendar as well. If we make an appointment to make some invoice for example, when we open this appointment we will notice Project “Madeira” button.

MadeiraCal1.jpg

Using this, system will as us what contact we want to use and when we choose one of them we will get all necessary information about him. Now, we can make new quote, invoice, order or credit memo for him if we want. We can add everything we want in this document without leaving the Outlook Calendar. When I finish, I can send this document on approval or just post or post and send.

On my first picture, I captured how it looks like in Outlook Online, but everything is a possible using desktop Outlook (as I noticed, you just must use Exchange Online). If we use desktop Outlook and open the same appointment, we can notice two buttons. The first is about Contact Insights and the second is intended for directly creating a new documents. You can type a new document directly in the right part of appointment or click on “Pop Out” button (you can use this in online and desktop versions as well) to get independent window for easier way of typing.

MadeiraCal2.jpg

And when you finish everything is the same as in online version. Now you can choose to work in Project “Madeira” or in NAV from email or from calendar and it will make your daily business faster for sure.

How to Run NAV 2016 Integration with CRM Online

In my previous article, I described how you can register your trial CRM Online subscription. Now, I suppose you want to test new feature in NAV 2016 – enabling natively integration with CRM Online.

We can do in on following way. Before we start with integration, we should enable encryption in Data Encryption Management page. After that, to configure connection in NAV 2016, open “Microsoft Dynamics CRM Connection Setup” page and type your Dynamics CRM Online URL you already registered (https://YYYYYYYY.crm4.dynamics.com), your username (full YourAccount@XXXXX.onmicrosoft.com) and password.

Now we need to test the connection settings. We can do it running Test Connection command on ribbon. When we run it, NAV will try to establish a connection to the Dynamics CRM server and if the settings are valid and a connection can be established, a message appears that states the test was successful. If everything is OK, then we need click in Enable check-box.

NAVCRM1

After you configure all these fields, you need to click Yes to make synchronization between CRM Online and NAV. After synchronization is finished, the connection to CRM Online is configured and CRM integration is enabled.

NAVCRM2

Now, you can configure some additional fields if you want. I suppose to use help for this (but I’ll write about it in other articles). And on the end, if you want to disable CRM integration, you only need to uncheck Enable field.

How to Create CRM Online Trial Subscription

I suppose all NAV people have already heard that NAV 2016 has natively Dynamics CRM Online integration. This is a really great feature in new NAV release. Probably most of you want to try how it looks like. If you don’t know how to create your trial CRM Online subscription or didn’t try it, this article is for you. I want to show you how to do it, step by step.

First open this web page. On this page, in upper right part, click the “Sign In”. You have to type your Office 365 account.

CRM1

Now you need to confirm this order to get Microsoft Dynamics CRM Online Trial with 30 day subscription for 25 users. After you confirm it, you will open your Office 365 Portal. You will see new e-mail with all instructions and I suggest read it. Click on Login and choose Admin.

Go to your Active Users on portal and add CRM license to you and your other users. You can do it clicking on Edit > Licenses > and check “Microsoft Dynamics CRM Online Professional”. Click Save.

Now you need to choose your CRM App, enter your domain name you already registered (*.onmicrosoft.com) and click “Continue Setup”.

CRM16

You can find potential issue here. Maybe you will not see it, but it is possible. If you get the following error message, try do to next step:

You are not a member of this organization. You (YourAccount@XXXXX.onmicrosoft.com) do not belong to the organization YYYYY. Verify the organization name and try to sign in again.

Resolution: Click the “Sign Out” button on the page that you see the error on. Then log back in with the correct login to access your Dynamics CRM Online organization. This is because the cookies that are used in the Internet Explorer browser sessions are trying to use your previous credentials to login.

Then, you should confirm some details about your language, country and currency. Then click the “Finish” and you can start “get started video”.

And… You’re in! Click on your CRM Online URL you’ve got on this page (copy this URL because you will need it later and for integration with NAV 2016). Now you’ve opened your CRM Online and you have to assign security roles to the new user. You can do it clicking Assign Roles button on the top of the screen.

CRM15

Now, assign security roles in CRM so this user can access your Dynamics CRM organization.

You can use your 30-days trial Dynamics CRM Online subscription. In next article, I will show how you can connect your CRM Online subscription with your NAV 2016.

Video Series on Partner Source Site

In the last few years, you could find a lot of different “How Do I” videos on MSDN or Youtube. But, you always had a problem when you want to find some specific video. Now, Microsoft have arranged a part of Partner Source for these videos and not only for videos. If you are a Microsoft Dynamics NAV partner, you will easy find video you need.

Microsoft organizes six different contents “buckets” from the Readiness & Training News page for Microsoft Dynamics NAV. There are:

Now, you can find all currently published videos, allocated in logical parts. In the near future, there will be a lot new videos to make cohesion between them and all of us hope that it will help to all partners.