Trigger Power Automate from the Marketing Journeys

If you are a Dynamics 365 Marketing user, you may have already seen that you can trigger Power Automate in your Marketing Journey (Real-Time Marketing). And why is this a good thing? Power Automate allows users to create, update and delete records and can assign records or complex pass-through processes.

There are several actions you have to do before you can trigger Power Automate through Marketing App.

Let’s see all steps necessary to perform before you start using Power Automate together with Dynamics 365 Marketing app.

First, you must create a Customer Journey in Real-Time Marketing.

I have created a simple Journey that starts with a Segment and has only one stage, after which Power Automate will be triggered. But you can create as many stages before initiating Power Automate.
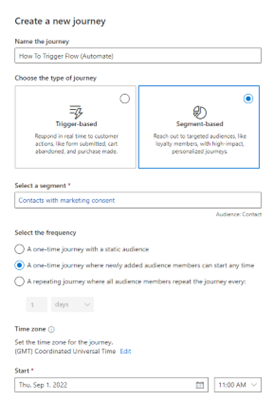
You need to take care of time when you want to start this Journey. Of course, you are not obligated to use Segment as I did. Still, this was the easiest way to show you how to start using Power Automate in your day-to-day Marketing Journeys.
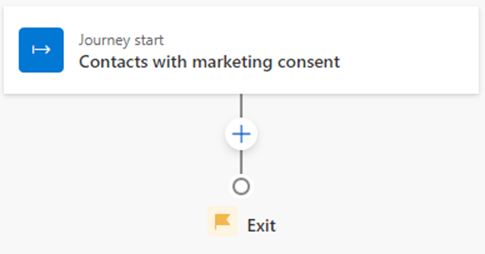
After choosing the Segment, we will continue with the Journey creation.

What we have to do next is to add a new action to our Journey, which will activate a Custom Trigger.
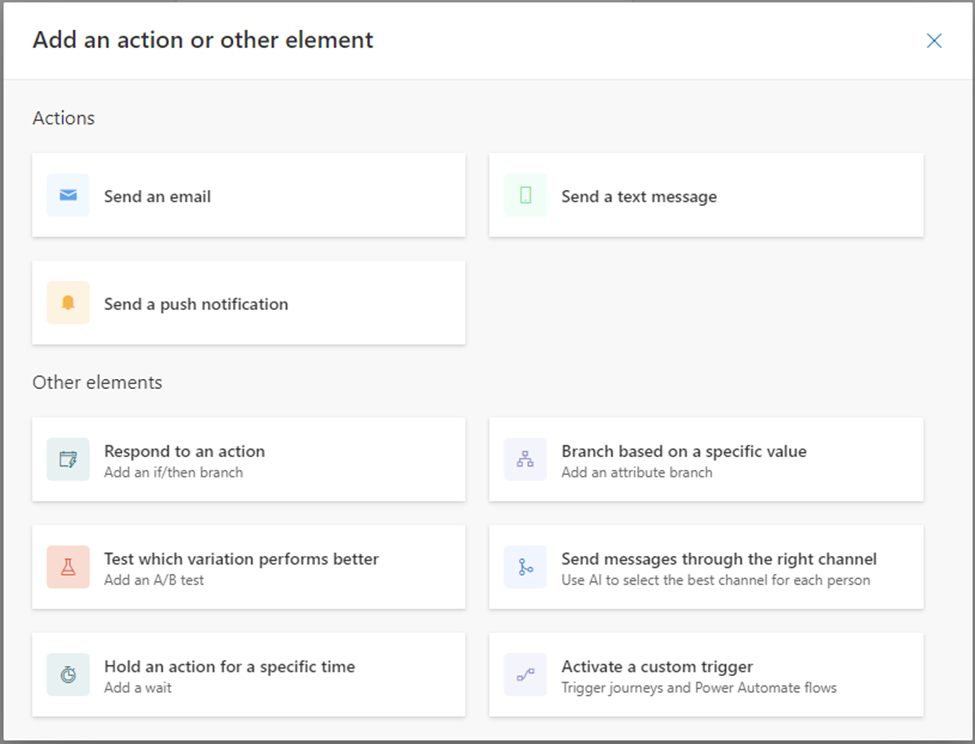
The system will give you one lookup file where you can choose some of the previously created triggers, and then you can use one trigger for multiple Journeys.
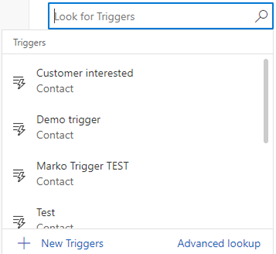
But now we will choose to create a new one. When you choose New Trigger, the popup window will open, and you will start defining your trigger.
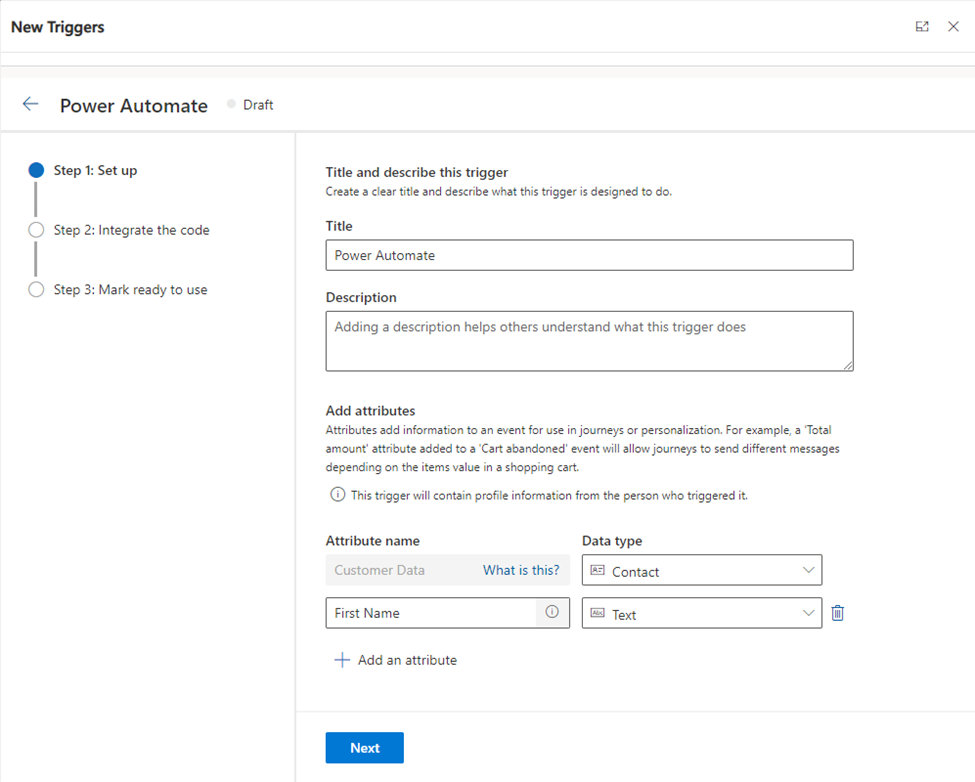
Here you define some of the usual things like Name and Description, but the critical part for Power Automate is where you define Attributes.

Suppose you have been creating Manually Triggered Flow or Power Automate from the Canvas app for example, or just triggered based on Power Automate. In that case, this is how we get values and proceed them through Power Automate.

This is where you will define key attributes you need to use from this Journey in your Power Automate.

I have created one attribute named First Name for this purpose, but be free and create as much as you need for your Journey.

After defining attributes, finish through the wizard, and you will be able to come back to Journey Form.

Now when you are on the Journey, you must do some mapping.

This is one of the most critical parts because you map your attributes to the fields on Entity/Table.
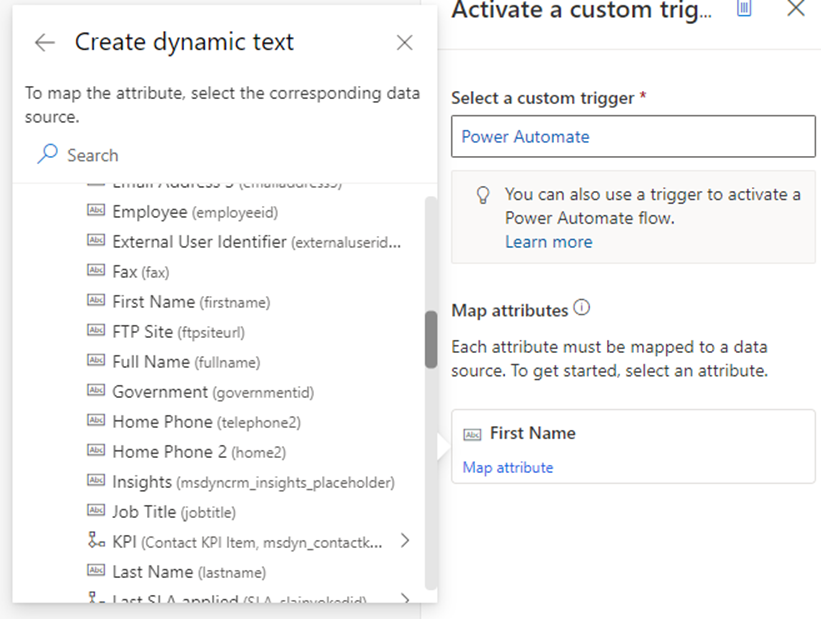
This is too last step before we go to Power Automate.

Because we had only First Name and Table is Contact, and I have found just my Field in the list of Fields. Just be aware that you must map all attributes you have defined.

And this is the end of the Marketing part.

Now we are going to create one Power Automate.

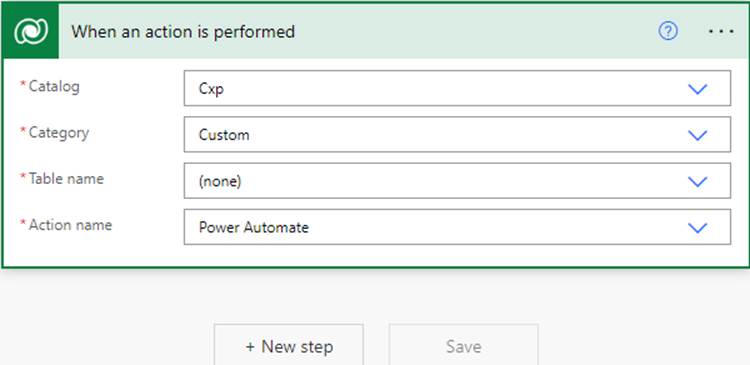
First, go to the Power Automate page, Name your Flow as you like, and choose Datavesr – When Action is Performed as Trigger.
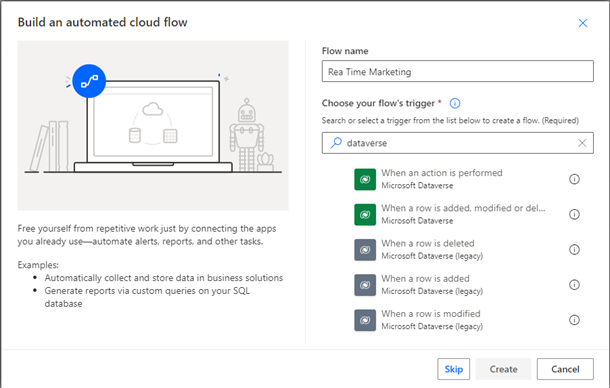
So in the following screenshot, you will have to be careful what you are choosing.

Catalog > Cxp

Category > Custom

Table name > (none)

Action Name > Choose your action
And the next thing is to continue with Power Automate creation.

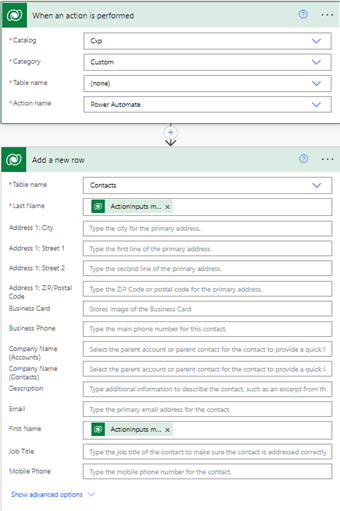
I will add a new step where I will use data from our attribute definition. But you can, from now on, create new records, update records, send an email notification, send approvals, work with all connectors in Power Automate, and make the best possible Journey and the best possible steps which have to be automated after your Journey pass.
When you finish with Power Automate creation, Save it and Close it, and return to your Customer Journey Page in Marketing, where you can Publish your Journey and wait for the magic to happen.

I hope that this feature in Dynamics 365 Marketing will allow you to create more complex and more customer-oriented Marketing Jounies, which will allow you to deliver better content to your clients. After all, Power Automate is a really powerful tool that can bring a lot of new ideas, which now can be achieved together with Dynamics 365 Marketing Real-Time Jounies in day-to-day use for Marketing experts.

Dynamics 365 for Marketing – Check for Errors

As I’ve already wrote, Dynamics 365 for Marketing Public Preview has been announced. Also, in my previous blogs I wrote about Click Dimensions Marketing solution for Microsoft Dynamics 365 for Sales, and this time I want to take an opportunity to show you something new in this new D365 for Marketing Public Preview solution.

I have been testing Dynamics 365 for Marketing for a while, and I’ve found one interesting feature named as ‘Check for Errors’. This feature looks like really good functionality because you can check if everything is fine with your Marketing Customer Journey, or Email Template, or something else before you go live with it.

Check - GoLive

Checking process will take only a few seconds, and until this checking done, you can’t do any other thing, but still it is only a few seconds. 🙂

Error 1

After system has checked your configuration, it comes with even better things. As the first, system shows you a notification bar where you can see where to look for an error.

Error 2.PNG

After going to the place where error is, the system will show where your error is placed, or if there is a few more errors you will see the places where they are, as in my example.

Error 3

In my example I have one error in two campaign parts. With going to the properties of each campaign part, you will see exactly where you did a mistake.

Error 4.PNG

After testing a little while Dynamics 365 for Marketing Public Preview, I’ve found this interesting thing, and I wanted to share it with you. This shows that the new Dynamics Marketing app is very interesting for using and testing.

Dynamics 365 for Marketing Public Preview

Few days ago, Dynamics 365 for Marketing Public Preview finally has been announced. For those of you who already attended on some of Dynamics events, this was expected moment.

If you want to try it, go to this URL: https://trials.dynamics.com/Dynamics365/Preview/Marketing and you just need to use work email and phone number for verification:

D365M1

The second step will be accepting trust to the Microsoft CRM Services as publisher…

D365M2.PNG

When you finish registration, you will get the main Dynamics 365 for marketing landing page:

D365M3

Now, you have possibility to run ‘First time setup’ and finish this configuration and continue to work with this app after that. In the following texts, we will write more about them.

The main features covered with this App are:

  • Multi-channel campaigns
  • Lead management
  • Sales and marketing alignment
  • Marketing analytics
  • Event Management

Marketing Campaign Automation in Click Dimensions – Step by step

In my previous blog about making marketing campaign automation in Click Dimensions, I just wanted to cover top processes and share an idea how I solved this requirement. But when you know what you want, creating Marketing Campaign Automation in Click Dimensions is not so complex, and now I’ll show you how to do it, but this time step-by-step.

Marketing List

I prefer to start with creating Marketing List, because you will use it in creating automation, and it won’t be a good idea to forget it.

So, everybody who has ever used Microsoft Dynamics 365 for Sales knows how to create marketing list, but I will explain it in a few sentences. First you are going to the Marketing card, and in the row Marketing you will see Marketing Lists. After entering the marketing list, you need to fulfill what is necessary in creating marketing list.

CD1.jpg

I will not be so long on this, but everything is shown on pictures, so if somebody is doing this for the first time please follow the pictures.

Email Templates

Now we are coming in to Click Dimensions, so who have not ever used Click Dimensions I will explain everything step by step, and for those who already use Click Dimensions, maybe you will learn something new.

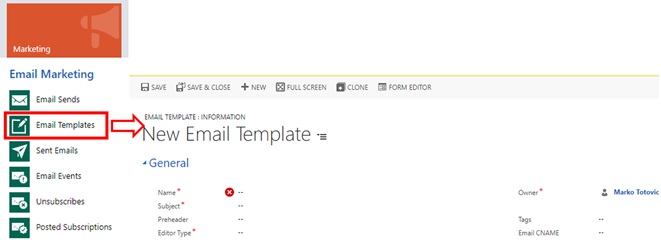
So, Click Dimensions is located on Marketing card, so you are probably figuring that we won’t go out of Marketing card in creating this automation. Let’s go back on creating, first we have to create Email Template. We are going to row Email Marketing, where we will find and enter it to the Email Templates.

CD2.jpg

After we entered this, we are starting with creating an Email Template, so we first have to fulfill necessary data, and then click on Save (as creating everything in Dynamics 365 for Sales). After saving your data you have to enter this in the editor to really create template.

In editor, way of working is ‘drag & drop’, so it is easy and intuitive. So, you need to choose what you will put in your email, and just save it.

CD3.jpg

Depends on how many emails you want to send in one automation, you have to create as much email templates.

Campaign Automation

As you see this is going pretty easy and fast. So, we’ve came to the main thing in this step by step explanation. So, we are still on Marketing Card, and this time we are going in row Marketing Automation where we have to enter only one thing we have in this row, and that is Campaign Automation.

CD4.jpg

After entering it you just need to begin with creation of regular New Campaign Automation. After you open a Campaign Creator, you will see that the only thing that is mandatory to fulfill is the Name of this Campaign, and after typing the name we just must save this, and to be prepared to go into the Builder where we will create the campaign.

Builder

Builder is placed on the ribbon inside of Campaign Automation you’ve created, and you have to enter it from the start with creating with your automation.

CD5

The Builder is intuitive created, and you can work easy through this process. It has ’Triggers’, ’Actions’, ’Timers’, and ’Series’. In this text I will explain how to use only some of the triggers, and actions.

So, we will start with trigger ’Added to List’ and this works as drag & drop, so you just have to choose what you will use and to move it to white background. And after starting with our trigger, we will add the next one as action, and in this example, this action will be ’Send Email’.

CD6.jpg

After doing this, we will again use one trigger, and not this is an ’Email Interaction’. And just to know, when trigger is not used on the beginning of the whole design it will have ’yes’ and ’no’ conditions sides. It is important to know that you can’t finish with opened any of these sides of trigger, without actions. So, it is better to have the trigger on the beginning (to avoid thinking what actions to put on both of sides). After we add our second trigger, we will first focus on our ‘true’ side. Because it is some email campaign we will use in ‘true’ side action ’Assign Owner’ and in ‘false’ side ’Remove from List’. Now we have just created what campaign will do, and you just have to fulfill some more information and we have finished.

First by clicking on first trigger ’added to list’ you will see on the right side that instead of triggers and actions something new appear, and in that place in first trigger, you just have to bring your marketing list which is mandatory, and to check check-box for ’Run on entire list’. That means that this automation will collect all your contacts from your marketing list, but if you type in some new contact, this automation will automatically add it to list.

After this is finished, we are going on our action in the same way by clicking on it. Now you will have to type some more information, but not so much. Mandatory is to select which email template you want to use in this automation, so you will use one you have created on the beginning. After that you have to type in subject, and to choose from which name and email address this mail will be sent.

After that, you have to go on the next trigger, and you have to choose from which series the email will be sent, and in can be only that you’ve used in a step before. After that you have to choose what is an interaction you want to monitor (email clicking, or email opened). In this example, I’ll use clicking. And only timer configuration is left if you want to use it. I’ve set here on the timer that if in 3 days nothing happens that this interaction is going in to ‘false’ side.

If condition is positive, we’ve put action ’Assign Owner’ and setting up of this action is easy. You have just to choose a display name, and to type which user will be assigned if somebody open our email.

If our condition is negative, it is similar. You just have to choose from which list you want to delete if somebody didn’t respond to campaign. Of course, it will be the list from which you have started. This is because, as I already mentioned, we must have action on the end of each condition.

CD7

And we finally arrived at the end. It just left to save this, and after saving, you just have to click ’PUBLISH’ and whole Campaign Automation is starting, as your email is sent.

CD8.jpg

The future of NAV – a small wrap up

These days we got a lot of messages about the future of our product – Dynamics NAV. Now I’m seating in a plane and traveling to Nashville on NAVUG Summit and finally have found some time to make a small wrap up with all important things. I think now, after two Directions in North America and EMEA, picture is clearer.

Roadmap

The first thing I want to mention is roadmap of Dynamics NAV. I think it is absolutely clear that in this moment we have Dynamics NAV 2017 as ‘on prem’ and ‘on cloud ready’ solution, but as SaaS, we have Dynamics 365 for Financial and Operations Business Edition, generally based on Dynamics NAV. But this is just in this moment, because Marko Perisic announced in Madrid last week that we will have published Dynamics NAV 2018 at December 1st. This announced is mostly based on partners feedback and this is absolutely this what partners wanted. For now, SaaS solution will stay the same, with the same name and in the same countries (US, Canada and UK). But with this new NAV version, partners will get new solution and the most important, with this new NAV version they can start to use Visual Studio Code for Extensions v2. This is important because partners now can start immediately with new model of development and to be ready for the spring and new solution.

NAV##1

At the spring 2018, we will finally get already announced new product – Dynamics 365 “Tenerife”, but only as cloud SaaS solution. As on-prem solution, we will get Dynamics NAV 2018 R2, but with the same code base as Dynamics 365 “Tenerife”. In this moment I don’t know a reason why we will still have the same product with the different names ‘on cloud’ and ‘on prem’. But very soon, we will continue with only one name – currently code name Dynamics 365 ‘Tenerife’. System will have new modern web interface, sandbox and lot of new features (more about it in another post).

And ant the spring, we will get Dynamics 365 for Sales App with less features (ex Business Edition) and Dynamics 365 for Marketing as preview. Both of these products was presented on Directions and they really look nice and rich.

New Package – New Opportunities

As I said, I don’t want to write about all new features in the future release, but what with the whole package. The main idea is to stop to implement ERP and/or CRM; but to continue to implement full business solution. This is what clients need; they don’t care what part of system it is, the just need to solve their problems and their requirements. And as the new business solution, we will have Dynamics 365 as business solution who cover most of the potential client’s needs. That means we will not sell e.g. ERP, but solution. In this solution we will see what real requirements client has and implement adequate Apps with adequate level of features. Price will depend of this, but we will don’t know prices, because of lot of changes. By my opinion, very important is that now we can combine Apps from ex Business Edition and ex Enterprise Edition. With this we will have more agility in implementation process. And of course, all of this will be integrated with Common Data Service. And even better, we can use CDS for our integrations. We can use not only Dynamics 365 Apps, but also PowerApps, Flow, Office 365, Power BI, 3th party Apps… as the same business environment.

NAV##2

Conclusion

The final message is by my opinion very clear and very positive. For both partners and customers. Don’t afraid, Microsoft will not stop with this amazing product. Rebranding is not canceling. But with new name, we will get still the same powerful product, but with the great new opportunities as well.

I can write probably more, but I think this is more than enough as the first wrap up after two Directions. Future of our product is a clear.

Dynamics ERP and CRM Continue Together

I didn’t write a blog for a while, but these few days I’m on eXtreme 365 conference and I decided to share some observation. For some time, since there is a Dynamics 365 product family, we created a closer collaboration between ERP and CRM products. Generally, it was mostly based on technology.

But now, I see the next steps. First, more and more ERP partners try to learn more about CRM and the same situation is with CRM partners and ERP knowledge. Now, I’m at eXtreme 365 conference that was originally CRM conference, but from this year this is not only CRM conference. We have a lot of sessions about D365 for Financials, D365 for Operations, Common Data Service, PowerApps, Flow… And as I see, there are some NAV partners (and MVP’s as well J). Also, I saw announcement for Directions this year and there is a same situation, this will not be only NAV event and we will have CRM sessions as well.

IMG_1849

This is very important, because all of use started with thinking that we need to continue with both products together. And this is a huge opportunity for partners. This is opportunity for upselling and if they know both products they will be better on a market.

And about a conference. Great conference and great opportunity for networking. This is the first time I’m on some big conference that was not originally NAV conference and this is the great opportunity to see some new people, sometimes with different attitude. I also met some friends from a NAV world here and I can say this is a great mixture. I’m expecting something similar on Directions as well.

OK, in some next posts I’ll write more about some news with these products, but for sure we can expect more and more news in this world in next few months.