First I need to admit that I’m not big fan of this kind of certification. Based on my previous experience 10+ year ago, it was more about getting certificate and less about proving a real knowledge. I had an opportunity to meet a lot highly certified persons, but they couldn’t implement even the easiest projects. But still, partners wanted to invest in certification as some kind of knowledge proof.
But with new exams in the last few years things are slightly changed and I had opportunity to check them. But with these two new exams I’m talking about, things improved drastically. And I can say I’m really positive surprised.
First what I want to say is that I didn’t prepare myself for these two exams. And when I say ‘I didn’t prepare’, I mean it for real. I wanted to see if it is possible to pass these exams with real experience and practical knowledge. And I succeed! From my perspective this is the most important fact – if you are waring with these technologies and have a real practical knowledge, you can pass them without any problem. It still means you should be focused on questions as they can sometimes be complicated, especially when it comes to the case studies. I didn’t want to say these exams are easy as they are not, but you don’t need to prepare yourself if you know topics. But to be honest, you can still find a couple of useless questions, you really don’t need in practice, but even if you fail on some of them you will still have big chance to pass exams.
What I want to mention about BC exam is to be prepared with SaaS topics as this is very important. It is not enough to know only features in system, as you need to understand cloud concept as well. On the other side, when we talk about Power Platform, you should know both Canvas and Model-driven Power Apps, Power Automate as well as other Power Platform features (AI, Chat Bots…) and CDS. But this is what we imply with the Power Platform knowledge.
If you are newbie, in this case you need to learn for these exams. But good thing is that if you want to start, you can find everything you will need on the Learning Path site. But one small note, when you start to learn from Learning Paths, I often hear that there are not enough information and some of people often fail on exams. This is because, you need to open every link you have in your learning path as often you can find basic information in this part of text, but when you click on some links, you will be redirected to Microsoft docs site with all necessary information with related topic.
On the end I want to say THANKS to all people involved in preparation these two new exams as they made a good result. And for all of you who didn’t register for these exams, do it… you will not make mistake.
Recently I published an article about the functional areas covered with standard clean implementation of Business Central. But this is not the end as you can add much more features using built-in extend and integration features in Business Central. This picture is not a part of some official presentation, but this is my view on visualization and conceptual architecture of Business Central collaboration features (I’m suggesting to download this picture to see details in better resolution 2526×1370).
Extensibility
First when we start with only Business Central, we can say that this is completely solution with built-in security model, business processes and data validation. Even then, we can need more features and it is important to understand that you can easily extend its functionalities. You can do it using ISV solutions from AppSource, where you can find a lot of different solutions: Retail, Real Estate, Quality Management, Transportation, Payrolls… even different languages or localizations… Some of them are for free and for some of them you need to pay. But if you know AL language and if you have VS Code, you can easily build your own extensions and extend standard features with your customizations. My personal opinion is that every time you need industry specific solution, first try to find some ISV solution because it is probably already well proved in this industry. But if you cannot find it or this is not fit with your requirements you can build it with AL. If you don’t know how to do it, you can start with learning from here.
Collaboration
The most of experienced NAV people will be well prepared for customizations, but often they don’t know all integration and collaboration features. Because of that, very often I could see customizations in areas already covered with standard integration features. That is why I wanted to write about this topic. It is important to know that almost all integrations are done through API’s in Business Central. There are a lot of built-in API’s, but if you miss the for some of entities, it is not so complicated to create custom API. Let’s start with one of integration parts.
Office 365
Starting with the 2020 Wave 2, we can use Business Central inside the Microsoft Teams, where you just need to install an app from the Teams Store and this app will allow you to paste a link to any Business Central record into chat, and it will expand that into a compact card to share with your coworkers as well as to view card details, edit data, and take action without ever leaving Microsoft Teams… and soon you can expect even more.
Business Central Outlook add-in is well known for a while. With this add-in, you can see financial data related to customers and vendors, as well as create and send quotes and invoices from email or from meeting appointments. When you create document, you can even use AI for automatically recognition of text in your email body.
Business Central Excel add-in allows you to open any Business Central list in Excel respecting any filters on the page that limit the records shown or to edit in excel, where system will allow you to make changes to records in Excel and then publish the changes back to Business Central.
With Word you can be master of your outgoing documents, easily modifying documents layouts in Word and importing them back in Business Central where you don’t need to be a developer to change document layouts.
If your company uses the Bookings app, you can do bulk invoicing for appointments and it can be very useful. Unfortunately, based on my experience this integration is not used as it deserves.
You can use Microsoft Graph to access and manage your financials, work with your business contacts, and gain insights from your financial reports, all based on entities in the Business Central data platform. By integrating your apps with Business Central in Microsoft Graph, you can create experiences that span your business needs.
Power Platform
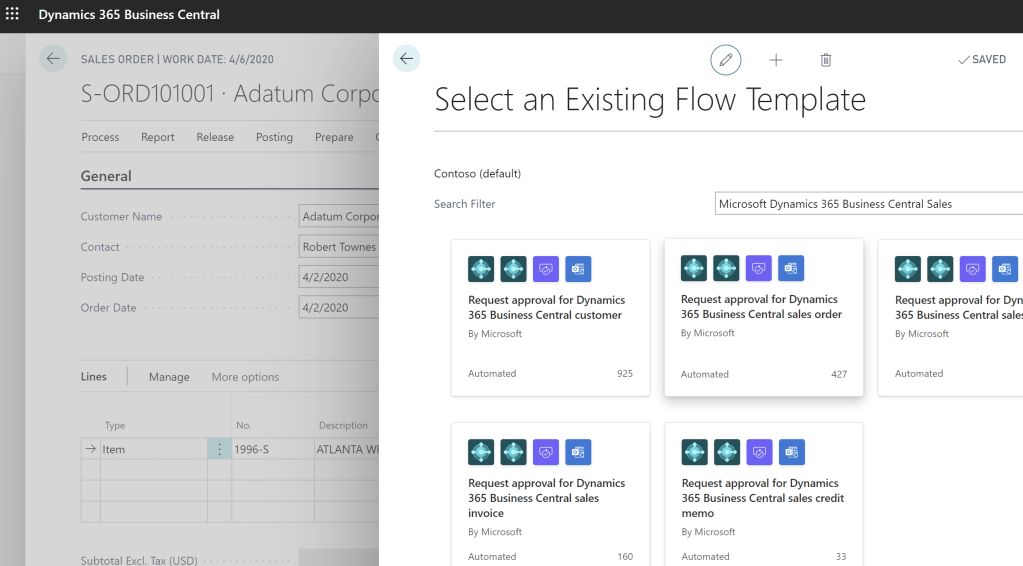
You can make your Business Central data available as a data source in Power Apps or PowerAutomate through available Business Central Connectors (online and onprem) based on exposed APIs in Business Central. If you need more, you can create your custom APIs and custom connectors based on them. Power Automate allows more using embedded flows in Business Central for approval process in many of documents and other entities.
With Power BI you can get insight your Business Central data. Power BI retrieves Business Central data through OData allowing you to build dashboards and reports based on that data. And even more, you can embed all those Power BI reports in Business Central and looking all those data visualizations without leaving your system.
Azure
Using Business Central you will find some Azure built-in features such as AI (Cash Flow Forecast, Inventory Forecast, Late Payment Prediction) and Cognitive Service (Items and Contacts recognitions).
But with Business Central you can also use some advance Azure features such as Azure Logic Apps or Azure Functions connecting them through available or custom connectors. And you are not limited only to these tools as you can use many of them with not so complicated integrations. My recommendation for all Business Central experts is to pass Azure Fundamental exams to learn more about available tools and services in Azure.
And on the end, you can connect SharePoint with Business Central using Microsoft SharePoint Connection Setup page in BC. This integration is not so complicated, and you just need to fill in a few fields, but unfortunately there is no official online documentation about this integration.
When I think about new Dynamics 365 Business Central (in the future, I’ll use only ‘Business Central’ or just ‘BC’) features, the first things in my mind are openness and integrations. Then one of the most common limits in Business Central (and in Dynamics NAV before) was lack of portal connected with the database. Of course, you could develop portal from the scratch or use one of existing solutions and develop integration… But what is common in both of these cases? You need to pay in the first case for development (not so cheap) and in the other case for IP or license (again not so cheap).
But with Power Platform we got something more. Now we have Power Portal and as you have Power Platform included in your user’s subscriptions, you don’t need to pay something more (minimum, not such a big amount of money). Only what you need to pay is using portal, but this is really not so costly (100USD per month for 100,000 page views for unauthenticated users or 200USD per month for 100 daily login sessions for authenticated users. More details here: https://powerapps.microsoft.com/en-us/pricing/). And yes… we have an issue here… Power Portal is based on Dataflex Pro (formerly known as Common Data Service). But this is an opportunity, not a limitation. And this is the topic of this whitepaper.
First as I already mentioned, this is necessary to build solution in Dataflex Pro and that means you need to create entity(ies) you want to connect with Business Central. That means you need to run Power Apps: https://powerapps.microsoft.com/. After that, I’ll continue with task. In this example, I’ll use Employee entity as we already have Employee table in BC.
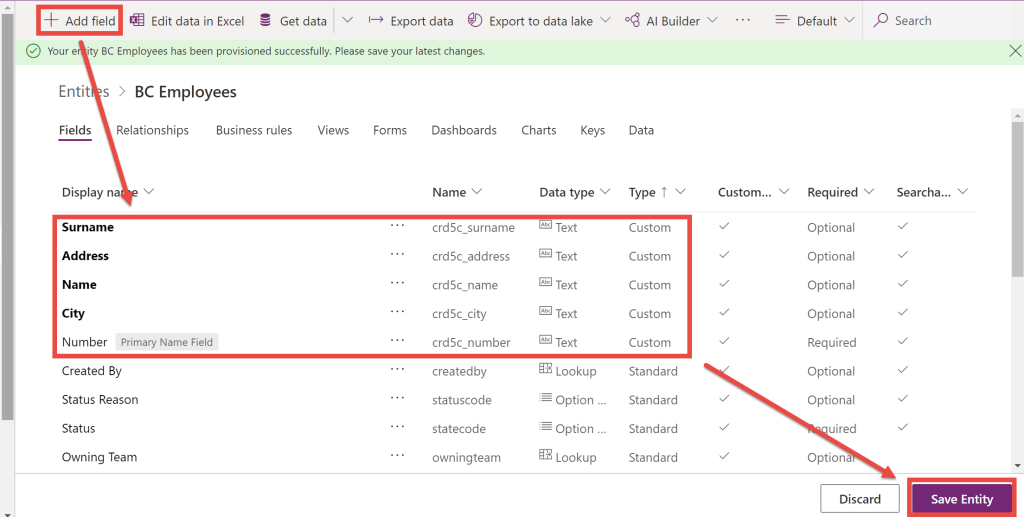
To do this, you need to start from Entities (Data > Entities in the left navigation pane) or you can start with Solutions and create new entity from there. In the new entity, enter Display name and enter primary name.
Click Done when you enter that. After that, you need to add new fields using Add fields command. When you finish with all fields, click Save Entity to save all changes.
When you finish with all details in creation of entity you can start with building connection with Business Central. But keep in the mind that you need to make something more here and we will come back later. Right now, only one thing you can add is Key just to avoid having duplicates and my recommendation is to copy keys from BC table.
From the Wave 1 2020, Business Central supports an integration by default with a set of entities in the Dataflex Pro default database, but you can make customization through extension and add more. For developing extensions that integrate Business Central with Dataflex Pro, system uses extensibility capabilities where proxies to Dataflex Pro tables can be created in Business Central, and these will be made extensible. This allows for custom attributes to be synchronized and for additional tables to be added to the default synchronization process.
When you create this extension, only what you need to do is mapping tables with entities as well as mapping fields in Business Central and Dataflex Pro.
Previous way of integration is native, but it requires some development knowledge. But what if you are not developer and still want to build portal based on Business Central? Do you think it is possible? Yes… this is an answer.
From the Entity page in Power Apps, just click Get Data and in the Power Query window choose OData tile. Go next and then you need to stop yourself there. You should move to the Business Central. Open Web services page and add page you want to use in synchronization. In our case, this is page 5200… just click New, as Objecttype choose Page and add this page number; enter Servicename you want to use and click on Publish field. Copy ODataV4URL value.
Move back to the Power Apps and in the Connection setting paste this value to the URL field. Choose Organizational account as an Authenticationkind. Confirm your credentials and go to the next page. Click Next until you open the following page.
Now you need to choose Load to existing entity option and in the Destinationentity choose entity you created (in my example BCEmployees).
In the Field mapping part of window (right side), you need to map fields from web service in Business Central as a Source column with Destinationfields (fields in our entity). When you finish it, just click Next and you will find a page where you can configure refresh settings. That means you need to choose how often system will synchronize data from Business Central web service to the entity. Click Create and you have been finished with integration.
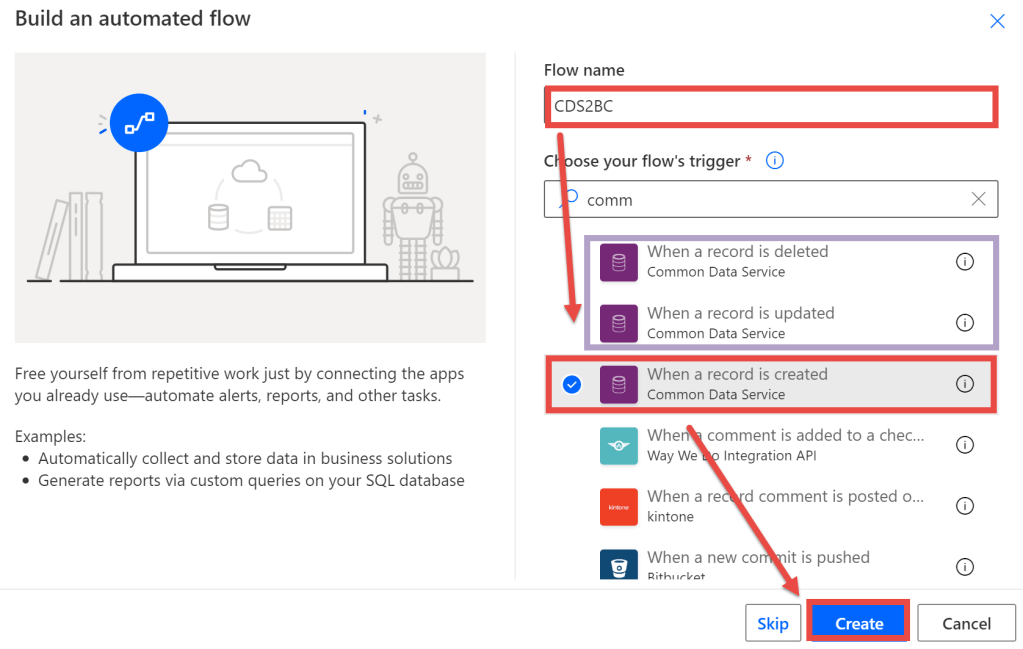
But something will miss here. As you are using just refresh model, that means you will get records from Business Central, but you cannot insert there. Actually, you can insert to entity, but system will not insert them to BC. To solve this, you can create very simply flow in Power Automate. Actually… you will need as many flows as you want actions.
You can see on previous picture that I chose When a record is created and it will be OK if you want to have only Insert from portal. But if you want more action, you need to use the following triggers:
For Modify – When a record is updated,
For Delete – When a record is deleted.
In this example you will see flow for inserting, but I think you can easily understand how to create two additional flows based on well-known parameters.
Keep in the mind that you need to use the following parameters in the trigger:
Environment – choose an environment you used for building solution in Power Apps
Entityname – entity you created
Scope – Organization
Now when you save it, your solution is finished. I would just like o mention that instead of web service integration you could choose API integration as well:
Configuration in both of cases is very similar and there is not a reason to repeat completely process.
Now when we made an integration using one of the models, we can continue with building our portal.
To finish with this process, we need to open Power Apps again and to start with creation new Power App. You can start from Home or from Create and you need to choose Portalfromblank option.
Enter the name of your portal and carefully choose Address for your portal. This is place where you can also choose a language.
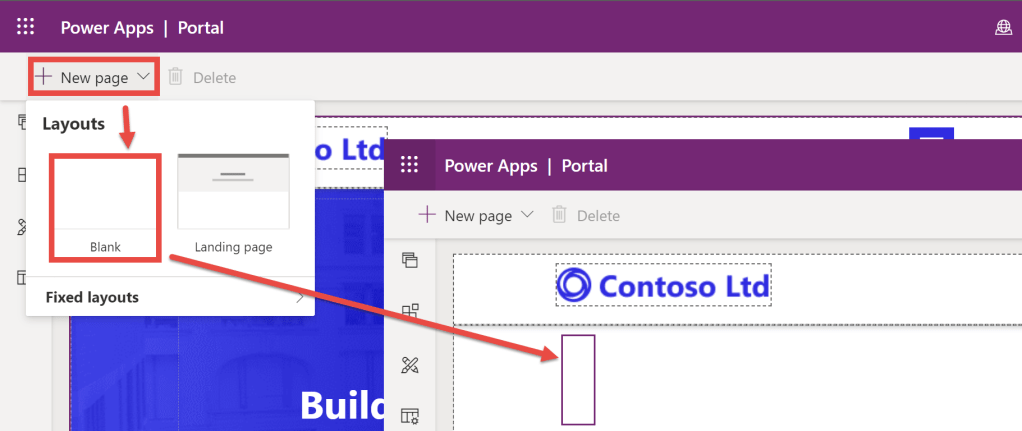
When you select Create, you need to be ready to wait some time until system create portal. It usually takes a few minutes, sometimes more, sometimes less… but be a patient. When an app is created, open it in the edit mode. You will see we have prebuilt portal, but we want to add new page with our data. To do this, select Newpage and choose Blank.
System will create new blank page and we need to add necessary components. Select Components icon in the left-side menu and locate List. This is logical if you want to start with a list view.
Now you need to configure some details. As we will create new component, choose Create new display and as Entity choose your entity (BC Employee in my example). The next important step is to choose a view as each entity has more views. I think that Active {items} are logical choice here.
OK, this is how we can create a list. But if you want to have possibilities to create new entry or to edit or delete it from here, you have an opportunity to do it immediately here. In the right-sided pane you will see a few options appear.
You can choose if you want to add the following features here: creating, viewing, editing and deleting. If you switch-on any of these options, you will get an opportunity to choose which form will be run to make this action. This is very easy for configuration, but what is important is that you need to have these forms already built.
OK, now you need to select Sync Configuration command to see result. But you can see that you have only two columns here in your list and this is not what you want. This is because, when system creates entity, views are created automatically but only with the main field plus Created On. But this is not problem as you just need to customize your view.
To customize view, you should go back to Power Apps and entity you previously created. There you need to select View tab and from the list of all view to select one you want to customize. In our case it is Active BC Employees.
When you open this view in edit mode, you need to add fields you want to see on your view. I’ll add Name, Surname, Address and City and resize it as I would like to see on the screen.
When you finish with adding and/or moving fields, you need to click first Save and after that Publish commands. Keep in mind that if you didn’t publish it you cannot use it.
Now we can say we finished with everything. Go back to the Power Apps and choose Apps on the left-side pane. You will see completely list of your apps. Just choose app (portal) you just created. When you run it, choose the page we created and that’s it. You can see the window in portal with our data from Business Central.
What happened with CDS, what is Microsoft Dataflex and what is difference in comparison with Dataflex Pro? Many of people went to Wikipedia and found DataFlex there…
I will try to avoid any additional confusing on this topic and try to be very short and very clear.
First, DataFlex you found on Wikipedia doesn’t have anything with Microsoft Dataflex (& Pro). You can go there and read what it is, but this is not my topic.
As the second fact, Microsoft Dataflex Pro is Common Data Service. Nothing more and nothing less. This is just rebranding. You can see that we still have old URL with common-data-service there. If you know CDS, you will know Dataflex Pro. If don’t, you can find a lot of materials on Microsoft learning site… and I’ll highly recommend starting to learn it if you are doing with Microsoft BizApps.
As this rebranding can confuse, I tried to create one timeline with all these changes. I’m not 100% sure I didn’t miss something, but it will be more then enough to understand what happened here.
And not as a third topic – Microsoft Dataflex (without ‘Pro’). What it is and what it isn’t? This is built-in, low-code data platform for Teams, and it is built atop the Common Data Service (or to use new name, atop the Microsoft Dataflex Pro 😊). This tool will help Teams users to easily build custom apps inside. You will not need to leave Teams and to build everything inside it with really user-friendly UI. You can build apps using Dataflex as environment and together with Power Apps, Power Automate and Power Virtual Agents. And this is not full CDS… this is just a subset of Dataflex Pro capabilities and usage is limited to within Teams.
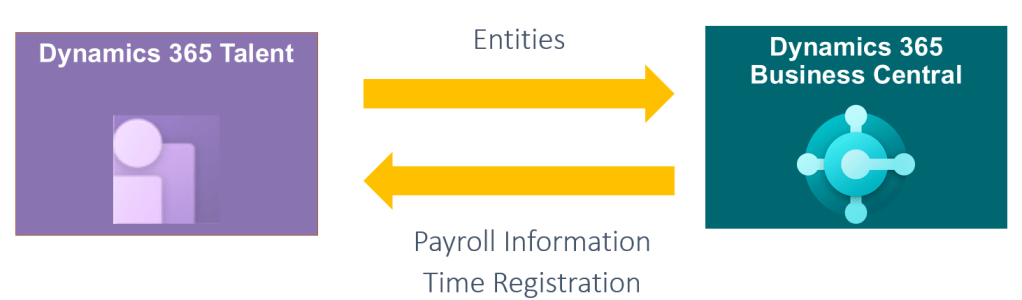
If you’ve already read my previous article about introduction in BC and Talent integration, then you probably expect the next part. I cannot put everything in one blogpost as it will be a huge one and it can be confused to track all details, so I decided to write it in parts. Today, I’ll write how to prepare Business Central and Talent and how to locate data/entities you will handle with.
As I’ve already mentioned in previous post, as we don’t need all HR capabilities in Business Central and we will use all of them in Talent, we will enter data directly to Talent and move to BC only data necessary for other areas in BC. We will move data to Employee table as this table will be used in other parts of BC.
As we will create new employees in Talent, we need to configure No. Series to be fit with Talent requirements. If you want automatic numbers, you need to be careful and to make it exactly the same as in Talent, but I’ll recommend to configure Employee number series as Manual Nos.; this will keep the same numbers in Business Central as we have in Talent and you will avoid all potential risks.
As connectors with Business Central, we will use API’s. Employee table, for example already exists as an API, but if you would like to connect something more, you will probably have to create custom API and custom connector.
What we can synchronize? As I said, minimum we need in BC is Employee table. And you need to find entity as a source in CDS (I’ll explain later). You can connect entities as following:
If you want to find all details about Workers data in Talent, the best is to use the following Worker entity relationship model. But the best is to integrate only what is really necessary… only what you will really use in Business Central.
As we need to locate Talent entities, you need to open list of CDS entities in PowerApps platform (you don’t need to do nothing in Talent environment and you can use it only if it will help you to better understand environment; for all integration purpose you will use CDS – PowerApp). When you open PowerApps web page, you need to choose environment created for Talent.
After that, you need to open Data and Find Entities. In Entities, you can easily find Worker entity as this is a place where we can find our information.
Opening this entity, you can address all necessary fields you want to use in integration. And how to do it, you will see in the following post.
When I think about new Business Central features, the first thing in my mind is openness for integrations. As a part of Dynamics 365 family, the main power of this solution is when it can work simultaneously with other. Because of that, I showed these capabilities in a few conferences. As I got lot of requirement to explain it in more details, I’ll write about good example of BC integrations with one other Dynamics 365 solution – with ‘Dynamics 365 Talent’.
‘Dynamics 365 Talent’ is a new Microsoft Dynamics HCM solution (new name ‘Dynamics 365 Human Resources‘). This solution was initially based on AX HRM, but now it is separated solution. As we can use it independently and this solution is really amazing HCM system, I think it can be interesting how we can integrate this solution with Business Central and make them as the powerful tool together… and with no code.
If you are thinking how to make it and how to make it with no code, the answer is using one of the Azure services – Logic Apps. As ‘Dynamics 365 Talent’ has entities on CDS and Logic Apps has connectors for CDS and for ‘Business Central’, only what we need to do is to map entities and fields in both systems and of course, to think abut business logic on the first place. Depends what is the primary reason for integration, we can choose some of the options:
integrate HRM core system with HR in Business Central
integrate Attract or Onboard apps in Talent with Business Central.
In second option, we will use HR module in Business Central and use only one or two parts from ‘Dynamics 365 Talent’. On the other side, in first option we will use core HR in ‘Dynamics 365 Talent’. In this text, I chose to explain the first option.
In this first text, I’ll just explain some basic concepts and you will find more details in the following texts with this topic.
Basic setup in Business Central
First, as we don’t need all HR capabilities in Business Central (we already have all of them in dedicated HR solution – ‘Dynamics 365 Talent’), we will move only data necessary for other areas in Business Central. In this example I’ll show how to move data to Employee table as this table can be used for example in a Payroll system or you can use this information in Fixed Assets card.
Locate information in Talent
Now when we have the basic configurations, we can continue with integration. First, we need to find where an employee’s data are saved in Talent. To find this we need to open list of CDS entities and we can do it using PowerApps platform.
When we have these basic information, we can continue with technical parts how to do it in a practice.
A few days ago, after the first day and first keynote of Directions NA, I’ve posted Business Central roadmap. But now after this event has finished, we can find updated roadmap for our NAV successor – Dynamics 365 Business Central and it looks very interesting:
I’ll wait Directions EMEA to collect all information and write more detailed about this, but from my point of few, big changes are coming in two years and this is the last moment to change some old habits and to continue our journey in modern business applications.
In a last period, I’ve got a lot of questions about how to make a proper licensing for Dynamics 365 for Talent. As it is a new solution, it is understandable. As I’ve already wrote a few articles about this product, I think I can help with some answers.
The first and very important, all users in this solution are named users. And if we speak about HR core part, we have two different user types and you can buy them on two separate ways. We have Full Users with total access to all HR core application and we have Team Members with very limited access (mostly, but not only for read tasks).
As I mentioned Full Users (Talent Users) can be bought on the following ways:
as a regular Talent User (you must take minimum 5 users) for 40 USD
buying Dynamics 365 for Finance and Operations, i.e. you will get full Talent Users buying Unified Operation (for 190 USD) or full Dynamics 365 Plan (for 210 USD); in both cases you will get much much more than just Talent, but Talent will be part of your completely system.
If we are speaking about Team Members, you can buy them for 8 USD, but again you will not get only access to Talent with them, but also to all other Apps in Dynamics 365 package. As I mentioned, Team Member are not limited only with read rights, because you can use them for example as employee for Employee Self Service.
OK, but this is not the end. Recently, Microsoft announce two additional AI Apps for Talent (Attract and Onboard) and that means if you want to use them, you first must be a regular Talent User. Then, you can subscribe them. Price is 8 USD for each of them separately or if you want both, price will be 12 USD in total.
And again, this is not the end. Actually, it doesn’t mean it must be the end. Why? Because if you want to customize something. As you already know (I hope), this App is full SaaS and you cannot just open a code and change it. If you want to change something on forms and similar, you can do it using PowerApps. In this case person who will make these customizations must have PowerApps Plan 2 (40 USD) license, but other users who will use these forms, have to have minimum PowerApps Plan 1 (7 USD) license. That means, not all users, only these who will use these new features. And just to know, if you are buying some Dynamics Plan, you will get PowerApps for free.
And again, it is similar situation if you want to use PowerBI for additional reports or Flow for additional workflows.
I hope I covered all models of licensing here. But just keep in mind, it is possible to be some changed, because it is a new App in Dynamics 365 family and with new releases, it is possible to be some changes. And I didn’t mentioned, but just to be sure: all pries are on monthly basis.
This year I’ll start with my sessions little bit earlier then usually. My first conference where I’ll have a lecture will be eXtreme in Dubrovnik. In a past, this conference was mainly for the Dynamics CRM solutions, but from the 2017., we have not only CRM, but AX, NAV… as well.
Hi, for all of you who want to learn how to use Dynamics NAV and Dynamics 365 for Financials with Microsoft Flow in a practice, I’ll provide webinar together with NAVUG.
Today I just want to share this information with you and I’ll keep you in touch. Soon more on NAVUG web site. For now, just to save a date, it will be at Wednesday, February 14, 2018 (9:00AM-10:00AM EST).