How to Build Power Portal connected with Business Central

Introduction

When I think about new Dynamics 365 Business Central (in the future, I’ll use only ‘Business Central’ or just ‘BC’) features, the first things in my mind are openness and integrations. Then one of the most common limits in Business Central (and in Dynamics NAV before) was lack of portal connected with the database. Of course, you could develop portal from the scratch or use one of existing solutions and develop integration… But what is common in both of these cases? You need to pay in the first case for development (not so cheap) and in the other case for IP or license (again not so cheap).

But with Power Platform we got something more. Now we have Power Portal and as you have Power Platform included in your user’s subscriptions, you don’t need to pay something more (minimum, not such a big amount of money). Only what you need to pay is using portal, but this is really not so costly (100USD per month for 100,000 page views for unauthenticated users or 200USD per month for 100 daily login sessions for authenticated users. More details here: https://powerapps.microsoft.com/en-us/pricing/). And yes… we have an issue here… Power Portal is based on Dataflex Pro (formerly known as Common Data Service). But this is an opportunity, not a limitation. And this is the topic of this whitepaper.

Start with building entities in Power Platform

First as I already mentioned, this is necessary to build solution in Dataflex Pro and that means you need to create entity(ies) you want to connect with Business Central. That means you need to run Power Apps: https://powerapps.microsoft.com/. After that, I’ll continue with task. In this example, I’ll use Employee entity as we already have Employee table in BC.

To do this, you need to start from Entities (Data > Entities in the left navigation pane) or you can start with Solutions and create new entity from there. In the new entity, enter Display name and enter primary name.

Click Done when you enter that. After that, you need to add new fields using Add fields command. When you finish with all fields, click Save Entity to save all changes.

When you finish with all details in creation of entity you can start with building connection with Business Central. But keep in the mind that you need to make something more here and we will come back later. Right now, only one thing you can add is Key just to avoid having duplicates and my recommendation is to copy keys from BC table.

Connecting Business Central with portal

OK, connection with the Business Central can be done on a few different ways and I’ll try to explain all of them here.

Business Central customizing an integration with Common Data Service

From the Wave 1 2020, Business Central supports an integration by default with a set of entities in the Dataflex Pro default database, but you can make customization through extension and add more. For developing extensions that integrate Business Central with Dataflex Pro, system uses extensibility capabilities where proxies to Dataflex Pro tables can be created in Business Central, and these will be made extensible. This allows for custom attributes to be synchronized and for additional tables to be added to the default synchronization process.

When you create this extension, only what you need to do is mapping tables with entities as well as mapping fields in Business Central and Dataflex Pro.

I don’t want to write in details how you can do it as Microsoft already published completely documentation how to build this kind of extension and how to configure it. For more details, open this page: https://docs.microsoft.com/en-us/dynamics365/business-central/dev-itpro/administration/administration-custom-cds-integration.

When you finish with developing an extension, you can find here how to map tables and fields: https://docs.microsoft.com/en-us/dynamics365/business-central/admin-how-to-modify-table-mappings-for-synchronization.

When you connect entities in Dataflex Pro and Business Central, you can continue with building Power Portal.

Integration using webservices and Power Automate

Previous way of integration is native, but it requires some development knowledge. But what if you are not developer and still want to build portal based on Business Central? Do you think it is possible? Yes… this is an answer.

From the Entity page in Power Apps, just click Get Data and in the Power Query window choose OData tile. Go next and then you need to stop yourself there. You should move to the Business Central. Open Web services page and add page you want to use in synchronization. In our case, this is page 5200… just click New, as Object type choose Page and add this page number; enter Service name you want to use and click on Publish field. Copy OData V4 URL value.

Move back to the Power Apps and in the Connection setting paste this value to the URL field. Choose Organizational account as an Authentication kind. Confirm your credentials and go to the next page. Click Next until you open the following page.

Now you need to choose Load to existing entity option and in the Destination entity choose entity you created (in my example BCEmployees).

In the Field mapping part of window (right side), you need to map fields from web service in Business Central as a Source column with Destination fields (fields in our entity). When you finish it, just click Next and you will find a page where you can configure refresh settings. That means you need to choose how often system will synchronize data from Business Central web service to the entity. Click Create and you have been finished with integration.

But something will miss here. As you are using just refresh model, that means you will get records from Business Central, but you cannot insert there. Actually, you can insert to entity, but system will not insert them to BC. To solve this, you can create very simply flow in Power Automate. Actually… you will need as many flows as you want actions.

You can see on previous picture that I chose When a record is created and it will be OK if you want to have only Insert from portal. But if you want more action, you need to use the following triggers:

  • For ModifyWhen a record is updated,
  • For DeleteWhen a record is deleted.

In this example you will see flow for inserting, but I think you can easily understand how to create two additional flows based on well-known parameters.

Keep in the mind that you need to use the following parameters in the trigger:

  • Environment – choose an environment you used for building solution in Power Apps
  • Entity name – entity you created
  • ScopeOrganization

Now when you save it, your solution is finished. I would just like o mention that instead of web service integration you could choose API integration as well:

Configuration in both of cases is very similar and there is not a reason to repeat completely process.

Building a portal

Power Portal

Now when we made an integration using one of the models, we can continue with building our portal.

To finish with this process, we need to open Power Apps again and to start with creation new Power App. You can start from Home or from Create and you need to choose Portal from blank option.

Enter the name of your portal and carefully choose Address for your portal. This is place where you can also choose a language.

When you select Create, you need to be ready to wait some time until system create portal. It usually takes a few minutes, sometimes more, sometimes less… but be a patient. When an app is created, open it in the edit mode. You will see we have prebuilt portal, but we want to add new page with our data. To do this, select New page and choose Blank.

System will create new blank page and we need to add necessary components. Select Components icon in the left-side menu and locate List. This is logical if you want to start with a list view.

Now you need to configure some details. As we will create new component, choose Create new display and as Entity choose your entity (BC Employee in my example). The next important step is to choose a view as each entity has more views. I think that Active {items} are logical choice here.

OK, this is how we can create a list. But if you want to have possibilities to create new entry or to edit or delete it from here, you have an opportunity to do it immediately here. In the right-sided pane you will see a few options appear.

You can choose if you want to add the following features here: creating, viewing, editing and deleting. If you switch-on any of these options, you will get an opportunity to choose which form will be run to make this action. This is very easy for configuration, but what is important is that you need to have these forms already built.

OK, now you need to select Sync Configuration command to see result. But you can see that you have only two columns here in your list and this is not what you want. This is because, when system creates entity, views are created automatically but only with the main field plus Created On. But this is not problem as you just need to customize your view.

View customization

To customize view, you should go back to Power Apps and entity you previously created. There you need to select View tab and from the list of all view to select one you want to customize. In our case it is Active BC Employees.

When you open this view in edit mode, you need to add fields you want to see on your view. I’ll add Name, Surname, Address and City and resize it as I would like to see on the screen.

When you finish with adding and/or moving fields, you need to click first Save and after that Publish commands. Keep in mind that if you didn’t publish it you cannot use it.

Test

Now we can say we finished with everything. Go back to the Power Apps and choose Apps on the left-side pane. You will see completely list of your apps. Just choose app (portal) you just created. When you run it, choose the page we created and that’s it. You can see the window in portal with our data from Business Central.

What happened with CDS and what’s the hell is Dataflex?

Two days ago when we started with Microsoft Inspire, Charles Lamanna published new blog post about Introducing Microsoft Dataflex, a new low-code data platform for Microsoft Teams. But he also announced that Common Data Service has now been renamed to Microsoft Dataflex Pro… and everybody were confused.

What happened with CDS, what is Microsoft Dataflex and what is difference in comparison with Dataflex Pro? Many of people went to Wikipedia and found DataFlex there…

I will try to avoid any additional confusing on this topic and try to be very short and very clear.

First, DataFlex you found on Wikipedia doesn’t have anything with Microsoft Dataflex (& Pro). You can go there and read what it is, but this is not my topic.

As the second fact, Microsoft Dataflex Pro is Common Data Service. Nothing more and nothing less. This is just rebranding. You can see that we still have old URL with common-data-service there. If you know CDS, you will know Dataflex Pro. If don’t, you can find a lot of materials on Microsoft learning site… and I’ll highly recommend starting to learn it if you are doing with Microsoft BizApps.

As this rebranding can confuse, I tried to create one timeline with all these changes. I’m not 100% sure I didn’t miss something, but it will be more then enough to understand what happened here.

And not as a third topic – Microsoft Dataflex (without ‘Pro’). What it is and what it isn’t? This is built-in, low-code data platform for Teams, and it is built atop the Common Data Service (or to use new name, atop the Microsoft Dataflex Pro 😊). This tool will help Teams users to easily build custom apps inside. You will not need to leave Teams and to build everything inside it with really user-friendly UI. You can build apps using Dataflex as environment and together with Power Apps, Power Automate and Power Virtual Agents. And this is not full CDS… this is just a subset of Dataflex Pro capabilities and usage is limited to within Teams.

As I said I’ll be short, I don’t want to write details about it and I’ll just recommend to read Charles Lamanna blog post about it and to find some good presentations on Microsoft Inspire digital event: https://powerapps.microsoft.com/en-us/blog/introducing-microsoft-dataflex-a-new-low-code-data-platform-for-microsoft-teams/.

Business Central Certification Exam and more…

Yesterday on the first day of Microsoft Inspire (this year in digital format), we had an opportunity to see some long time waited news. We will finally have certification exam for Business Central. It will be MB-800 exam – Microsoft Dynamics 365 Business Central Functional Consultant and this exam will be available from October 2020. It will cover the following processes of implementation: set up Business Central, configure Financials, configure Sales and Purchasing, set up operations, and of course how to use Power Platform components. More about the exam here. When you pass this exam, you will become Microsoft Dynamics 365 Business Central Functional Consultant Associate.

But this is not all. We have more news in certifications. As Power Platform takes more and more spaces in solving business issues, we will get two new exams for Power Platform and they will be available from September 2020:

Business Central API’s and Available Methods

If you use API’s in Business Central, probably you found some limitations in methods, depending on API to API. Sometimes you can do more, sometime less. For example, with Accounts you can use only GET method (I still don’t understand why?), and so on…

You can find details about all of them here, but I prefer to have everything on one place as it will be easier to decide if I would use standard API or eventually I need to create the custom one. Because of that, I’ve made this matrix with all standard API’s and methods you can use with them:

Except these limitations, it would be nice to know that you have some other limits as well and they are important if you want to use API’s in some solutions. Even if those limits are high, they are still limits. For example, you can have maximum 600 requests per minute in production environment and 300 in sandbox. Complete list of limits is here.

And what is also important? If you are using those API’s through Power Platform (or Logic Apps) connectors, you should understand their actions and parameters. All details can be found here, but there is a table for better understanding:

It is important to mention that all that information are subject of change.

How to integrate Business Central with Dynamics 365 Talent – part 3 (inserting data with LogicApps)

The last days of the previous year, I’ve started with blog series how to integrate Business Central with Dynamics 365 Talent (now Dynamic 365 Human Resources). I wanted to show how to integrate these two solutions without code, using only available services.

I’ve started with the first post, with an overview and then continue with the second one where I explained how to configure both solutions. Now I would like to continue with the third part where I’ll explain integration tools we can use.

Generally, you can use Flow (Power Automation) or Azure Logic Apps. Personally, for this purpose I prefer Logic Apps. There are many reasons for this, and I’ll show the basic comparison between these two solutions:

I don’t want to say Flow is not good solution as I enjoy in using it, but for this purpose (integration) I think Logic Apps is much better choice.

To use Logic Apps, first you must have an Azure subscription. When you open an Azure portal, you can easily find Logic Apps using a search feature. Create a new Logic Apps using Add command.

If you already used Microsoft Flow, you will find that Logic Apps are very similar, but as this is on the first place Azure service, you have to make some basic configuration as a choosing a service Name, what Subscription you want to use, Resource Group and Location for your service.

Then you just need to click on Create and wait a few seconds. If you still don’t see new service, probably you need to hit Refresh and new service will appear. When a new service is created, you need to open it and start creating a flow. System will open Logic Apps Designer and you can start with a Blank Logic App button scrolling little bit down (if this is your first time with Logic Apps, I can recommend to look the introducing video before you start). Do not forget that you need to have already deployed Business Central and Talent and created Talend entities in CDS (check in PowerApps with Data tab).

On the first sight you will see it obviously look like very similar as Microsoft Flow (Power Automation). First you need to start with a trigger, and as there is not trigger for Talent, you need to find ‘Common Data Service’ trigger – ‘When a record is created’. Yes, the first Logic App will be for inserting new data, but to complete this process, minimum necessary will be to make a Logic App for update as well.

Now you need to sign in to create a connection to Common Data Service. You will use credentials you used for Talent and CDS. When you finish with signing in, choose an environment where you have installed Talent and Workers as an entity name. On the end, add Organization as a Scope.

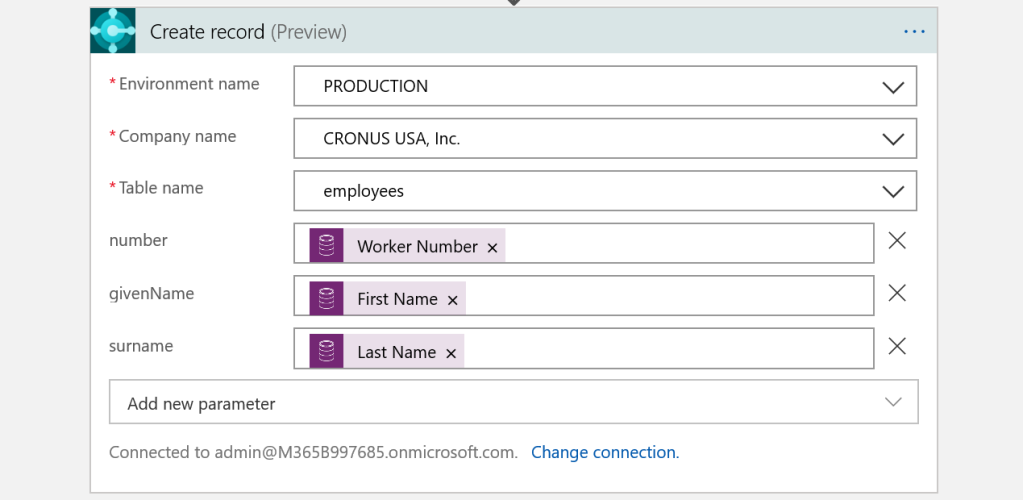
In a new step, you need to make an action. For this purpose, you need to choose Business Central and find ‘Create record’ action. When you sign in, first you need to choose if you want to use Production or some other environment and after that you need to choose a company name and as a Table name choose Employees (this is an API from Business Central).

On the end you just need to connect fields. To do this you need to click on Add new parameter and to choose Business Central fields you want to use for integration. Minimum you have to use are number, givenName and surname. Now you need to connect BC with Talent data i.e. Given Name (from Talent) to First_name, Surname to Last_name…

Click Save and as this is a service, do not forget to click Run. Only now, your Logic App is ready for using.

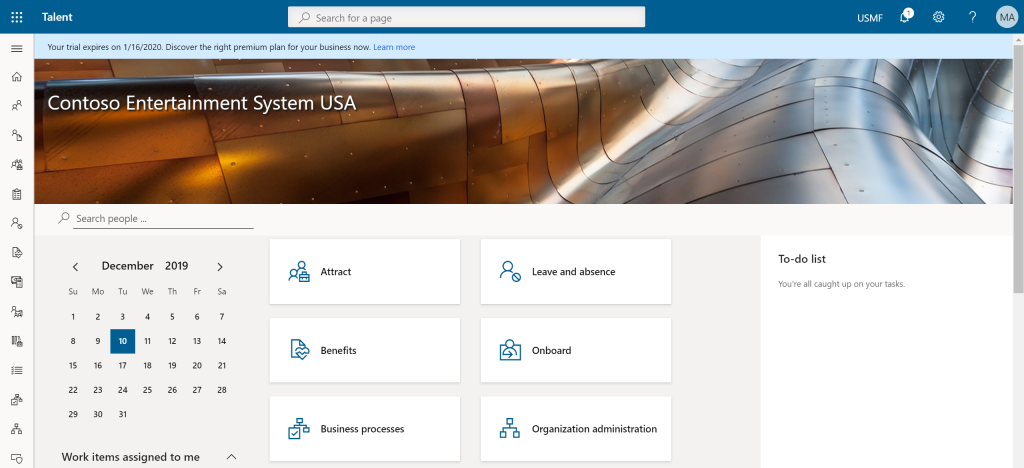
Be careful here with choosing fields for integration… you can try to integrate more fields here, but it cannot be useful. The answer on your question is when you create new record to the Worker entity in Talent, only a few field will be treated as an insert and the most of them will be treated as an update. Look at the last image where I’ll create new record… only these field you see are treated as an insert.

When you click Hire and add details, all other values you will add will be treated as an update. Because of that, you will see that created new Logic App for updating is absolutely necessary. But I’ll explain more about this in my next post.

But right now, you can create new Worker in Talent and you will see that system created new Employee in Business Central immediately.

How to integrate Business Central with Dynamics 365 Talent – part 1 (Introduction)

When I think about new Business Central features, the first thing in my mind is openness for integrations. As a part of Dynamics 365 family, the main power of this solution is when it can work simultaneously with other. Because of that, I showed these capabilities in a few conferences. As I got lot of requirement to explain it in more details, I’ll write about good example of BC integrations with one other Dynamics 365 solution – with ‘Dynamics 365 Talent’.

‘Dynamics 365 Talent’ is a new Microsoft Dynamics HCM solution (new name ‘Dynamics 365 Human Resources‘). This solution was initially based on AX HRM, but now it is separated solution. As we can use it independently and this solution is really amazing HCM system, I think it can be interesting how we can integrate this solution with Business Central and make them as the powerful tool together… and with no code.

If you are thinking how to make it and how to make it with no code, the answer is using one of the Azure services – Logic Apps. As ‘Dynamics 365 Talent’ has entities on CDS and Logic Apps has connectors for CDS and for ‘Business Central’, only what we need to do is to map entities and fields in both systems and of course, to think abut business logic on the first place. Depends what is the primary reason for integration, we can choose some of the options:

  • integrate HRM core system with HR in Business Central
  • integrate Attract or Onboard apps in Talent with Business Central.

In second option, we will use HR module in Business Central and use only one or two parts from ‘Dynamics 365 Talent’. On the other side, in first option we will use core HR in ‘Dynamics 365 Talent’. In this text, I chose to explain the first option.

In this first text, I’ll just explain some basic concepts and you will find more details in the following texts with this topic.

Basic setup in Business Central

First, as we don’t need all HR capabilities in Business Central (we already have all of them in dedicated HR solution – ‘Dynamics 365 Talent’), we will move only data necessary for other areas in Business Central. In this example I’ll show how to move data to Employee table as this table can be used for example in a Payroll system or you can use this information in Fixed Assets card.

Locate information in Talent

Now when we have the basic configurations, we can continue with integration. First, we need to find where an employee’s data are saved in Talent. To find this we need to open list of CDS entities and we can do it using PowerApps platform.

When we have these basic information, we can continue with technical parts how to do it in a practice.

Sessions from NAV TechDays – day 2

As I’ve promised a few days ago in my previous post, I’m completing the collection of all session from NAV TechDays 2019.

Let’s see what we had in the second day of this amazing NAV/BC event:

Leveraging the power of the cloud

Build, test, deploy and deliver your app by one file

NAV/BC for high demanding environments

{Connect app}²

Business Central with Power Platform – more than ERP solution

…and of course, this is my session where I’ve talked about PowerPlatform with BC together with an MVP Renato Fajdiga… expect feedback here 🙂

The Power Platform for Business Central Techies

If you liked my and Renato session, I’ll highly recommend to continue with this session from Arend-Jan Kauffmann.

Make the most out of Business Central on Docker

Migrate your customers to the cloud, and manage them there

How to make AI work for your Business… Central

Sessions from NAV TechDays – day 1

NAV TechDays 2019 has just finished a few days ago and I can say this was amazing event and again the biggest one – with 1452 attendees. As I promised the last year, I prepared session this time and made it together with an MVP Renato Fajdiga. I hope to see you next year again.

In a meantime, all sessions from the first day are already published and I want to have all of them on the one place. As soon as we have sessions from the second day published, I’ll add them. There are all of them:

Opening Keynote

The road from C/AL to AL

Development Methodologies for the future

How to run faster in SaaS

Unlocking new integration potential for 365 BC with Azure Event Grid and Azure Integration

Give Business Central access to your data files

Control Add in development supercharged

Developing for Modern clients

Using Docker and the ContainerHelper to convert your C/AL solution to an AL solution

#MSDyn365BC new Era of Integration: Intelligent Edge, SmartLists, Azure Service Bus and more!

Dynamics 365 April ’19 Release Notes

Today, the newest release notes for April 2019 has just been published. You can find details regarding all Dynamics 365 solutions, Power Platform and even more.

If you want to read all details, you can do it using the following link: https://docs.microsoft.com/en-us/business-applications-release-notes/April19/. You can navigate there very easy and find what you are interesting for.

After this first document, you can expect the following until the April and release official announcement:

  • February 1st – Preview will be available
  • February 21st – Update of release notes
  • April 2nd – Virtual launch event
  • April 5th – General availability

For now, read it and enjoy…

Dynamics 365 Business Central Licensing

As we already had insight in Dynamics 365 Business Central and this solution will be available in only three days, it is a moment to get more information about licensing. In this post I’ll show only the basic important topics regarding licensing.

As we already know, there are three licensing types Premium, Essential and Team Members. Premium and Essential will provide full access to solution, but not to the same level of features. Essential has most of the future, but not Manufacturing and Service Management (this is included in Premium package). And very important thing is that we cannot use a mix of these two user types. You must choose what level of features you need and all full users must use the same license type.

D365BC licenses.PNG

As a Team Member, you can do the following:

  • Read anything within Dynamics 365 Business Central
  • Update existing data and entries in Dynamics 365 Business Central – existing data are records like customer, vendor or item records which are already created. Entries means entries on which it is specifically allowed from an accounting perspective to update specific information. (e.g. due date on customer ledger entries)
  • Approve or reject tasks in all workflows assigned to a user
  • Create, edit, delete a quote
  • Create, edit, delete personal information
  • Enter a time sheet for Jobs
  • Use PowerApps for Dynamics 365

And more, it is important to know that the minimum number of full users is 1 and w don’t have a maximum number of users (you can register number of users you need). But keep in mind, we are talking about named users, not concurrent.

And Dynamics 365 Business Central Essential, Dynamics 365 Business Central Premium and Dynamics 365 Business Central Team Members also includes the PowerApps for Dynamics 365 Applications license.

Dynamics 365 Business Central users are not provided with any standalone or general-purpose Power BI license or use rights, but this subscription includes an option to embed Power BI content as a product feature but require users to subscribe to Power BI separately to configure access to this content.

And with a question what we have more included, this is important table:

D365BC environment

Customers who wish to expand beyond the default subscription capacity included in Dynamics 365 Business Central will need to have a separate Azure subscription.

But on the end as very important: please do not use this article as license manual. If you need more details for licensing of real or potential customers, please use an official Dynamics 365 Business central Licensing Guide.