We are close to the end of this year, and we mostly have important conference dates for the following year. I would like to have all Dynamics 365 (and/or Power Platform) conferences in one place, with all dates planned for 2024. So, you can find them here and start planning your attendance as most of them have early bird:
If you are a Dynamics 365 Marketing user, you may have already seen that you can trigger Power Automate in your Marketing Journey (Real-Time Marketing). And why is this a good thing? Power Automate allows users to create, update and delete records and can assign records or complex pass-through processes.
There are several actions you have to do before you can trigger Power Automate through Marketing App.
Let’s see all steps necessary to perform before you start using Power Automate together with Dynamics 365 Marketing app.
First, you must create a Customer Journey in Real-Time Marketing.
I have created a simple Journey that starts with a Segment and has only one stage, after which Power Automate will be triggered. But you can create as many stages before initiating Power Automate.
You need to take care of time when you want to start this Journey. Of course, you are not obligated to use Segment as I did. Still, this was the easiest way to show you how to start using Power Automate in your day-to-day Marketing Journeys.
After choosing the Segment, we will continue with the Journey creation.
What we have to do next is to add a new action to our Journey, which will activate a Custom Trigger.
The system will give you one lookup file where you can choose some of the previously created triggers, and then you can use one trigger for multiple Journeys.
But now we will choose to create a new one. When you choose New Trigger, the popup window will open, and you will start defining your trigger.
Here you define some of the usual things like Name and Description, but the critical part for Power Automate is where you define Attributes.
Suppose you have been creating Manually Triggered Flow or Power Automate from the Canvas app for example, or just triggered based on Power Automate. In that case, this is how we get values and proceed them through Power Automate.
This is where you will define key attributes you need to use from this Journey in your Power Automate.
I have created one attribute named First Name for this purpose, but be free and create as much as you need for your Journey.
After defining attributes, finish through the wizard, and you will be able to come back to Journey Form.
Now when you are on the Journey, you must do some mapping.
This is one of the most critical parts because you map your attributes to the fields on Entity/Table.
This is too last step before we go to Power Automate.
Because we had only First Name and Table is Contact, and I have found just my Field in the list of Fields. Just be aware that you must map all attributes you have defined.
And this is the end of the Marketing part.
Now we are going to create one Power Automate.
First, go to the Power Automate page, Name your Flow as you like, and choose Datavesr – When Action is Performed as Trigger.
So in the following screenshot, you will have to be careful what you are choosing.
Catalog > Cxp
Category > Custom
Table name > (none)
Action Name > Choose your action
And the next thing is to continue with Power Automate creation.
I will add a new step where I will use data from our attribute definition. But you can, from now on, create new records, update records, send an email notification, send approvals, work with all connectors in Power Automate, and make the best possible Journey and the best possible steps which have to be automated after your Journey pass.
When you finish with Power Automate creation, Save it and Close it, and return to your Customer Journey Page in Marketing, where you can Publish your Journey and wait for the magic to happen.
I hope that this feature in Dynamics 365 Marketing will allow you to create more complex and more customer-oriented Marketing Jounies, which will allow you to deliver better content to your clients. After all, Power Automate is a really powerful tool that can bring a lot of new ideas, which now can be achieved together with Dynamics 365 Marketing Real-Time Jounies in day-to-day use for Marketing experts.
We are close to the end of this, and we mostly have important conference dates for the following year. I would like to have all Dynamics 365 (and/or Power Platform) conferences in one place, with all dates planned for 2023. So, you can find them here and start planning your attendance as most of them have early bird:
First I need to admit that I’m not big fan of this kind of certification. Based on my previous experience 10+ year ago, it was more about getting certificate and less about proving a real knowledge. I had an opportunity to meet a lot highly certified persons, but they couldn’t implement even the easiest projects. But still, partners wanted to invest in certification as some kind of knowledge proof.
But with new exams in the last few years things are slightly changed and I had opportunity to check them. But with these two new exams I’m talking about, things improved drastically. And I can say I’m really positive surprised.
First what I want to say is that I didn’t prepare myself for these two exams. And when I say ‘I didn’t prepare’, I mean it for real. I wanted to see if it is possible to pass these exams with real experience and practical knowledge. And I succeed! From my perspective this is the most important fact – if you are waring with these technologies and have a real practical knowledge, you can pass them without any problem. It still means you should be focused on questions as they can sometimes be complicated, especially when it comes to the case studies. I didn’t want to say these exams are easy as they are not, but you don’t need to prepare yourself if you know topics. But to be honest, you can still find a couple of useless questions, you really don’t need in practice, but even if you fail on some of them you will still have big chance to pass exams.
What I want to mention about BC exam is to be prepared with SaaS topics as this is very important. It is not enough to know only features in system, as you need to understand cloud concept as well. On the other side, when we talk about Power Platform, you should know both Canvas and Model-driven Power Apps, Power Automate as well as other Power Platform features (AI, Chat Bots…) and CDS. But this is what we imply with the Power Platform knowledge.
If you are newbie, in this case you need to learn for these exams. But good thing is that if you want to start, you can find everything you will need on the Learning Path site. But one small note, when you start to learn from Learning Paths, I often hear that there are not enough information and some of people often fail on exams. This is because, you need to open every link you have in your learning path as often you can find basic information in this part of text, but when you click on some links, you will be redirected to Microsoft docs site with all necessary information with related topic.
On the end I want to say THANKS to all people involved in preparation these two new exams as they made a good result. And for all of you who didn’t register for these exams, do it… you will not make mistake.
Recently I published a blog post about Dynamics 365 Ecosystem for April 2020 release. As I see many of you downloaded these images, but I also got a comments that this was outdated as a few days ago Microsoft announced October 2020 release (2020 Wave 2 release). Because of that I started with updating these graphics and I’ve just finished with all news.
Again, I want to mention and to say ‘thanks’ to Vadim Korepin who made this initial graphics. I used his initial slides and added all news from the last release. But even more, I found that one important part of Dynamics 365 ecosystem was not there – Industry Accelerators. They are very important parts of ecosystem and it can be very useful for some specific industries. This time I added them, and I hope we will have more and more partners using them.
If you want to collect images in the best resolution, download them (right click on the image) and you will get 3840×2180 images.
And let’s start with the first image where we have completely list of all Dynamics 365 solutions and other related solutions:
Then we can continue wit ERP ecosystem where we have some added features in each of them:
The same situation is with CRM ecosystem where we got some new features:
With modular solutions we have some differences as now we have Dynamics 365 Customer Voice as new solution:
Dynamics 365 AI solutions have some new features as well as Mixed Reality solutions:
List of Dynamics 365 services is extended for new service – Electronic invoicing Add-on:
And now new part – Industry Accelerators for specific vertical solutions. This is completely new page with accelerators details. Based on official documents, industry accelerators are foundational components within Microsoft Power Platform and Dynamics 365 that enable ISVs and other solution providers to quickly build industry vertical solutions. The accelerators extend Common Data Model to include new entities to support a data schema for concepts within specific industries.
And finally, platform again with some updates:
I hope you will use these images in daily business and especially when you need to explain connections between our ecosystem.
Last months I see a lot of interests for completely Dynamics 365 ecosystem map. Even if we now what is part of Dynamics 365 ecosystem, visualization is much better. Because of that I want to share with you one global ecosystem map and more detailed maps per each solution. This is the last one made for April 2020 release and thanks to Vadim Korepin who made it. Keep in mind that resolution in my blog is not the best, but if you want to get in the best resolution, download image (right click on the image) and you will get 3242×1843 picture.
First start with completely Dynamics 365 ecosystem with all solutions.
Now let’s continue with more details. First let’s make a look in ERP ecosystem (Finance, SCM, project Operations and Business Central):
Logically we will continue with CRM portfolio:
Now to add ecosystem of our modular solutions to complete ERP and CRM solutions:
AI Solutions in D365 ecosystem looks like that (keep in mind that we have some additional embedded AI features in other solutions):
Mixed Reality is also part of Dynamics 365 ecosystem:
This is the list of Dynamics 365 services:
And the last but not the least, Microsoft platform ecosystem (Power Platform and other Microsoft platforms):
When you look at all these maps, it is obviously that we have a great ecosystem in Dynamics 365 family. I hope you will use these charts in daily business.
Usually when I talk with people with a small (or without) experience in NAV or Business Central but with ERP knowledge, they don’t know what functional areas are covered with Business Central. Mostly, they find something on internet that it is for SMB and they assume it cannot be used for complex business processes. Yes, Business Central is on the first place for SMB, but it can be found in very complex business as well and it covers the big number of business processes. And yes, Business Central is full ERP system.
Because of that, I wanted to show simplified map what business process are covered with standard Business Central. But just to clarify, this map represents only an overview of business processes… and if you want to see all of them, I can suggest to discuss with someone who is experienced and who can show everything what is possible.
As this picture cannot be viewed good here on blog post (small resolution), I’m suggesting to download it and to open as a picture on your desktop.
And what is important on the end… Business Central is easily extended solution. You can extend it adding new functional areas from AppSource or developing them from your partners.
When I think about new Dynamics 365 Business Central (in the future, I’ll use only ‘Business Central’ or just ‘BC’) features, the first things in my mind are openness and integrations. Then one of the most common limits in Business Central (and in Dynamics NAV before) was lack of portal connected with the database. Of course, you could develop portal from the scratch or use one of existing solutions and develop integration… But what is common in both of these cases? You need to pay in the first case for development (not so cheap) and in the other case for IP or license (again not so cheap).
But with Power Platform we got something more. Now we have Power Portal and as you have Power Platform included in your user’s subscriptions, you don’t need to pay something more (minimum, not such a big amount of money). Only what you need to pay is using portal, but this is really not so costly (100USD per month for 100,000 page views for unauthenticated users or 200USD per month for 100 daily login sessions for authenticated users. More details here: https://powerapps.microsoft.com/en-us/pricing/). And yes… we have an issue here… Power Portal is based on Dataflex Pro (formerly known as Common Data Service). But this is an opportunity, not a limitation. And this is the topic of this whitepaper.
First as I already mentioned, this is necessary to build solution in Dataflex Pro and that means you need to create entity(ies) you want to connect with Business Central. That means you need to run Power Apps: https://powerapps.microsoft.com/. After that, I’ll continue with task. In this example, I’ll use Employee entity as we already have Employee table in BC.
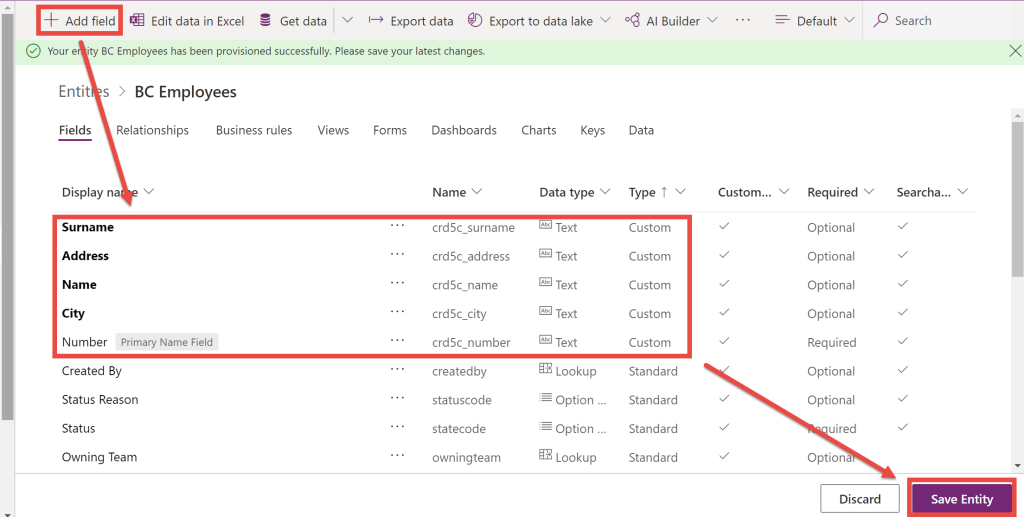
To do this, you need to start from Entities (Data > Entities in the left navigation pane) or you can start with Solutions and create new entity from there. In the new entity, enter Display name and enter primary name.
Click Done when you enter that. After that, you need to add new fields using Add fields command. When you finish with all fields, click Save Entity to save all changes.
When you finish with all details in creation of entity you can start with building connection with Business Central. But keep in the mind that you need to make something more here and we will come back later. Right now, only one thing you can add is Key just to avoid having duplicates and my recommendation is to copy keys from BC table.
From the Wave 1 2020, Business Central supports an integration by default with a set of entities in the Dataflex Pro default database, but you can make customization through extension and add more. For developing extensions that integrate Business Central with Dataflex Pro, system uses extensibility capabilities where proxies to Dataflex Pro tables can be created in Business Central, and these will be made extensible. This allows for custom attributes to be synchronized and for additional tables to be added to the default synchronization process.
When you create this extension, only what you need to do is mapping tables with entities as well as mapping fields in Business Central and Dataflex Pro.
Previous way of integration is native, but it requires some development knowledge. But what if you are not developer and still want to build portal based on Business Central? Do you think it is possible? Yes… this is an answer.
From the Entity page in Power Apps, just click Get Data and in the Power Query window choose OData tile. Go next and then you need to stop yourself there. You should move to the Business Central. Open Web services page and add page you want to use in synchronization. In our case, this is page 5200… just click New, as Objecttype choose Page and add this page number; enter Servicename you want to use and click on Publish field. Copy ODataV4URL value.
Move back to the Power Apps and in the Connection setting paste this value to the URL field. Choose Organizational account as an Authenticationkind. Confirm your credentials and go to the next page. Click Next until you open the following page.
Now you need to choose Load to existing entity option and in the Destinationentity choose entity you created (in my example BCEmployees).
In the Field mapping part of window (right side), you need to map fields from web service in Business Central as a Source column with Destinationfields (fields in our entity). When you finish it, just click Next and you will find a page where you can configure refresh settings. That means you need to choose how often system will synchronize data from Business Central web service to the entity. Click Create and you have been finished with integration.
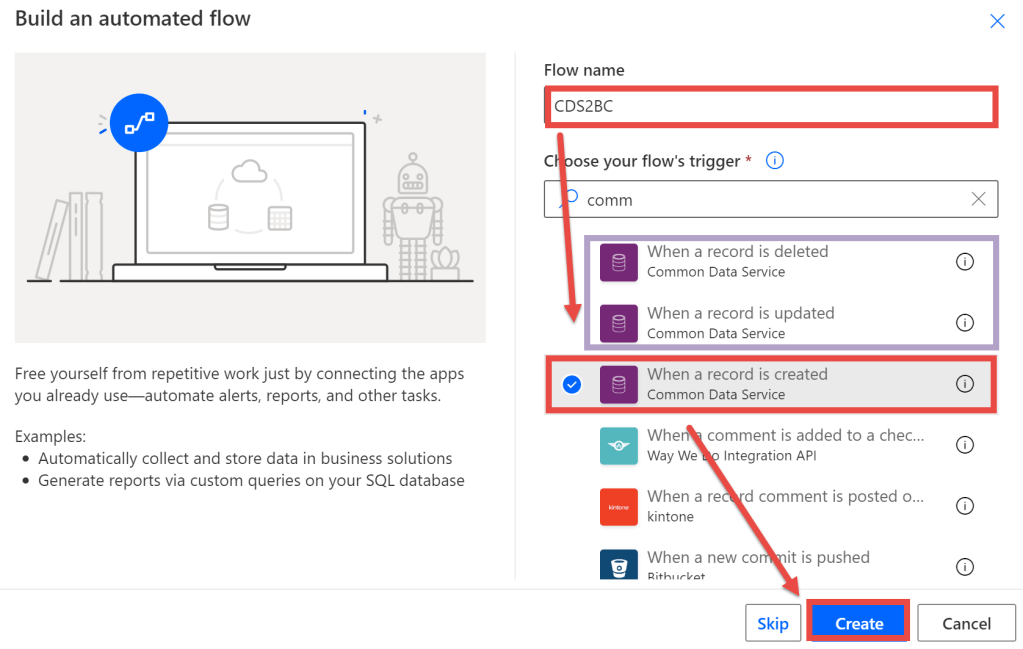
But something will miss here. As you are using just refresh model, that means you will get records from Business Central, but you cannot insert there. Actually, you can insert to entity, but system will not insert them to BC. To solve this, you can create very simply flow in Power Automate. Actually… you will need as many flows as you want actions.
You can see on previous picture that I chose When a record is created and it will be OK if you want to have only Insert from portal. But if you want more action, you need to use the following triggers:
For Modify – When a record is updated,
For Delete – When a record is deleted.
In this example you will see flow for inserting, but I think you can easily understand how to create two additional flows based on well-known parameters.
Keep in the mind that you need to use the following parameters in the trigger:
Environment – choose an environment you used for building solution in Power Apps
Entityname – entity you created
Scope – Organization
Now when you save it, your solution is finished. I would just like o mention that instead of web service integration you could choose API integration as well:
Configuration in both of cases is very similar and there is not a reason to repeat completely process.
Now when we made an integration using one of the models, we can continue with building our portal.
To finish with this process, we need to open Power Apps again and to start with creation new Power App. You can start from Home or from Create and you need to choose Portalfromblank option.
Enter the name of your portal and carefully choose Address for your portal. This is place where you can also choose a language.
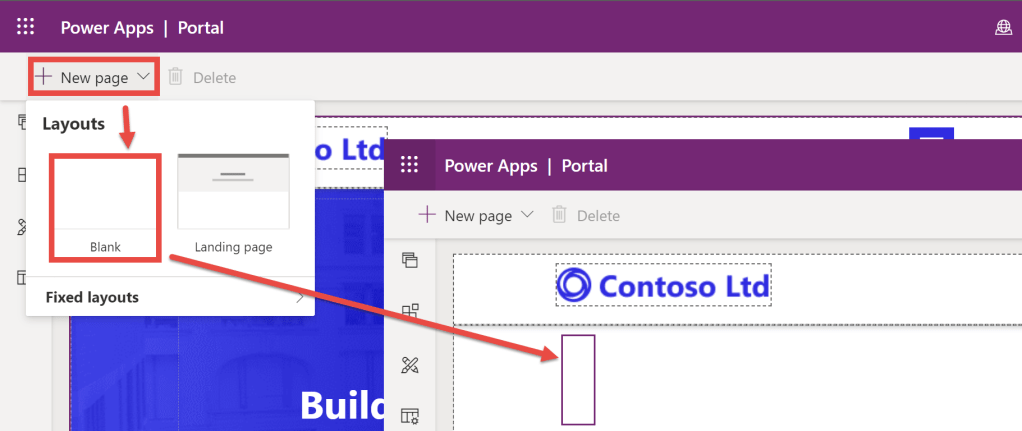
When you select Create, you need to be ready to wait some time until system create portal. It usually takes a few minutes, sometimes more, sometimes less… but be a patient. When an app is created, open it in the edit mode. You will see we have prebuilt portal, but we want to add new page with our data. To do this, select Newpage and choose Blank.
System will create new blank page and we need to add necessary components. Select Components icon in the left-side menu and locate List. This is logical if you want to start with a list view.
Now you need to configure some details. As we will create new component, choose Create new display and as Entity choose your entity (BC Employee in my example). The next important step is to choose a view as each entity has more views. I think that Active {items} are logical choice here.
OK, this is how we can create a list. But if you want to have possibilities to create new entry or to edit or delete it from here, you have an opportunity to do it immediately here. In the right-sided pane you will see a few options appear.
You can choose if you want to add the following features here: creating, viewing, editing and deleting. If you switch-on any of these options, you will get an opportunity to choose which form will be run to make this action. This is very easy for configuration, but what is important is that you need to have these forms already built.
OK, now you need to select Sync Configuration command to see result. But you can see that you have only two columns here in your list and this is not what you want. This is because, when system creates entity, views are created automatically but only with the main field plus Created On. But this is not problem as you just need to customize your view.
To customize view, you should go back to Power Apps and entity you previously created. There you need to select View tab and from the list of all view to select one you want to customize. In our case it is Active BC Employees.
When you open this view in edit mode, you need to add fields you want to see on your view. I’ll add Name, Surname, Address and City and resize it as I would like to see on the screen.
When you finish with adding and/or moving fields, you need to click first Save and after that Publish commands. Keep in mind that if you didn’t publish it you cannot use it.
Now we can say we finished with everything. Go back to the Power Apps and choose Apps on the left-side pane. You will see completely list of your apps. Just choose app (portal) you just created. When you run it, choose the page we created and that’s it. You can see the window in portal with our data from Business Central.
What happened with CDS, what is Microsoft Dataflex and what is difference in comparison with Dataflex Pro? Many of people went to Wikipedia and found DataFlex there…
I will try to avoid any additional confusing on this topic and try to be very short and very clear.
First, DataFlex you found on Wikipedia doesn’t have anything with Microsoft Dataflex (& Pro). You can go there and read what it is, but this is not my topic.
As the second fact, Microsoft Dataflex Pro is Common Data Service. Nothing more and nothing less. This is just rebranding. You can see that we still have old URL with common-data-service there. If you know CDS, you will know Dataflex Pro. If don’t, you can find a lot of materials on Microsoft learning site… and I’ll highly recommend starting to learn it if you are doing with Microsoft BizApps.
As this rebranding can confuse, I tried to create one timeline with all these changes. I’m not 100% sure I didn’t miss something, but it will be more then enough to understand what happened here.
And not as a third topic – Microsoft Dataflex (without ‘Pro’). What it is and what it isn’t? This is built-in, low-code data platform for Teams, and it is built atop the Common Data Service (or to use new name, atop the Microsoft Dataflex Pro 😊). This tool will help Teams users to easily build custom apps inside. You will not need to leave Teams and to build everything inside it with really user-friendly UI. You can build apps using Dataflex as environment and together with Power Apps, Power Automate and Power Virtual Agents. And this is not full CDS… this is just a subset of Dataflex Pro capabilities and usage is limited to within Teams.
Yesterday on the first day of Microsoft Inspire (this year in digital format), we had an opportunity to see some long time waited news. We will finally have certification exam for Business Central. It will be MB-800 exam – Microsoft Dynamics 365 Business Central Functional Consultant and this exam will be available from October 2020. It will cover the following processes of implementation: set up Business Central, configure Financials, configure Sales and Purchasing, set up operations, and of course how to use Power Platform components. More about the exam here. When you pass this exam, you will become Microsoft Dynamics 365 Business Central Functional Consultant Associate.
But this is not all. We have more news in certifications. As Power Platform takes more and more spaces in solving business issues, we will get two new exams for Power Platform and they will be available from September 2020:
PL-200: Power Platform Functional Consultant (topics covered: Configure the Common Data Service, Build a Power App, Create automations with Power Automate, Configure Power Virtual Agents, Create visualizations with Power BI)
PL-400: Power Platform Developer (topics covered: Create a technical design, Configure Common Data Service, Create and configure Power Apps, Configure business process automation, Extend the user experience, Extend the platform, Develop integrations)