We are close to the end of this year, and we mostly have important conference dates for the following year. I would like to have all Dynamics 365 (and/or Power Platform) conferences in one place, with all dates planned for 2024. So, you can find them here and start planning your attendance as most of them have early bird:
Over the past week, the Dynamics 365 and Power Platform community came together for two exceptional events: DynamicsMINDS and Days of Knowledge Central. These events provided a platform for enthusiasts, experts, and industry leaders to connect, collaborate, and dive deep into the world of Microsoft’s cutting-edge technologies. As a participant and speaker at both events, I had the privilege of experiencing firsthand the energy, innovation, and knowledge-sharing that took place.
In this blog post, I will take you on a journey through these extraordinary events and share my insights and highlights.
As a speaker at DynamicsMINDS, I had the opportunity to share my insights and experiences with the audience. It was truly exhilarating to connect with like-minded individuals who are passionate about leveraging Dynamics 365 to drive business transformation. The enthusiasm and eagerness to learn were palpable, creating an electric atmosphere throughout the event. From deep dives into the latest product updates to exploring real-world use cases, DynamicsMINDS served as a catalyst for innovation, empowering attendees to unlock the full potential of Dynamics 365.
Days of Knowledge Central provided a unique opportunity to gain deep insights into the various components of the Dynamics 365 Business Central & Power Platform. From hands-on workshops to expert-led sessions, attendees were exposed to the full breadth of possibilities offered by the Dynamics 365 & Power Platform. As a speaker at this event, I had the privilege of sharing my knowledge and expertise, demonstrating how the Dynamics 365 & Power Platform can revolutionize business processes and empower organizations to achieve digital transformation at scale.
Networking and Collaboration: The events fostered an environment of collaboration and networking, allowing attendees to connect with industry experts, Microsoft MVPs, and fellow enthusiasts. The opportunity to exchange ideas, share best practices, and build meaningful connections was invaluable.
DynamicsMINDS and Days of Knowledge Central were two remarkable events that brought the Dynamics 365 and Power Platform community together for an unforgettable week of learning, networking, and collaboration. As a participant and speaker, I was inspired by the passion, expertise, and commitment demonstrated by the attendees and fellow speakers.
As we look to the future, it is evident that these events have further solidified the Dynamics 365 and Power Platform community as a hub of innovation and knowledge. The insights gained, connections made, and experiences shared will undoubtedly propel individuals and organizations towards continued success in their digital journeys.
Now, when chatbots are becoming a more and more popular way of communicating with customers, all users would like to do more via chatbots. As Microsoft’s response to tools that can make chatbots, there is Power Virtual Agents, and the real power of Power Virtual Agent (PVA) is enormous.
But as business application specialists, we always try to think about how to connect it to some of our Business Applications. This time we plan to connect PVA to Business Central (BC). More precisely, we want to create New Sales Order from PVA and directly in BC.
How we can achieve that, and not to say it is easy, but it is not so complicated. In a concise explanation, we will create PVA with typical questions, and then we will ask some specific questions to our users so that they can give us order-specific data. After collecting data, we will use Power Automate to connect all.
But let’s stop talking hypothetically and start creating our PVA connected to BC.
The critical thing to mention is that I will not explain how to create PVA nor suggest which questions to use to trigger it and which flow you will make. I will focus only on the essential steps you must implement to create a Sales Order in BC using PVA. You can start as you like and do it in the best possible way so that it fulfills all of your requirements.
So, let’s start.
First, you will have to get three essential pieces of information from your PVA users:
Account/Customer No.
Item No.
Quantity of Item which customer wants to buy
You can work with Item Name and Customer Name, but be aware that this can make your process more complicated because we have a few things to take into consideration before using this approach:
Human error
Similar names
Many more questions for users
Many more variables to consider
Etc.
If you want to try this approach, consider this problem, and you can do it. The process is similar, only with some more steps.
But with our approach, let’s create three questions in Power Virtual Agent and define Variables for them:
Choose Add Node
Choose Ask a Question
In Question, define:
What is your company account number with us?
Identify the User’s entire response
Save response as
Click on the Pen icon and name it VarCustomerID
choose Add Node
Choose Ask a Question
In Question, define:
What Product No. are you looking to purchase?
Identify the User’s entire response
Save response as
Click on the Pen icon and name it as VarItemNo
Choose Add Node
Choose Ask a Question
In Question, define:
Can you tell us which Quantity you would like to order?
Identify Number
Save response as
Click on the Pen icon and name it as VarItemNo
And now we have our questions and variables. What we have to do from here is to add a new action in our PVA, but this time is going to be active for triggering Power Automate.
To do this, you will have to:
Navigate to Add node in a Topic editor in Power Virtual Agent
Choose to Call an action
Choose to Create a flow
And from here, you will be redirected to the Power Automate editor, and you should start creating a new Power Automate.
You will see immediately that you already have trigger and Output predefined for PVA. Just keep it, and we will use it in the process.
From here, you will have to create some Variables and, most important Sales Order Header and Line.
As you probably know, in BC, Sales order contains two tables:
Sales Order Header
Sales Order Line
We will have to use both. First, we will create Header, and later we will use the Find Record action to find our Item, and then, in the end, we will fulfill Sales Order Line.
Don’t worry. I will now list all actions one by one and in the order in which you will have to create them so that you’re Power Automate works at the end.
Before you start with Sales Order Header and Lines, as I sed, you will need to do some setup in Trigger and initialize some variables.
For the trigger, what you would need to do is to add you’re Inputs. You will probably understand now whose inputs are values we will get from Questions we have asked users in our PVA.
So let’s create three inputs:
Text:CompanyName
Text:Item
Number:Quantity
And after inputs, I will list all variables you have to Initialize, and all of them will be STRING. Just create them, don’t assign any values. We will do that later in the Power Automate.
Order ID
Currency Code
Item No
Quantity
UOM
Total Price
Now that we have created Variables, we can continue creating records in BC. For better understanding, our Variables are here so that we can collect output at the end and show Sales Order info in PVA so that users can understand what they have created and get some information about orders they had made automatically.
If you want to create Sales Order and not use data back in PVA, you don’t need all these Variables. But when making PVA, it is always lovely to show values at the end to users of PVA.
Now let’s continue with Power Automate, and finally, let’s create a record in BC.
We will now perform three actions; you must do this in this order.
Create Record V3 (Business Central)
Environment Name: SANDBOX (if you are working with a PRODUCTION environment, choose PRODUCTION)
Company Name: CRONUS USA, Inc.
API Category: v2.0
Table name: salesOrders
customerNumber: CompanyName (from trigger)
Find Records V3 (Business Central)
Environment Name: SANDBOX (if you are working with a PRODUCTION environment, choose PRODUCTION)
Company Name: CRONUS USA, Inc.
API Category: v2.0
Table name: items
Filter Query: number eq ‘ItemNo’ (ItemNo Variable form dynamic value)
Create Record V3 (Business Central) (Apply to Each will be created automatically)
Environment Name: SANDBOX (if you are working with a PRODUCTION environment, choose PRODUCTION)
Company Name: CRONUS USA, Inc.
API Category: v2.0
Table name: salesOrderLines
documentId: id (from Create Record (Header) dynamics value)
itemId: id (from Find Records (Item) dynamics value)
quantity: Quantity (from the trigger, dynamics value)
And now, after we have created Sales Order in BC, we need to get data and show them back in PVA so that users can see what they have done.
We will do this by assigning values to our Variables. For this scenario, it is best to use Append to string variable action.
Again let’s see what we have to do here.
Append to a string variable (in Apply to Each)
Name: ItemNo
Value: description (from Create Record line)
Append to a string variable (in Apply to Each)
Name: Quantity
Value: Quantity (from Create Record line)
Append to a string variable (in Apply to Each)
Name: UOM
Value: UniteOfMesureCode (from Create Record Line)
Append to a string variable (in Apply to Each)
Name: Order ID
Value: number (from Create Record Header)
Append to a string variable (in Apply to Each)
Name: Total Price
Value: amountIncludingTax (from Create Record Line)
Append to a string variable (in Apply to Each)
Name: Currency Code
Value: currencyCode (from Create Record Line)
When we have assigned values to Variables, we are only left with a few steps till the end of this scenario.
Now we must create one more Variable and append value to it.
This time we are doing this to format our Output result in the best possible way because formatting output values from Power Automate in the PVA is not the best, so we want now to do it in Power Automate and later show this value in our PVA.
To do this, we will create the following Variable:
Initialize variable (Out of Apply to Each)
Name: Order
Type: String
Value: (none)
Append variable
Name: Order
Value: You have created a sales Order with ID: Order ID (Variable dynamics value)
With total price: Total Price (Variable dynamics value) Currency Code (Variable dynamics value)
And now, we are just two more steps to the end in Power Automate.
This time we must use two actions and keep in mind that one of them is already there, so in reality, we must create one more cation (COMPOSE) and, in the end, assign that value to our PVA output.
Compose
Inputs: Order (Variable dynamics value)
Return value(s) to Power Virtual Agents
Inputs
Text: Item
Outputs
And now we are finished with Power Automate. All that is left here is to Save it, jump back to PVA, and map Variables in PVA so that our inputs in Power Automate can work. Your Power Automate would look like the one on the Screenshot if you created it with the exact steps I described.
To do this, you will have to go back to your PVA and inaction, which you have called Power Automate. You have to choose one which we have created just now.
Choose Power Automate, Which you have created
Setup Variables
CompanyName (text) -> VarCustomerId
Item -> VarItemNo
Quantity -> VarQuantity
Add Node
Show a message
Dear customer VarCustomerID (add a variable from the list),
Your order has been created with the following details:
Item(variable from the list)
Now you can Save your PVA and Test it to see if it works. If everything is fine, the result will look something like this.
This is not the end. You can continue playing with this PVA and add one new branch where you will create one more Power Automate for users who are not Customers in BC and first create them so that they can make an order. But this is the end for this scenario, How to create a Sales Order from PVA in BC.
In conclusion, when we can use Power Automate with some other tool natively, SKY IS THE LIMIT in what we can do.
I know that this scenario has a bigger number of steps, but in total, it is not so complicated. Still, it gives an excellent perspective on what you can do and gives you an idea of what some other Power Automates should look like if you are using them from PVA. Enjoy creating this Power automate and Power Virtual Agent.
If you are a Dynamics 365 Marketing user, you may have already seen that you can trigger Power Automate in your Marketing Journey (Real-Time Marketing). And why is this a good thing? Power Automate allows users to create, update and delete records and can assign records or complex pass-through processes.
There are several actions you have to do before you can trigger Power Automate through Marketing App.
Let’s see all steps necessary to perform before you start using Power Automate together with Dynamics 365 Marketing app.
First, you must create a Customer Journey in Real-Time Marketing.
I have created a simple Journey that starts with a Segment and has only one stage, after which Power Automate will be triggered. But you can create as many stages before initiating Power Automate.
You need to take care of time when you want to start this Journey. Of course, you are not obligated to use Segment as I did. Still, this was the easiest way to show you how to start using Power Automate in your day-to-day Marketing Journeys.
After choosing the Segment, we will continue with the Journey creation.
What we have to do next is to add a new action to our Journey, which will activate a Custom Trigger.
The system will give you one lookup file where you can choose some of the previously created triggers, and then you can use one trigger for multiple Journeys.
But now we will choose to create a new one. When you choose New Trigger, the popup window will open, and you will start defining your trigger.
Here you define some of the usual things like Name and Description, but the critical part for Power Automate is where you define Attributes.
Suppose you have been creating Manually Triggered Flow or Power Automate from the Canvas app for example, or just triggered based on Power Automate. In that case, this is how we get values and proceed them through Power Automate.
This is where you will define key attributes you need to use from this Journey in your Power Automate.
I have created one attribute named First Name for this purpose, but be free and create as much as you need for your Journey.
After defining attributes, finish through the wizard, and you will be able to come back to Journey Form.
Now when you are on the Journey, you must do some mapping.
This is one of the most critical parts because you map your attributes to the fields on Entity/Table.
This is too last step before we go to Power Automate.
Because we had only First Name and Table is Contact, and I have found just my Field in the list of Fields. Just be aware that you must map all attributes you have defined.
And this is the end of the Marketing part.
Now we are going to create one Power Automate.
First, go to the Power Automate page, Name your Flow as you like, and choose Datavesr – When Action is Performed as Trigger.
So in the following screenshot, you will have to be careful what you are choosing.
Catalog > Cxp
Category > Custom
Table name > (none)
Action Name > Choose your action
And the next thing is to continue with Power Automate creation.
I will add a new step where I will use data from our attribute definition. But you can, from now on, create new records, update records, send an email notification, send approvals, work with all connectors in Power Automate, and make the best possible Journey and the best possible steps which have to be automated after your Journey pass.
When you finish with Power Automate creation, Save it and Close it, and return to your Customer Journey Page in Marketing, where you can Publish your Journey and wait for the magic to happen.
I hope that this feature in Dynamics 365 Marketing will allow you to create more complex and more customer-oriented Marketing Jounies, which will allow you to deliver better content to your clients. After all, Power Automate is a really powerful tool that can bring a lot of new ideas, which now can be achieved together with Dynamics 365 Marketing Real-Time Jounies in day-to-day use for Marketing experts.
We are close to the end of this, and we mostly have important conference dates for the following year. I would like to have all Dynamics 365 (and/or Power Platform) conferences in one place, with all dates planned for 2023. So, you can find them here and start planning your attendance as most of them have early bird:
Recently I finished my session about using Dynamics 365 Sales professional with Business Central at Directions EMEA. But there were many questions about D365 Sales Professional capabilities… what is possible, where are limitations…
First, Sales Professional is a CRM solution for SMB companies targeting businesses with more straightforward sales needs with basic sales force automation and limited customizations. But it is still a powerful tool, and I wanted to show you what this app includes using an infographic model. You can see details here:
What more is essential to know? You cannot mix a Sales Professional license with Sales Enterprise (and other Sales licenses)… if you decide to use Sales Professional, you must use it for all Sales users. But if this is not enough for you (at some moment, your company has grown), you can upgrade this license to Dynamics 365 Sales Enterprise.
If you like this infographic, I’ll add a similar one for Sales Enterprise.
You already know Microsoft publishes new releases two times per year (wave 1 in April and wave 2 in October). You can find all news in Microsoft’s release plans. There is also an amazing ecosystem map by Vadim Korepin about all solutions in Dynamics 365 family.
But as I’m most connected with SMB solutions inside Dynamics 365 and Power Platform, I wanted to share more details on what is available for SMB users and companies from Microsoft Dynamics 365 family. Three business applications (Dynamics 365 Business Central, Sales Professional, Customer Service Professional) covered ERP and CRM parts but with plenty of features. I’m sure no other vendor currently can offer more for SMB customers worldwide.
You can look at and download the Ecosystem map for Dynamics 365 SMB solutions I created (resolution is 3840×2160):
I hope this SMB ecosystem map will be helpful for you, and we will have more features and maybe even more solutions here in the future.
First I need to admit that I’m not big fan of this kind of certification. Based on my previous experience 10+ year ago, it was more about getting certificate and less about proving a real knowledge. I had an opportunity to meet a lot highly certified persons, but they couldn’t implement even the easiest projects. But still, partners wanted to invest in certification as some kind of knowledge proof.
But with new exams in the last few years things are slightly changed and I had opportunity to check them. But with these two new exams I’m talking about, things improved drastically. And I can say I’m really positive surprised.
First what I want to say is that I didn’t prepare myself for these two exams. And when I say ‘I didn’t prepare’, I mean it for real. I wanted to see if it is possible to pass these exams with real experience and practical knowledge. And I succeed! From my perspective this is the most important fact – if you are waring with these technologies and have a real practical knowledge, you can pass them without any problem. It still means you should be focused on questions as they can sometimes be complicated, especially when it comes to the case studies. I didn’t want to say these exams are easy as they are not, but you don’t need to prepare yourself if you know topics. But to be honest, you can still find a couple of useless questions, you really don’t need in practice, but even if you fail on some of them you will still have big chance to pass exams.
What I want to mention about BC exam is to be prepared with SaaS topics as this is very important. It is not enough to know only features in system, as you need to understand cloud concept as well. On the other side, when we talk about Power Platform, you should know both Canvas and Model-driven Power Apps, Power Automate as well as other Power Platform features (AI, Chat Bots…) and CDS. But this is what we imply with the Power Platform knowledge.
If you are newbie, in this case you need to learn for these exams. But good thing is that if you want to start, you can find everything you will need on the Learning Path site. But one small note, when you start to learn from Learning Paths, I often hear that there are not enough information and some of people often fail on exams. This is because, you need to open every link you have in your learning path as often you can find basic information in this part of text, but when you click on some links, you will be redirected to Microsoft docs site with all necessary information with related topic.
On the end I want to say THANKS to all people involved in preparation these two new exams as they made a good result. And for all of you who didn’t register for these exams, do it… you will not make mistake.
Recently I published a blog post about Dynamics 365 Ecosystem for April 2020 release. As I see many of you downloaded these images, but I also got a comments that this was outdated as a few days ago Microsoft announced October 2020 release (2020 Wave 2 release). Because of that I started with updating these graphics and I’ve just finished with all news.
Again, I want to mention and to say ‘thanks’ to Vadim Korepin who made this initial graphics. I used his initial slides and added all news from the last release. But even more, I found that one important part of Dynamics 365 ecosystem was not there – Industry Accelerators. They are very important parts of ecosystem and it can be very useful for some specific industries. This time I added them, and I hope we will have more and more partners using them.
If you want to collect images in the best resolution, download them (right click on the image) and you will get 3840×2180 images.
And let’s start with the first image where we have completely list of all Dynamics 365 solutions and other related solutions:
Then we can continue wit ERP ecosystem where we have some added features in each of them:
The same situation is with CRM ecosystem where we got some new features:
With modular solutions we have some differences as now we have Dynamics 365 Customer Voice as new solution:
Dynamics 365 AI solutions have some new features as well as Mixed Reality solutions:
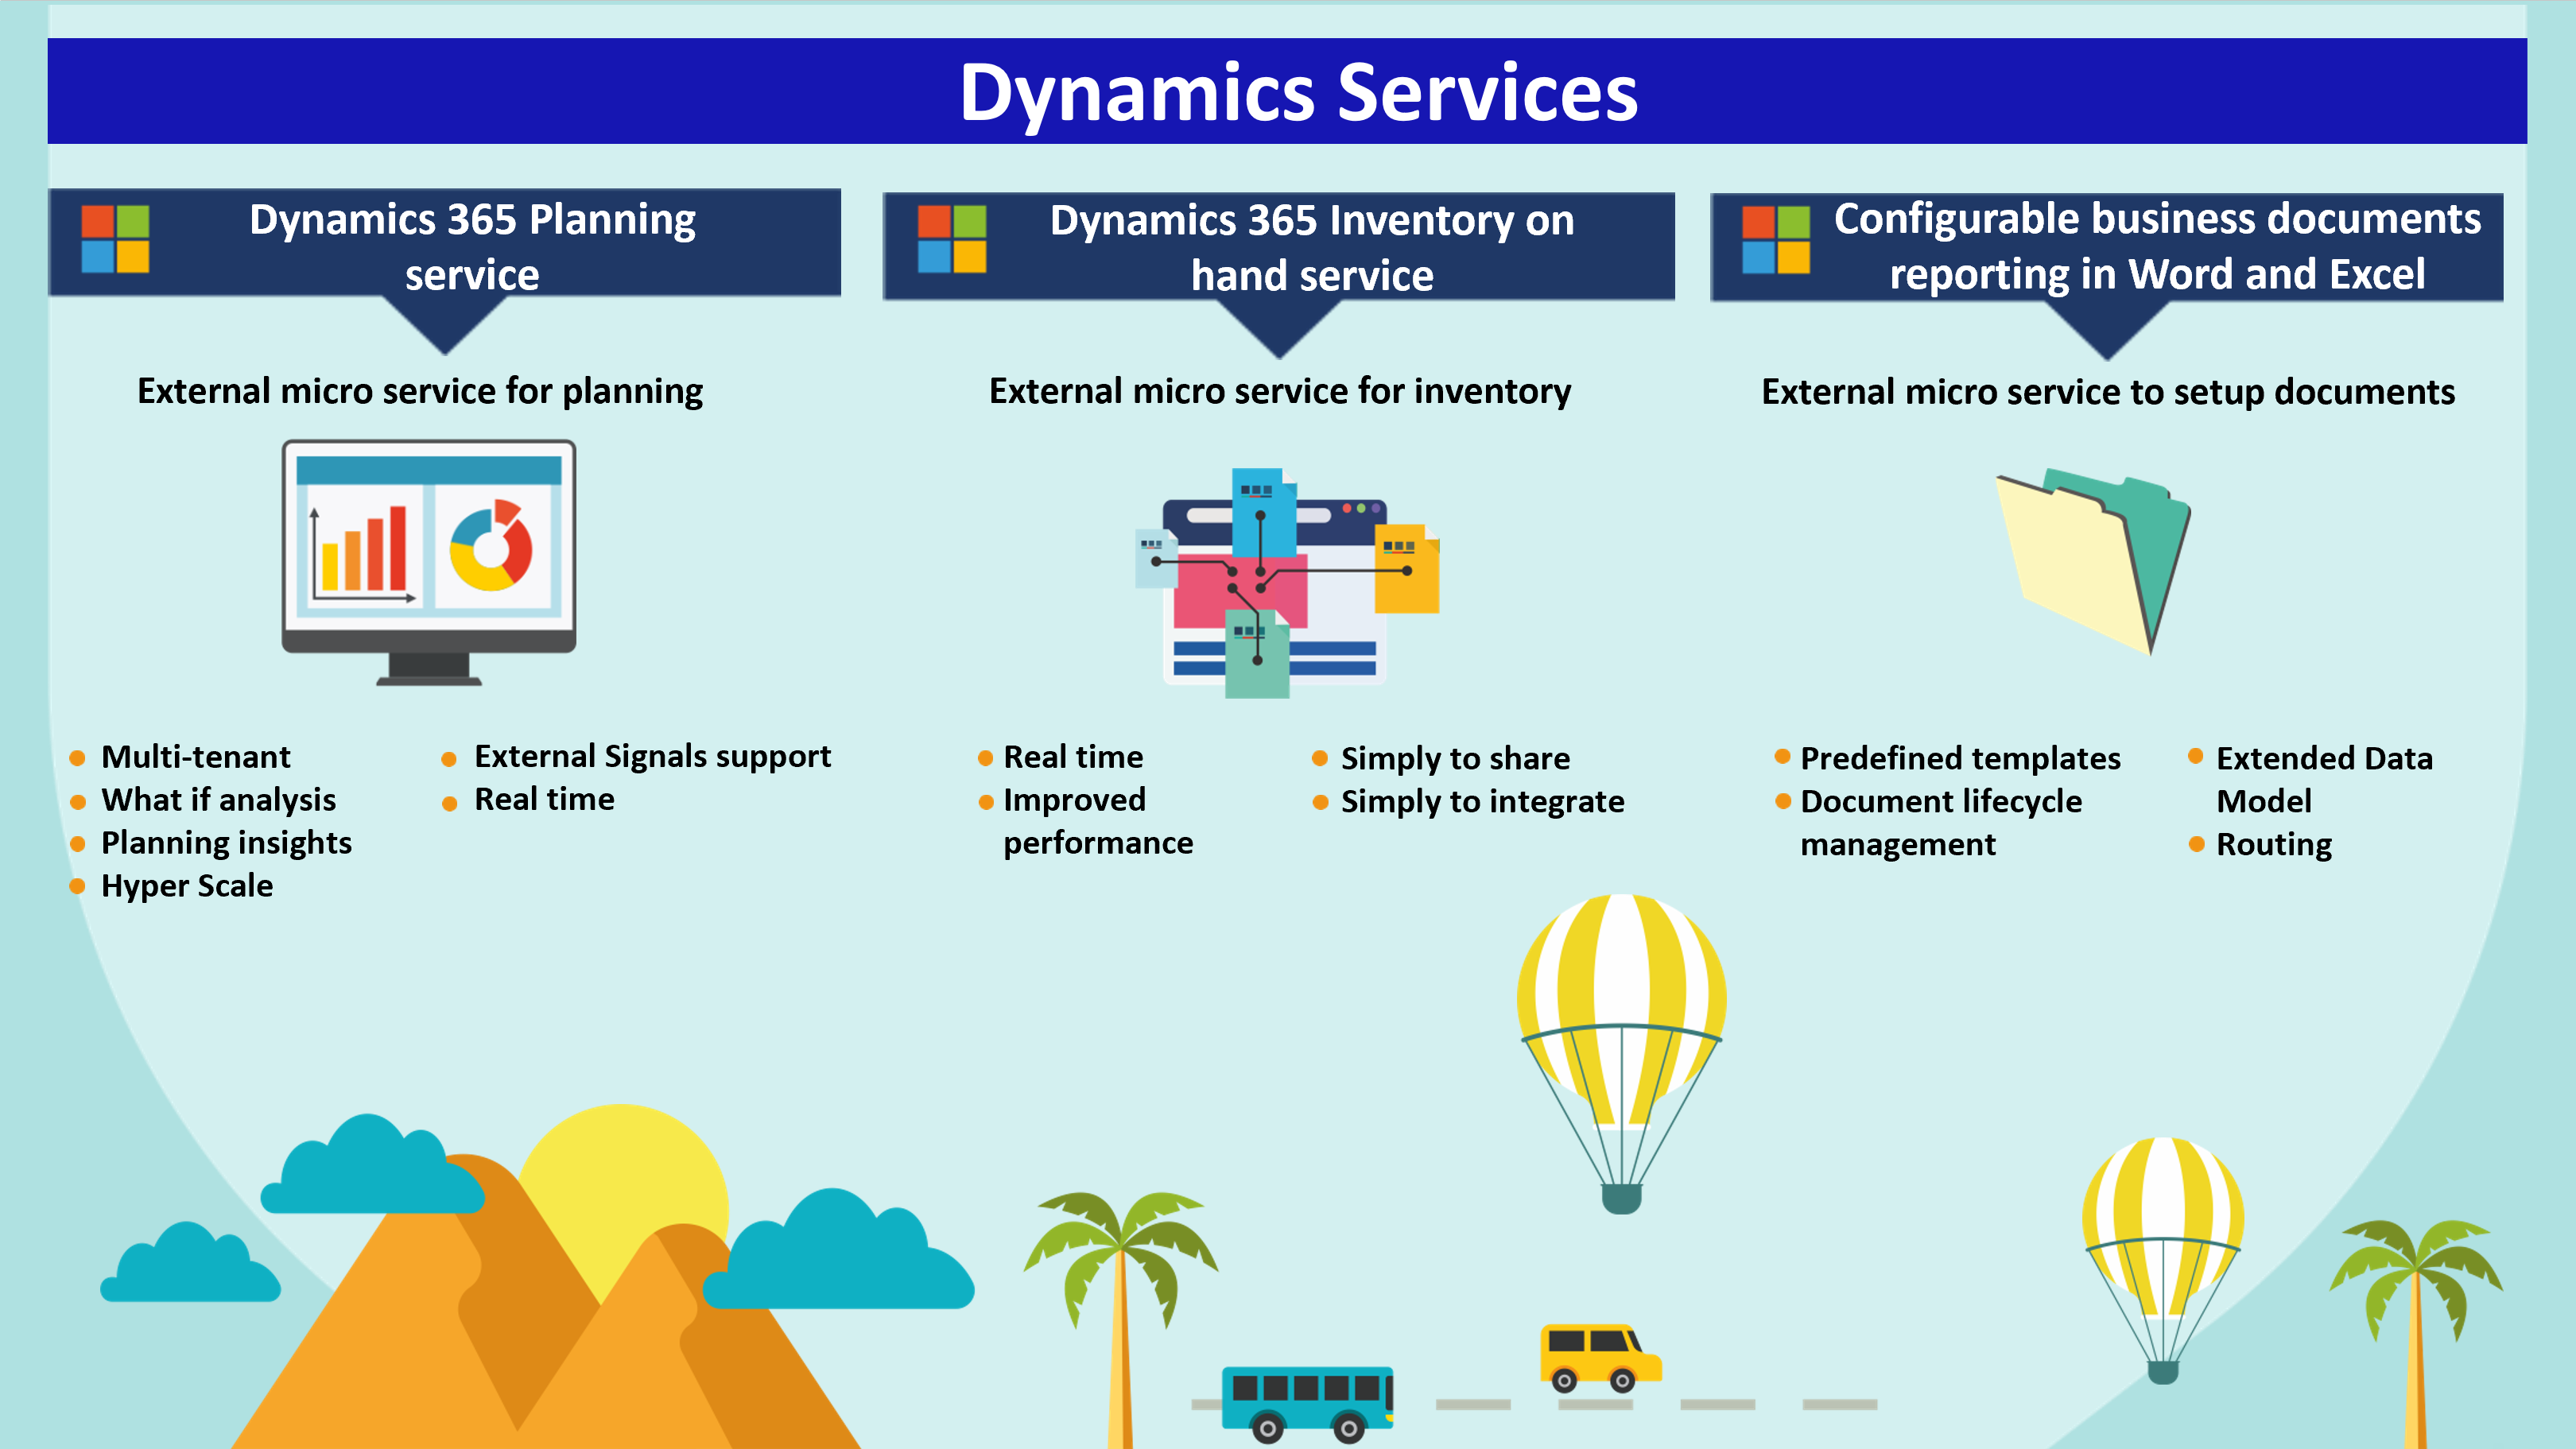
List of Dynamics 365 services is extended for new service – Electronic invoicing Add-on:
And now new part – Industry Accelerators for specific vertical solutions. This is completely new page with accelerators details. Based on official documents, industry accelerators are foundational components within Microsoft Power Platform and Dynamics 365 that enable ISVs and other solution providers to quickly build industry vertical solutions. The accelerators extend Common Data Model to include new entities to support a data schema for concepts within specific industries.
And finally, platform again with some updates:
I hope you will use these images in daily business and especially when you need to explain connections between our ecosystem.
Last months I see a lot of interests for completely Dynamics 365 ecosystem map. Even if we now what is part of Dynamics 365 ecosystem, visualization is much better. Because of that I want to share with you one global ecosystem map and more detailed maps per each solution. This is the last one made for April 2020 release and thanks to Vadim Korepin who made it. Keep in mind that resolution in my blog is not the best, but if you want to get in the best resolution, download image (right click on the image) and you will get 3242×1843 picture.
First start with completely Dynamics 365 ecosystem with all solutions.
Now let’s continue with more details. First let’s make a look in ERP ecosystem (Finance, SCM, project Operations and Business Central):
Logically we will continue with CRM portfolio:
Now to add ecosystem of our modular solutions to complete ERP and CRM solutions:
AI Solutions in D365 ecosystem looks like that (keep in mind that we have some additional embedded AI features in other solutions):
Mixed Reality is also part of Dynamics 365 ecosystem:
This is the list of Dynamics 365 services:
And the last but not the least, Microsoft platform ecosystem (Power Platform and other Microsoft platforms):
When you look at all these maps, it is obviously that we have a great ecosystem in Dynamics 365 family. I hope you will use these charts in daily business.