Introduction
When I think about new Dynamics 365 Business Central (in the future, I’ll use only ‘Business Central’ or just ‘BC’) features, the first things in my mind are openness and integrations. Then one of the most common limits in Business Central (and in Dynamics NAV before) was lack of portal connected with the database. Of course, you could develop portal from the scratch or use one of existing solutions and develop integration… But what is common in both of these cases? You need to pay in the first case for development (not so cheap) and in the other case for IP or license (again not so cheap).
But with Power Platform we got something more. Now we have Power Portal and as you have Power Platform included in your user’s subscriptions, you don’t need to pay something more (minimum, not such a big amount of money). Only what you need to pay is using portal, but this is really not so costly (100USD per month for 100,000 page views for unauthenticated users or 200USD per month for 100 daily login sessions for authenticated users. More details here: https://powerapps.microsoft.com/en-us/pricing/). And yes… we have an issue here… Power Portal is based on Dataflex Pro (formerly known as Common Data Service). But this is an opportunity, not a limitation. And this is the topic of this whitepaper.
Start with building entities in Power Platform
First as I already mentioned, this is necessary to build solution in Dataflex Pro and that means you need to create entity(ies) you want to connect with Business Central. That means you need to run Power Apps: https://powerapps.microsoft.com/. After that, I’ll continue with task. In this example, I’ll use Employee entity as we already have Employee table in BC.
To do this, you need to start from Entities (Data > Entities in the left navigation pane) or you can start with Solutions and create new entity from there. In the new entity, enter Display name and enter primary name.

Click Done when you enter that. After that, you need to add new fields using Add fields command. When you finish with all fields, click Save Entity to save all changes.
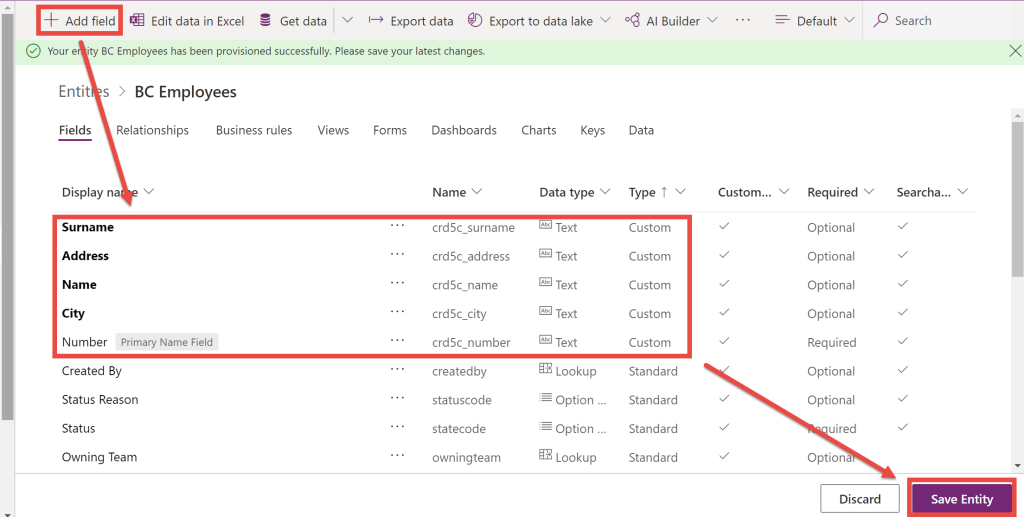
When you finish with all details in creation of entity you can start with building connection with Business Central. But keep in the mind that you need to make something more here and we will come back later. Right now, only one thing you can add is Key just to avoid having duplicates and my recommendation is to copy keys from BC table.
Connecting Business Central with portal
OK, connection with the Business Central can be done on a few different ways and I’ll try to explain all of them here.
Business Central customizing an integration with Common Data Service
From the Wave 1 2020, Business Central supports an integration by default with a set of entities in the Dataflex Pro default database, but you can make customization through extension and add more. For developing extensions that integrate Business Central with Dataflex Pro, system uses extensibility capabilities where proxies to Dataflex Pro tables can be created in Business Central, and these will be made extensible. This allows for custom attributes to be synchronized and for additional tables to be added to the default synchronization process.
When you create this extension, only what you need to do is mapping tables with entities as well as mapping fields in Business Central and Dataflex Pro.
I don’t want to write in details how you can do it as Microsoft already published completely documentation how to build this kind of extension and how to configure it. For more details, open this page: https://docs.microsoft.com/en-us/dynamics365/business-central/dev-itpro/administration/administration-custom-cds-integration.
When you finish with developing an extension, you can find here how to map tables and fields: https://docs.microsoft.com/en-us/dynamics365/business-central/admin-how-to-modify-table-mappings-for-synchronization.
When you connect entities in Dataflex Pro and Business Central, you can continue with building Power Portal.
Integration using webservices and Power Automate
Previous way of integration is native, but it requires some development knowledge. But what if you are not developer and still want to build portal based on Business Central? Do you think it is possible? Yes… this is an answer.
From the Entity page in Power Apps, just click Get Data and in the Power Query window choose OData tile. Go next and then you need to stop yourself there. You should move to the Business Central. Open Web services page and add page you want to use in synchronization. In our case, this is page 5200… just click New, as Object type choose Page and add this page number; enter Service name you want to use and click on Publish field. Copy OData V4 URL value.

Move back to the Power Apps and in the Connection setting paste this value to the URL field. Choose Organizational account as an Authentication kind. Confirm your credentials and go to the next page. Click Next until you open the following page.
Now you need to choose Load to existing entity option and in the Destination entity choose entity you created (in my example BCEmployees).

In the Field mapping part of window (right side), you need to map fields from web service in Business Central as a Source column with Destination fields (fields in our entity). When you finish it, just click Next and you will find a page where you can configure refresh settings. That means you need to choose how often system will synchronize data from Business Central web service to the entity. Click Create and you have been finished with integration.
But something will miss here. As you are using just refresh model, that means you will get records from Business Central, but you cannot insert there. Actually, you can insert to entity, but system will not insert them to BC. To solve this, you can create very simply flow in Power Automate. Actually… you will need as many flows as you want actions.
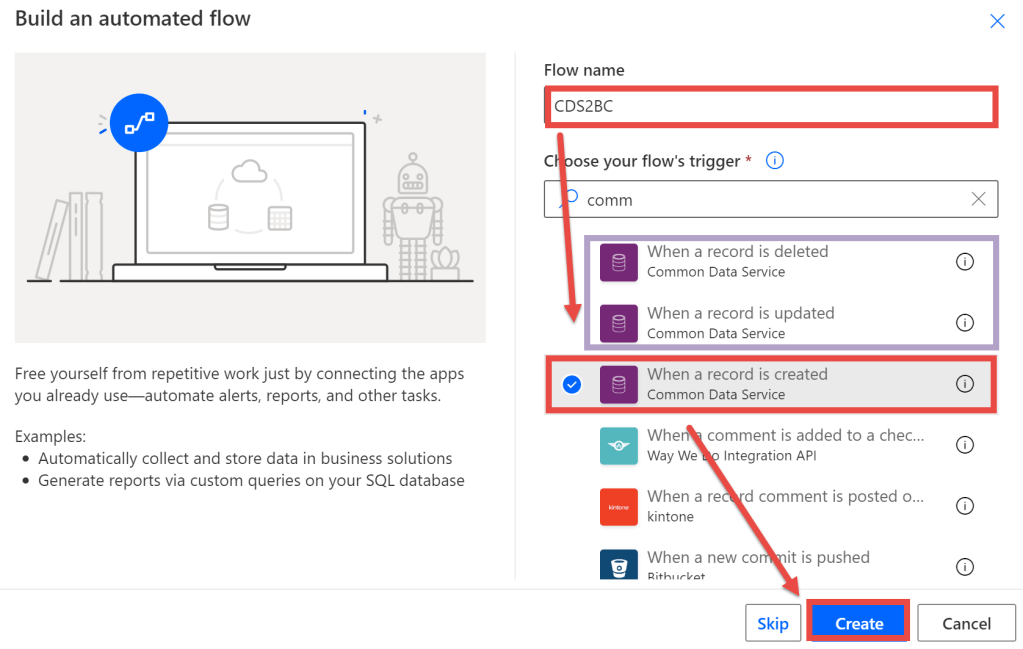
You can see on previous picture that I chose When a record is created and it will be OK if you want to have only Insert from portal. But if you want more action, you need to use the following triggers:
- For Modify – When a record is updated,
- For Delete – When a record is deleted.
In this example you will see flow for inserting, but I think you can easily understand how to create two additional flows based on well-known parameters.

Keep in the mind that you need to use the following parameters in the trigger:
- Environment – choose an environment you used for building solution in Power Apps
- Entity name – entity you created
- Scope – Organization
Now when you save it, your solution is finished. I would just like o mention that instead of web service integration you could choose API integration as well:

Configuration in both of cases is very similar and there is not a reason to repeat completely process.
Building a portal
Power Portal
Now when we made an integration using one of the models, we can continue with building our portal.
To finish with this process, we need to open Power Apps again and to start with creation new Power App. You can start from Home or from Create and you need to choose Portal from blank option.
Enter the name of your portal and carefully choose Address for your portal. This is place where you can also choose a language.

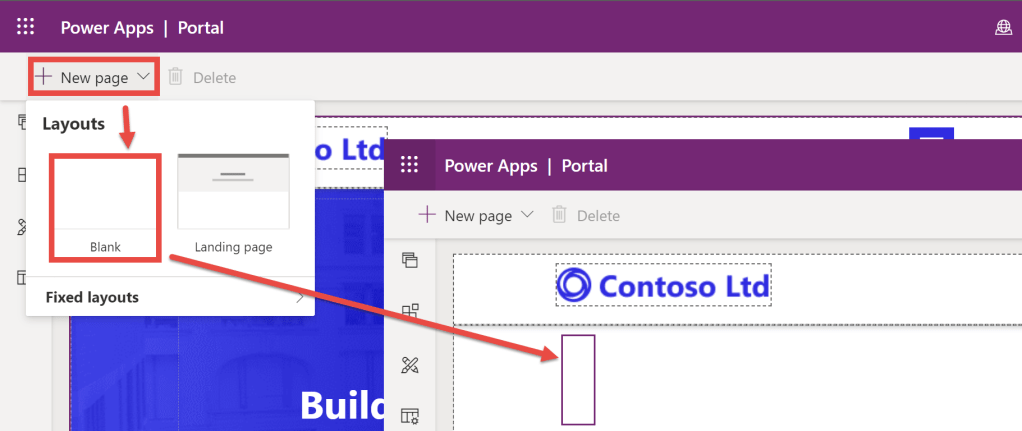
When you select Create, you need to be ready to wait some time until system create portal. It usually takes a few minutes, sometimes more, sometimes less… but be a patient. When an app is created, open it in the edit mode. You will see we have prebuilt portal, but we want to add new page with our data. To do this, select New page and choose Blank.
System will create new blank page and we need to add necessary components. Select Components icon in the left-side menu and locate List. This is logical if you want to start with a list view.

Now you need to configure some details. As we will create new component, choose Create new display and as Entity choose your entity (BC Employee in my example). The next important step is to choose a view as each entity has more views. I think that Active {items} are logical choice here.

OK, this is how we can create a list. But if you want to have possibilities to create new entry or to edit or delete it from here, you have an opportunity to do it immediately here. In the right-sided pane you will see a few options appear.

You can choose if you want to add the following features here: creating, viewing, editing and deleting. If you switch-on any of these options, you will get an opportunity to choose which form will be run to make this action. This is very easy for configuration, but what is important is that you need to have these forms already built.
OK, now you need to select Sync Configuration command to see result. But you can see that you have only two columns here in your list and this is not what you want. This is because, when system creates entity, views are created automatically but only with the main field plus Created On. But this is not problem as you just need to customize your view.

View customization
To customize view, you should go back to Power Apps and entity you previously created. There you need to select View tab and from the list of all view to select one you want to customize. In our case it is Active BC Employees.
When you open this view in edit mode, you need to add fields you want to see on your view. I’ll add Name, Surname, Address and City and resize it as I would like to see on the screen.
When you finish with adding and/or moving fields, you need to click first Save and after that Publish commands. Keep in mind that if you didn’t publish it you cannot use it.

Test
Now we can say we finished with everything. Go back to the Power Apps and choose Apps on the left-side pane. You will see completely list of your apps. Just choose app (portal) you just created. When you run it, choose the page we created and that’s it. You can see the window in portal with our data from Business Central.


