NAV Gallery Image – PS Scripts Order

This week I have training about NAV and Azure and I used some examples in NAV 2016 Gallery Image on Azure.

NAV90GalleryImage.jpg

This image is awesome, but sometime people doesn’t know what PowerShell script can be started before some others. For example, you cannot run “Use Azure SQL Database” and after that “Install Multitenancy”…

Because of that I wanted to make some small help to all people who want to use this NAV 2016 image. In the following, you can find a chart with order of using all PowerShell scripts. Now, you know how to configure all of them on the same VM.

NAV90GalleryImageOrder.jpg

Project Madeira Universal App

If you want to try Project “Madeira” on your devices (phone or tablet for example), you can download this App from App Store or from Windows Store.

When you run them, you will see that system requires Activation Code. This is not the same as you use App for Dynamics NAV (you don’t need to put it URL). You can find this Activation Code if you open “Get The App and Activation Code” page (you can find it using search pane).

MadeiraAC1.jpg

You need to type this Activation Code in your App.

MadeiraAC2.jpg

After that system will require to confirm your email as account with password and just wait few seconds. After that, everything will be fine. I’ve checked it with Windows Tablet and Windows Phone and with iPhone, as well. It looks fine.

May 2016 Cumulative Updates for NAV 2016, 2015, 2013R2, 2013

Yesterday, Microsoft has been published the newest Cumulative Updates for Microsoft Dynamics NAV 2016, NAV 2013R2 and NAV 2013. Today morning, Microsoft has published Cumulative Update for Microsoft Dynamics NAV 2015 as well.

There are the all Cumulative Updates based on versions:

There are not so many Platform hotfixes and more Application hotfixes for almost all business area. Newer versions as usually have more hotfixes.

MPS.jpg

As usually, these cumulative updates replace previously released cumulative updates.

Project Madeira and Power BI

If you have demo Project “Madeira”, you can also try to use Project “Madeira” automated Power BI. You need to use the same credentials and log to powerbi.com

Then, you need to run Services and choose Project “Madeira” package:

PowerBiMadeira1.jpg

Choose “Connect” and put your OData Feed URL. You can find this URL in your Project “Madeira”. You need to find Web Services page using search and copy OData URL until your company name, as the following model:  https://[navserver]/[instance]/OData/Company(‘Sample%20Company’).

Wait some time and type your credentials, using the basic authentication method. You need to use your O365 username, but as your password, you need to use your “Web Service Access Key”. To create your “Web Service Access Key”, go to the your User card in Project “Madeira” and use “Change Web Service Key” command to generate your “Web Service Access Key”.

PowerBiMadeira2.jpg

After that, you need to continue with logging to your PowerBI. You don’t need to take care about certificates and similar; everything is already prepared. When you finish, you will get page similar as my. Then, you can check and try to make it funny…

PowerBiMadeira3.jpg

Pretty easy. Enjoy.

Project Madeira – The Final Configuation

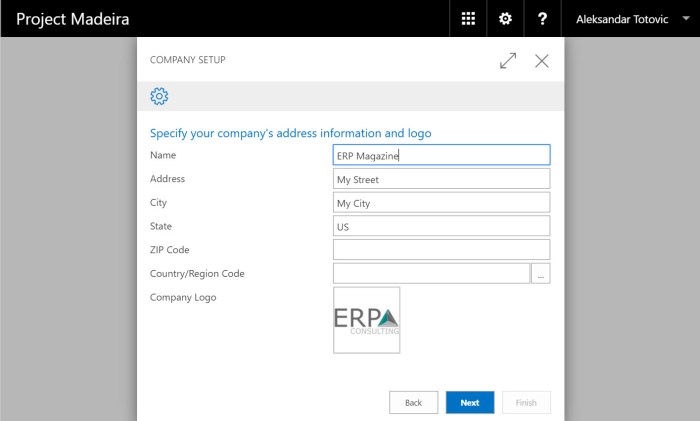
In few previous articles, I’ve already wrote about configuration of our new product “Project Madeira”. Now I want to finish with configuration.

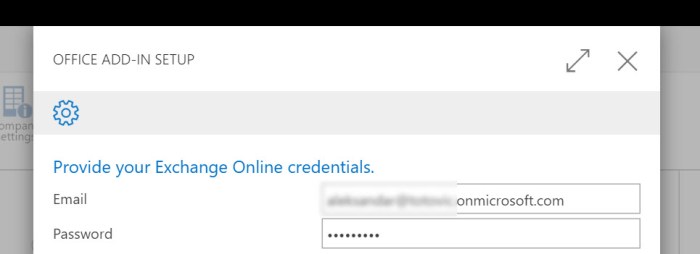
I’ll continue with Office Add-Ins set up. When we start wizard, first we can choose to set up only our mailbox or completely organization. Then, system will ask us to fill our exchange online credentials (email and password). If we choose My organization, then we have to have an administration rights.

Madeira1.jpg

After that, we just need to click on Finish and everything is finished. Then, I’ll continue with setting up approval workflow. After reading of small manual, we can chose to activate Purchase Invoice Approval or Sales Invoice Approval; or both of them. We need to choose approver person and amount limits.

Madeira2.jpg

After that, just click Next > Next and Finish. Very easy (of course, if you know and understand what you actually want to configure and use). And finally, we can configure email logging. We can set up Exchange public folders and rules, so that system processes incoming and outgoing emails to create Interactions. Just fill your Exchange Online administrator credentials. After we finished with this, system will create a few public folders:

Madeira3.jpg

After that, system will ask to create and activate incoming and outgoing email rules.

Nothing else. Your “Project Madeira” is configured. Of course, we can do some additional work, but about this in some other articles.

Project Madeira – Tax and Email Setup

OK, in previous mails, we’ve already made the basic configuration and data migration, but now we need to continue with “Madeira” setup. The next step is Sales Tax Setup.

When we start wizard, the tax group of TAXABLE is created. Then, we need to add sales and purchase tax accounts:

ProMad11.jpg

After that, we need to set up city tax rate, county tax rate and state tax rate. And, finally we need to choose for whom we want to add these tax areas.

You can notice, I speak only about taxes and not about VAT. This is because this “Preview” is only for US area.

After we configure taxes, we will continue with email configuration. We can choose between O365 or some other providers. If we choose O365 option, we just need to fill our User ID and password. But if we choose other, we need to fill more details: Authentication, SMTP Server and SMTP Port and of course, our credentials:

ProdMadeira12.jpg

After we configured this, we can send test email from the wizard. And this will be all about configuration of tax and email. Very easy, right?

Project Madeira – Configuration

When you open “Project Madeira” for the first time, you will get access to the Cronus demo company with a Business Manager role center. Of course, you can this change role center, but you have not all role centers as you can find in standard Dynamics NAV solution. There are “only” five role centers:ProMadeiraRCs.jpg

But for this kind of software, it is more then enough. It is really everything what you actually need. Of course, you can create your really company. When you open My Setting, you can find how to change companies. You can choose Cronus as you actually use and “My Company”. When you choose “My Company”, you need to log-out and log-in, and you will get the wizard for company configuration. When you click “Next”, you will see the standard configuration questions. These questions are very simply and everybody can finish this questionnaire (the basic company data, bank data, accounting period… and that’s it):

ProMadeiraQues.jpg

You will get your production environment for your company. This wizard is simply and excellent and the most important, on this way you’ve just got your company in SaaS. You can continue your work.

This is just small intro about configuration. You can expect more soon.

Microsoft Envision – The Final Countdown

Registration for Microsoft Envision 2016 starts in only 2 days. This first Envision conference will be really impressive with nearly 300 sessions. After registration, conference will start in Monday – April 4th. You can find a really imposing agenda here with the main keynote prepared by Satya Nadella. All topics will be business oriented and they will cover almost all business activities (manufacturing, financial, retail, government…).

All sessions will be grouped on the following way:

  • Keynotes
  • General Sessions
  • Presentations
  • Theater Sessions
  • Panel Discussions
  • Envisioning Sessions

Of course, a lot of these sessions will be dedicated to Dynamics world and I hope NAV will be cover as it really deserves.

If you’re a business leader who is charged with making or influencing key business decisions within your organization, you just need to be here. You’ll find a depth of resources here that will help you not only come away better positioned for your future, but help you discover how to take advantage of solutions today that will deliver immediate results to your business.

New Orleans.jpg

If you didn’t plan to go, you still have time to change your mind; open registration form and only few clicks… New Orleans is waiting for you.

March 2016 CU’s for Dynamics NAV

Cumulative Updates for Microsoft Dynamics NAV 2016, 2015, 2013R2 and 2013 has been released today:

  • NAV 2016 – Cumulative Update 5 (Build 45243)
  • NAV 2015 – Cumulative Update 17 (Build 45244)
  • NAV 2013R2 – Cumulative Update 29 (Build 45254)
  • NAV 2013 – Cumulative Update 36 (Build 45241)

These cumulative updates include all application and platform hotfixes and regulatory features that have been released for these NAV versions.

update-1170x630.png

There are a really lot of application and platform hotfixes for the NAV 2016 and proportionately less for older versions. All versions, except NAV 2013 have both of application and platform hotfixes. NAV 2013 has only few application hotfixes. Some of them are common hotfixes for more versions, and some of them are only for one version.

You can check all hotfixes and download these cumulative updates on the following links:

How to Configure Limited Users in NAV?

A few days ago I’ve wrote about new possibilities in using of Limited Users in NAV 2016. I think this is big improvement, because we can use limited users for much more roles.

But I got a few comments about configuration limited users. OK, you can configure users as limited and this is all. Nothing more.

l-1.jpg

But people wants to configure what three additional application tables these limited users can use. Base on the standard NAV, this is not possible. These users get write access to a maximum of three application tables in the object range 0 – 99,999,999 other than the General Ledger Entry table. But system will count the first three used application tables beside the default tables. This is counted by the session. That means, users can use different three application tables in different sessions.

Some of administrators still want to limit these users on some specific tables. There is not feature for this requirement, but it can be made using User Permission Sets. We can create one permission set with all read permission on all tables (or less if you want this). Then, we can configure additional permission set with all permissions (insert, modify, delete) on our default 151 application tables. And on the end we can configure specific permission set based on our requirements for three additional tables.

Every time when we want to configure new limited user, we just need to add him these first two permission sets and one specific for him (or his role). In this case this limited user will have read permission to all tables and all other permissions to default tables and three we added to him. In this case, his three application tables will not depends of his first usage in session.

This is not some specific feature, but it is useful work around solution for configuration.