Run D365 Business Central for the first time

When you run your Dynamics 365 Business Central for the first time, you will see new refreshed Web Client. Well, I think we will get some more small features soon (but just small polishing). Anyway, everything is easy for navigate and everything is exactly where you expect to be. And everything works very smoothly. I think the first what we can see are the messages in the left part of screen, with the most important information (the first will be “Good afternoon…”, but after that information).

d365bc1.PNG

Now we have a main menu on the top of the screen. Depends what we choose, we will get submenu just below the first row. Again, depends of the number of commands, we will get just one or more rows.

d365bc2

But we also have a lot of the most important actions on the right side of the page. Then we can see information and tiles in the activities and there are ordered noticeable. If you click on ‘See more’ or on some tile, you will open additional information (the same thing s with the large message on the left top part of screen).

We can also find “Product videos” and “Get started” links. On “Product videos”, you can find a few interesting videos about product, but more interesting is “Get started”. OK, we can find some educated videos again, but we have something more interesting – Role Centers link. With this, we can Explore different business roles features.

d365bc3.PNG

If you run it, you will get new window where you can choose all available role centers as an option and see what features are covered with each of them as the main menu structure (for each of them, you will see small tooltips with the basic information). And even more, if you click on Continue, you can change your role center; and again you don’t need to make logout/login, because system will change your role center automatically.

d365bc4.PNG

Of course, you can change your role center using ‘My Settings’, but guess… you will run the same page as I already showed. Really good user experience.

Then, when you run some page, from menu… for example customer, you can choose if you want to unpin the top menu… just to get little more space. Of course, you can chose the view type and so. But everything is so modern and provides really good experience.

d365bc5

OK, this is just beginning. This is still not even the first impression. But I don’t like to write so big texts. I’ll continue soon with more details.

D365 Tenerife is Dynamics 365 Business Central

I didn’t plan to write this article before keynote on Directions ASIA, but two days before it, it is announced – new SaaS solution, previously known as code name Dynamics 365 ‘Tenerife’ is named as Dynamics 365 Business Central. This news is published today by Alysa Taylor (General Manager, Business Apps & Strategy) here in blog.

BC1.PNG

Dynamics 365 Business Central (it is interesting that only this solution hasn’t ‘for’ in its name) will be available in first 14 countries from April 2nd and it will continue one of the most successful customer base with more than 160.000 customers. This solution also has new refreshed Web Client and many other interesting features.

If you want to find more information, you can run official D365BC page, where you can find new licensing model and new prices as well.

We will have two different packages of features with different price range:

BC2

I will try not to copy already published blog and wait on another news in next two days. And just not to forget, Dynamics 365 Business Central has new logo:

BC0

Dynamics NAV and GDPR

A few days ago, Microsoft published Whitepaper about GDPR regulations and NAV as well as package of new Cumulative Updates where the first part (DataClassification property) on these changes were implemented.

Day after this was published, we could find a new article with more details how to work with classified data and new DataClassification property in tables and fields.

I don’t want to retype all these details, because you can find all these information on NAV Team blog as well as complete documentation about data classification. I’ve just wanted to spread a word. Again, all details about new CU’s and how to implement GDPR requirements can be found on a NAV Team blog.

Waiting Directions ASIA

Today is Sunday and I’m seating on the airport waiting my flight to Bangkok. I just few days Directions ASIA 2018 will start. This time, it will be one of the most important conferences in Dynamics NAV world.

DirectionsASIA.PNG

Why it will be so important? On this conference we will see the new product with still code name – Dynamics 365 ‘Tenerife’. As we already know, this solution will be full Dynamics NAV on a cloud as full SaaS solution. But we will get the same on-prem product, with the same code base – Dynamics NAV 2018R2. From my point of view, I’m primarily waiting SaaS solution and I expect it will be much more significantly for Dynamics world. In this moment I don’t want to write anything about news in this solution, because we will get officially information in only few days. I’ll be there and I’ll publish the most important news announced on Directions.

Also, we will see some news from CRM world (Sales and Marketing), especially from SMB area. It will be very important in the future of business applications, because we can offer common solutions to cover all requirements in specific companies.

Dynamics 365 for Marketing Public Preview

Few days ago, Dynamics 365 for Marketing Public Preview finally has been announced. For those of you who already attended on some of Dynamics events, this was expected moment.

If you want to try it, go to this URL: https://trials.dynamics.com/Dynamics365/Preview/Marketing and you just need to use work email and phone number for verification:

D365M1

The second step will be accepting trust to the Microsoft CRM Services as publisher…

D365M2.PNG

When you finish registration, you will get the main Dynamics 365 for marketing landing page:

D365M3

Now, you have possibility to run ‘First time setup’ and finish this configuration and continue to work with this app after that. In the following texts, we will write more about them.

The main features covered with this App are:

  • Multi-channel campaigns
  • Lead management
  • Sales and marketing alignment
  • Marketing analytics
  • Event Management

Counting Named Subscription Users in Dynamics NAV

Waiting Dynamics NAV as full SaaS solution (Dynamics 365 ‘Tenerife’), a lot of partners are deploying NAV on Azure with subscription licenses. Subscription license has much better price in comparison with perpetual model, even from only BREP.

But we have a small difference here. In perpetual licensing model, users are concurrent, but n subscription model, users are named. Because of that I’ve got a lot questions how system count these users and prevent bigger number of users from licensed.

Generally, this is very easy. NAV counts number of created users and compare it with your subscription license. That moment, when you try to create new user, more than you have licensed, system will stop you.

##1

As you can see on the previous picture, I’ve got a message that creating this new user will not meet the terms of the current license. OK, it works. That means if you want to change user, you need to delete old one and than create new one.

But in subscription model, you can change number of users monthly. What if you had in one moment, because of business needs, more licensed users and now you scaled down number of users? In this case, when you try to log in, system will show the following message:

##2.PNG

That means with current license and number of users, you are not legal. But if you press OK, system will allow you to log in. But every time when you try run NAV, you will get this violation message that shows you are not legal.

Dynamics 365 for Talent availability per countries

In my previous blog post, I hope I make a licensing process closer to you, but now when you know how to calculate price for licenses and you can start with selling process, question is where you can do it. In what countries?

Regarding this question, I can prepare two different answers. One is answer about officially availability per countries where it is possible to sell product and second answer is a new question; can we sell if we don’t have localization (in this case translation).

Product is available in 138 countries in this moment: Americas 30, EMEA 88 and Asia Pacific 20. This is the mast full list I have (but this list will be updated):

Talent1.PNG

If you have a demo environment, you can go there: System administration > System settings and check all available languages in System language field. In this moment, we have available the following 42 languages: Arabic, Czech, Danish, German (DE, AT, CH), English (AU, CA, GB, IE, IN, MY, NZ, SG, US, ZA), Spanish (ES, MX), Estonian, Finnish, French (FR, BE, CA, CH), Hungarian, Icelandic, Italian (IT, CH), Japanese, Lithuanian, Latvian, Norwegian, Dutch (NL, BE), Polish, Portuguese (BR), Russian, Swedish, Thai, Turkish and Chinese (Simplified). This is not small number of languages, but we still need more, and I hope we will get them soon. On the other side, if you are going to Attract or Onboard apps, you can find, these apps have much more languages; if I count well, there are 61 languages. It would me nice if we have minimum all these languages in HR core.

Talent2.png

I hope this amazing product will be available in more and more languages.

Licensing in Dynamics 365 for Talent

In a last period, I’ve got a lot of questions about how to make a proper licensing for Dynamics 365 for Talent. As it is a new solution, it is understandable. As I’ve already wrote a few articles about this product, I think I can help with some answers.

The first and very important, all users in this solution are named users. And if we speak about HR core part, we have two different user types and you can buy them on two separate ways. We have Full Users with total access to all HR core application and we have Team Members with very limited access (mostly, but not only for read tasks).

As I mentioned Full Users (Talent Users) can be bought on the following ways:

  • as a regular Talent User (you must take minimum 5 users) for 40 USD
  • buying Dynamics 365 for Finance and Operations, i.e. you will get full Talent Users buying Unified Operation (for 190 USD) or full Dynamics 365 Plan (for 210 USD); in both cases you will get much much more than just Talent, but Talent will be part of your completely system.

TalentLicense.PNG

If we are speaking about Team Members, you can buy them for 8 USD, but again you will not get only access to Talent with them, but also to all other Apps in Dynamics 365 package. As I mentioned, Team Member are not limited only with read rights, because you can use them for example as employee for Employee Self Service.

OK, but this is not the end. Recently, Microsoft announce two additional AI Apps for Talent (Attract and Onboard) and that means if you want to use them, you first must be a regular Talent User. Then, you can subscribe them. Price is 8 USD for each of them separately or if you want both, price will be 12 USD in total.

And again, this is not the end. Actually, it doesn’t mean it must be the end. Why? Because if you want to customize something. As you already know (I hope), this App is full SaaS and you cannot just open a code and change it. If you want to change something on forms and similar, you can do it using PowerApps. In this case person who will make these customizations must have PowerApps Plan 2 (40 USD) license, but other users who will use these forms, have to have minimum PowerApps Plan 1 (7 USD) license. That means, not all users, only these who will use these new features. And just to know, if you are buying some Dynamics Plan, you will get PowerApps for free.

PowerAppsLicense.PNG

And again, it is similar situation if you want to use PowerBI for additional reports or Flow for additional workflows.

I hope I covered all models of licensing here. But just keep in mind, it is possible to be some changed, because it is a new App in Dynamics 365 family and with new releases, it is possible to be some changes. And I didn’t mentioned, but just to be sure: all pries are on monthly basis.

Marketing Campaign Automation in Click Dimensions – Step by step

In my previous blog about making marketing campaign automation in Click Dimensions, I just wanted to cover top processes and share an idea how I solved this requirement. But when you know what you want, creating Marketing Campaign Automation in Click Dimensions is not so complex, and now I’ll show you how to do it, but this time step-by-step.

Marketing List

I prefer to start with creating Marketing List, because you will use it in creating automation, and it won’t be a good idea to forget it.

So, everybody who has ever used Microsoft Dynamics 365 for Sales knows how to create marketing list, but I will explain it in a few sentences. First you are going to the Marketing card, and in the row Marketing you will see Marketing Lists. After entering the marketing list, you need to fulfill what is necessary in creating marketing list.

CD1.jpg

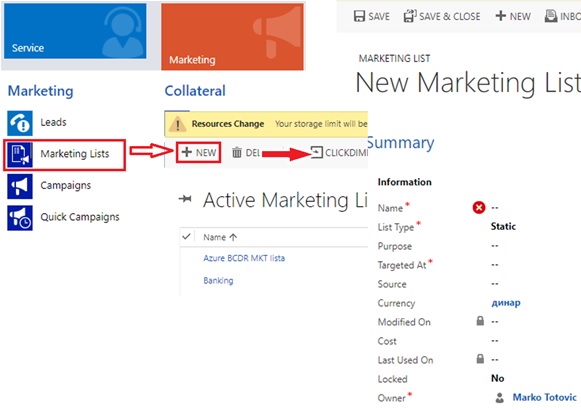
I will not be so long on this, but everything is shown on pictures, so if somebody is doing this for the first time please follow the pictures.

Email Templates

Now we are coming in to Click Dimensions, so who have not ever used Click Dimensions I will explain everything step by step, and for those who already use Click Dimensions, maybe you will learn something new.

So, Click Dimensions is located on Marketing card, so you are probably figuring that we won’t go out of Marketing card in creating this automation. Let’s go back on creating, first we have to create Email Template. We are going to row Email Marketing, where we will find and enter it to the Email Templates.

CD2.jpg

After we entered this, we are starting with creating an Email Template, so we first have to fulfill necessary data, and then click on Save (as creating everything in Dynamics 365 for Sales). After saving your data you have to enter this in the editor to really create template.

In editor, way of working is ‘drag & drop’, so it is easy and intuitive. So, you need to choose what you will put in your email, and just save it.

CD3.jpg

Depends on how many emails you want to send in one automation, you have to create as much email templates.

Campaign Automation

As you see this is going pretty easy and fast. So, we’ve came to the main thing in this step by step explanation. So, we are still on Marketing Card, and this time we are going in row Marketing Automation where we have to enter only one thing we have in this row, and that is Campaign Automation.

CD4.jpg

After entering it you just need to begin with creation of regular New Campaign Automation. After you open a Campaign Creator, you will see that the only thing that is mandatory to fulfill is the Name of this Campaign, and after typing the name we just must save this, and to be prepared to go into the Builder where we will create the campaign.

Builder

Builder is placed on the ribbon inside of Campaign Automation you’ve created, and you have to enter it from the start with creating with your automation.

CD5

The Builder is intuitive created, and you can work easy through this process. It has ’Triggers’, ’Actions’, ’Timers’, and ’Series’. In this text I will explain how to use only some of the triggers, and actions.

So, we will start with trigger ’Added to List’ and this works as drag & drop, so you just have to choose what you will use and to move it to white background. And after starting with our trigger, we will add the next one as action, and in this example, this action will be ’Send Email’.

CD6.jpg

After doing this, we will again use one trigger, and not this is an ’Email Interaction’. And just to know, when trigger is not used on the beginning of the whole design it will have ’yes’ and ’no’ conditions sides. It is important to know that you can’t finish with opened any of these sides of trigger, without actions. So, it is better to have the trigger on the beginning (to avoid thinking what actions to put on both of sides). After we add our second trigger, we will first focus on our ‘true’ side. Because it is some email campaign we will use in ‘true’ side action ’Assign Owner’ and in ‘false’ side ’Remove from List’. Now we have just created what campaign will do, and you just have to fulfill some more information and we have finished.

First by clicking on first trigger ’added to list’ you will see on the right side that instead of triggers and actions something new appear, and in that place in first trigger, you just have to bring your marketing list which is mandatory, and to check check-box for ’Run on entire list’. That means that this automation will collect all your contacts from your marketing list, but if you type in some new contact, this automation will automatically add it to list.

After this is finished, we are going on our action in the same way by clicking on it. Now you will have to type some more information, but not so much. Mandatory is to select which email template you want to use in this automation, so you will use one you have created on the beginning. After that you have to type in subject, and to choose from which name and email address this mail will be sent.

After that, you have to go on the next trigger, and you have to choose from which series the email will be sent, and in can be only that you’ve used in a step before. After that you have to choose what is an interaction you want to monitor (email clicking, or email opened). In this example, I’ll use clicking. And only timer configuration is left if you want to use it. I’ve set here on the timer that if in 3 days nothing happens that this interaction is going in to ‘false’ side.

If condition is positive, we’ve put action ’Assign Owner’ and setting up of this action is easy. You have just to choose a display name, and to type which user will be assigned if somebody open our email.

If our condition is negative, it is similar. You just have to choose from which list you want to delete if somebody didn’t respond to campaign. Of course, it will be the list from which you have started. This is because, as I already mentioned, we must have action on the end of each condition.

CD7

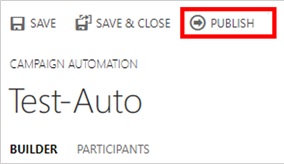
And we finally arrived at the end. It just left to save this, and after saving, you just have to click ’PUBLISH’ and whole Campaign Automation is starting, as your email is sent.

CD8.jpg